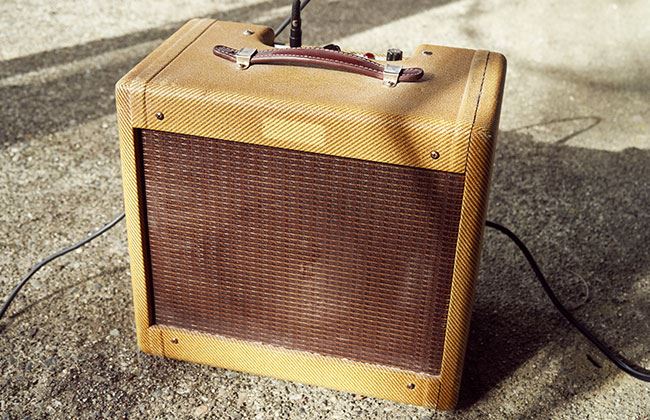
How to relic a tweed amp
A step-by-step guide for creating that "broken-in" look for your new amp kit.
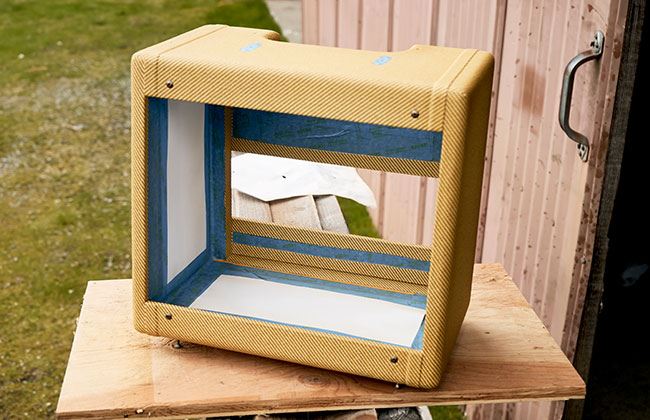
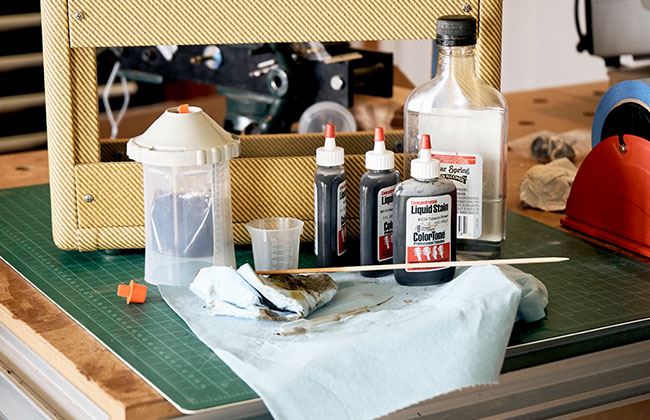
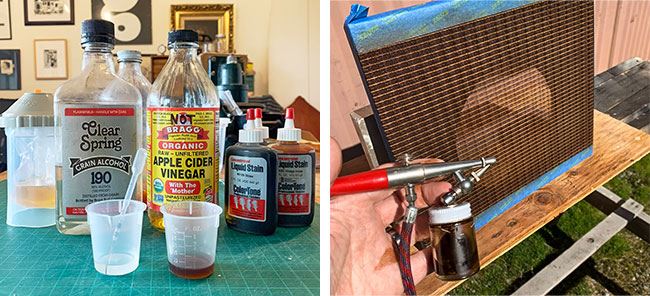
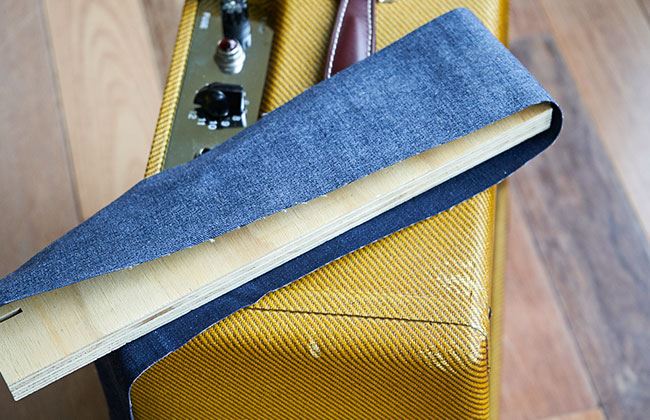
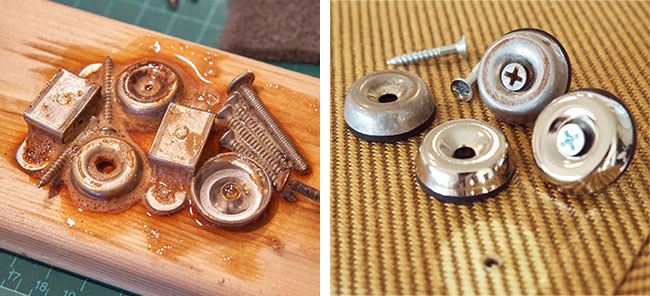
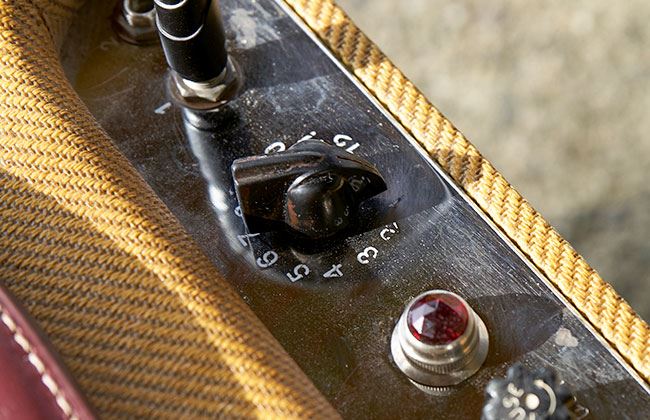
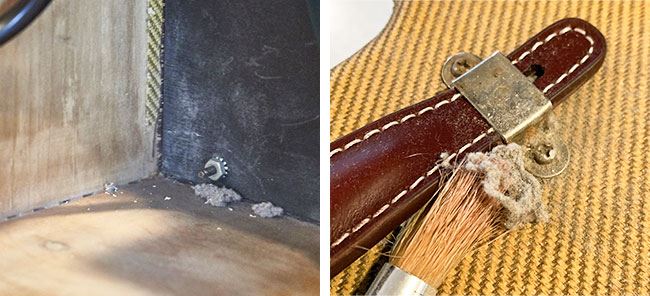
By Daniel Petrzelka A new tweed amp kit is a killer canvas for learning or practicing your relic technique, and one that is a little more forgiving, in some respects, than a solid body. Many of the steps are similar to relic'ing an instrument, so let's get into it. 1. Disassemble cab (mask interior) The fist step is to remove the amp chassis, baffle, and hardware. Next is to mask off anything you don't want to get stain or finish on. Remember, the inside of the amp would not have the same wear as the outside. History and inspection suggest that Fender lacquered most of the tweed amps they produced, likely with the same clear nitro lacquer they were spraying on solid bodies of the era. This nitro would have gone on clear, and then time and gigs took their toll. We'll start in a similar way. For the base coat, shellac is a great choice as it will stick to almost anything and almost anything will stick to it. I used freshly mixed 1lb cut of blonde shellac with just a few drops of Straw-colored ColorTone Liquid Stain and sprayed it on with a traditional gravity-feed spray gun. You could use a brush, or spray it on with an aerosol can of Zinsser Clear Shellac (use a Preval Spray Unit), ColorTone Sanding Sealer or even ColorTone Clear Nitro Lacquer if you have some leftover from another project. This base coat doesn't need much, if any, color in it, as the tweed itself will darken as you apply a coat or two. This step is just about sealing the tweed and giving the lacquer a clear base to stick to—start with the cab upside down, all hardware and panels removed. Spray the edges, then the middle of the panel, then flip the cab over to hit all of the other sides. Two light coats on all tweed surfaces is a great foundation. The next step is all about adding the effect of yellowed, dirty nitrocellulose lacquer. Many of us love the warmer, softer look of vintage guitars and 50s tweed amps. That is a direct result of the yellowing of the nitro gloss coats that almost all of the classic electric and acoustic builders used. Air and UV light are the primary cause of the nitro yellowing, so reassemble your cab or tape off areas that would be covered by hardware, baffles, and if you want, where the nameplate might have been. These covered areas would not age the same as the exposed areas of tweed. We want to create some nice tan lines. I mixed my own shaded nitro lacquer with ColorTone Liquid Stains so that I could spray with my usual equipment. Vintage Amber and Tobacco Brown are perfect for mixing up a range of colors, but I also used some Straw, Medium Brown, and Nazareth Mahogany. If you don't have spray equipment, or don't want to get crazy mixing colors just yet, you could look at using the ColorTone Aged Clear, Vintage Amber, and Tobacco Brown aerosol cans. Read up on using aerosol—with the right technique you can get great results. Without having to worry about getting a nice smooth gloss finish as you would on an instrument, this project is an easy entry into spraying. Essentially, we're spraying a very subtle burst on the tweed. The shellac or lightly tinted base lacquer sprayed earlier helped establish an amber base coat. I like to spray another thin coat or two of Vintage Amber or Straw tinted lacquer to give it a warmer, more yellowed look. If you spray thin coats the lacquer will dry quickly, and you can follow one coat almost immediately after the other. After two or three coats it's good to take a break and let it dry for an hour or more. This also gives you a chance to take the tweed cab into different light to be sure the color is looking nice. Just like spraying a guitar, start with the edges first and then hit the main areas. There are two reasons for this: First, it ensures you get a good coat out on the perimeter, where the most wear is likely to occur. Second, it helps to darken the edges for a pleasing transition (it also accentuates the physical wear later). Start on the bottom of the cab with each sequential coat, hitting the bottom edges, the bottom, and then flip the cab over to work on the sides and top. I worked through several light burst coats with the Tobacco Brown and darker Vintage Amber tints, focusing on adding color lower on the cab and on edges that might collect dirt and the most sun exposure. I then finished off with a couple very light clear (tinted with Straw) lacquer coats. The goal is not to fill in the texture of the tweed, but to lay down some pleasing color and enough lacquer to provide protection and some to wear away later. Grill cloth collects a lot of dust, dirt and grime over the years and the bright gold and brown cloth can benefit from a light dusting of time. For this step I masked off the areas of the baffle/grill cloth that would be hidden behind the tweed and airbrushed on a mixture of 1lb cut ColorTone Shellac, ColorTone Brown Pigment (adds opacity), and a little Tobacco Brown Stain. Spray from a little further back than you would wet coat on a solid surface—this should look dull and dusty. Cabinet interior relic treatment can be done before or after spraying the tweed. I chose to do this first, and then mask it off. If you choose to spray first, mask the exposed pine interior with Low Tack Protective Tape to keep the overspray off. 60-year old pine rarely looks like the bright freshly planed and sanded interior of our repro cabs, but there are two easy ways to give the guts that aged look. One way is a light Medium Brown stain with just a hint of Cherry, but I prefer a more authentic aged look that can only be achieved with proper oxidation. The good news is that adding decades of oxidation is pretty easy with potassium permanganate. Mamie Minch did a Trade Secrets video several years back that inspired me to use this on spruce cleats in vintage repairs. It can almost instantly make fresh spruce look right at home in an older instrument. Before you mix up any of this chemical, know that it is a powerful chemical—gloves, goggles, and safe handling are key. Read the precautions. Also, know that a very little of the potassium permanganate (also known as KMnO4) goes a long way. It only takes a tiny scoop of the end of a pallet knife or mixing spatula in 4-8oz of water to make a very strong solution. Watering it down can help slow the process and give you time to layer on coats of the solution as you work up to the level of color you want. I used a 2" wide brush on the main interior areas of the cabinet as it helps cut down on the overlap and gives a more even coat. The potassium permanganate solution goes on bright purple, but turns brown within seconds as it oxidizes. You can, of course, leave your 5F1 as a closet classic—beautifully aged color, without the dents, dings, stains and edge softening that comes with being hauled in and out of the van or to the bar. Maybe this amp was only played for a few years before being tucked under the bed or into the back of the closet when a young guitarist headed off to school. If you are super fastidious about caring for your gear, if you cringe at the thought of that first scratch or ding, STOP HERE—that amp looks beautiful, leave it alone. If you're having fun with the process so far, and want to develop some real mojo, let's go for it. PUT AWAY the sandpaper, wire brushes, and files! Please. There are countless posts online about taking these to a lacquered tweed amp to simulate the wear of years on the road. We are trying to make a reproduction, an artifact, a relic. It may take a little more time, a little more care, but it will also have a little more natural look and hopefully a little more mojo. It's unlikely many amps have really been worn over the years because of the type of abrasion provided by sandpaper and files. Rather, it's rubbing against your jeans, bumping into the van, sunlight, smoky bars, and handling, rough-handling at times that really wears on the tweed. For breaking it in I use three primary things: a strip of denim, a piece of leather, and a backing board that's about 2-4 inches wide and a foot to 18 inches long (nothing special about those dimensions other than its easy to hold). If you have a favorite old denim jacket or pair of 501s around, they can work really well too—the metal buttons and brass rivets help with the aging. The essence here is use the denim, wood, and leather to wear away and burnish the shaded lacquer in key areas—the rounded edges (especially along the bottom and front), the raised portions of the seams in the tweed, the back panel where you rub the cord every time you set up. Think of it like buffing a pair of boots—let the denim flex over the edges and use a back-and-forth buffing motion to begin thinning the shaded lacquer. The leather can be used to burnish areas that might get wear from your hand or lighter wear from rubbing against your leg. Backing the denim strip with the board allows you to target the top edge of the seams along the top and front. As you rub, the tweed will quickly lighten up. You are cutting through the shaded lacquer back to your shellac base coat. Throughout this abrading/buffing, I take the opportunity to put a few dents in it. Knock the corner with the board or drop a screwdriver on the top. Go easy, take it out into different light, and come back to it in the morning. It's easy to go too far. Here is where you can decide how hard of a life this tweed cab has lived. If it's led a life of leisure, the tweed may be perfect. If it's spent more than a few runs at the Eagles Club or as the stage amp at the club, you can take it further. Tears, coffee stains, liquor spills, and cigarette burns should be done right—mix a drink, light a smoke or leave a coffee ring. Some of these are better saved until the very, very end. Save this for last so that you can remove overspray from the toned/shaded lacquering. Remove all the hardware that you had installed when spraying the final shaded lacquer and clean them with solvent/lacquer thinner. The key ingredients here are a PCB etchant solution, hydrogen peroxide (3% solution that many of us have in the medicine cabinet works fine), white vinegar (acetic acid) and salt. It is also a good idea to mix up a baking soda and water wash for neutralizing the acids. The ferric chloride in the PCB etchant is the only really hazardous chemical here—read all of the precautions and protect your skin, eyes, and lungs. That stuff is pretty serious. The only chemical we may use that is more serious is Muriatic Acid (hydrochloric)—but to be honest, the risk vs visual benefit is minimal for this project, so unless you want to really age the chromed chassis face plate, save that stuff for cleaning concrete. The PCB etchant can be used straight, but it cuts nickel plating quickly, so you may want to thin it down by as much as 50% with water. For some steps, I use it straight, wiped on with a paper towel, and thinned, brushed on for other times. This chemical is about tarnishing the nickel-plated hardware on one end and at the other end, it's about cutting into the nickel to expose the steel underneath. The hydrogen peroxide, vinegar, and salt combine to make a solution that encourages oxidization and rusting of the metal parts. It will have little if any effect on the chrome or brass hardware but works wonderfully on steel or where nickel-plated pieces have been worn down. There are countless formulas, but what worked for me was about 3/4 cup of hydrogen peroxide, 1/8-1/4 cup white vinegar and maybe a tablespoon or two of salt. Mix it up and store in a plastic or glass jar. Aging the screws and handle-mounting hardware is one of the few places I'll use abrasives as they help ensure you get down to the steel base in some areas. For the feet, I gently swipe them across some emery paper to approximate the amp having slid around on rough surfaces. For the screws and mounting hardware, I'll just hit the edges very gently with sandpaper to ensure I get a few rust spots in the next steps. If you want a more "gently" relic'ed look, use watered-down PCB etchant. Dip or wipe the hardware with this solution for only a few seconds. For a "heavy aged" look, use the PCB etchant at full strength, but again for only a few seconds at a time. Either way, follow with a fresh water rinse and then neutralize in a baking soda and water wash. At this point, the hardware will look tarnished and you can stop there if it suits you. I like a little surface rust for something that's from the 50s, so each piece of hardware needs some encouragement from the hydrogen peroxide/vinegar/salt solution. The trick here is that you need both the solution and exposure to air for the best results. You can spray it on with a small spray bottle or dip each piece and pile them up to begin rusting. This can happen within minutes or take more than an hour. The process can be repeated several times as you build up to the aging that looks right. Don't forget the washers and mounting nuts from the input jacks as well—that and a little scraping off of the panel numbers can really make the chassis face look good. Aging the chicken head knob is two-part: wear and dirt. For the dirt, you can use any brown or black pigment and dye that simulates grime. There is something about the brown Colortone Waterbase Pigment that works really well here—it has enough body to build, dries quickly, and sticks reasonably well to the plastic. Put on a pair of latex/nitrile gloves, squirt a very small drop of the water-based pigment (I used #5365) add a drop of Black or Tobacco Brown dye to darken it just a little and rub it into the knob. As you rub, it will dry and give a really grimy look. Work some into the white stripe on the pointer, but just enough to look dirty, while still leaving a little white. Leave a little extra grime, as it can be worked back in the next step. Now, mount the knob and take note of the edges that your fingers would rub as you turn it on-and-off, up-and-down. Any edges your fingers don't touch should be left crisp and untouched. Those that you do touch can be softened with gray 3M Scotch-Brite. It's just coarse enough to ease the edges, without putting phony scratches in the plastic. If you do get more scratches than you like, try following up by buffing with white Scotch-Brite. Remove most of the brown pigment, leaving just enough to look dirty. For aging leather, I've never found anything that quite looks like time itself. Whatever you do, skip the sandpaper. My approach is to dry it out a little with denatured or rubbing alcohol (acetone works too) anything that will help dry the leather. You can then soften the white of the stitching in the leather by brushing on thinned-down brown water-based pigment, or ColorTone Stain thinned with alcohol. Thin it way down and build up to an aged, dirty look for the thread—it's much easier to add than take away. We're going for a look that suggests that maybe the handle was replaced only a couple decades back. What do you find in almost any vintage amp? A little dust, lint, and a few picks (if you're unlucky maybe a fingernail, but we can choose to leave that out). Once your shellac or lacquer coats have dried, you can reassemble and start adding some of these special seasonings. My top three for adding dust are white ash from a fireplace, charcoal powder (crush charcoal or a piece from the same fireplace, and dryer lint—the best lint is the finer stuff from inside the dryer. Pull the lint screen and reach your hand down inside and scrape out anything stuck to the sides. It has more fine dust and debris than that which is on the screen itself. With these three, you can add character to both the inside and outside of the cab. Put the speaker baffle in, as dust wouldn't be under it, and grab a cheap 1/2"-1" chip brush. The 1/2 round stiff bristle brush I used work great as well. Anything that allows you to work the ash and lint dust into the wood and tweed works great. Focus on working the light gray ash into the bottom of the cab—working it into any pine knots on the bottom and into the seams where the tweed ends. A little brushing up the sides is OK, but dust doesn't usually settle there. Sprinkle in a very little of the coarse charcoal dust while you work. A light vacuuming will remove the excess and leave you with a dusty look usually earned over many years. Finish with a little dust bunny from your lint jar and throw in a favorite pick. Just like a relic guitar, you can really make your amp your own. From light aging to a lifetime in smoky clubs, it's all up to you. With just a little time, some finish, and a few nicks and scratches, you can have your amp tell a story. Now it's your turn to personalize your amp.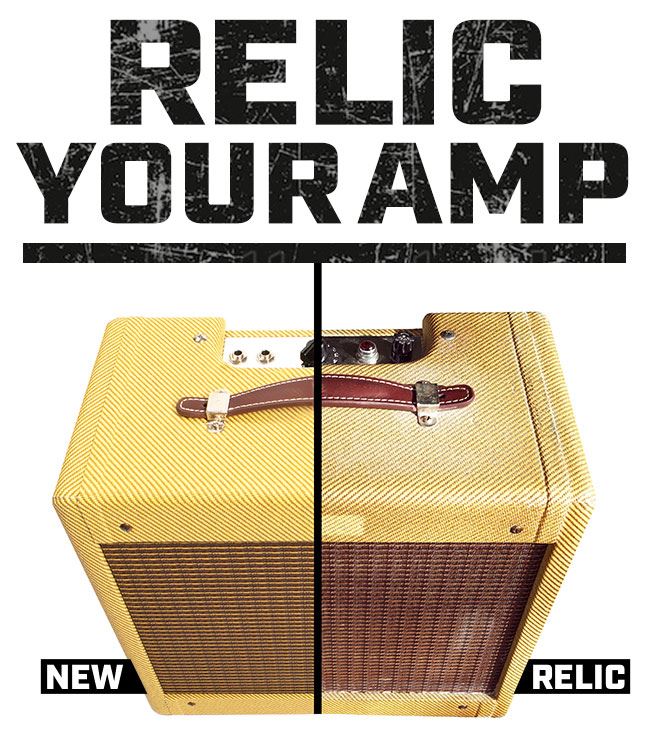
A step-by-step guide for creating that "broken-in" look for your new tweed amp kit.
There is something about a well-worn guitar that inspires me. It feels right, it looks right, and it sounds right. Relic guitars may be a controversial topic in some circles, but it's safe to say that many love the look, and countless practice the craft of simulating, replicating, and accentuating the toll of time on our six-string friends. Tweed amps often have this same aura—they wear the effects of time in their worn edges and shaded panels, with stains, rips, and stories untold. That broken-in look may have no measurable effect on the sound, but it is often more fun to play. And in the end, playing more is what it's all about.What You'll Need
'57 Mini Tweed 5W Amp Kit
'59 Tweed 15W Amp Kit
A quick outline of the steps:
2. Spray clear base coats
3. Reassemble or mask cab hardware and baffle locations (tan lines)
4. Age cabinet interior
5. Relic hardware
6. Reassemble
7. Physically age tweed—dings, dents, and wear
8. Add the finishing touchesDisassemble the Cab
Clear Base Laquer Coats
What You'll Need
ColorTone Liquid Stains
Zinsser Clear Shellac
Gravity-feed Spray Gun
Preval Spray Unit
Toner, Tan Lines, and Technique
What You'll Need
ColorTone Liquid Stains
ColorTone Liquid Pigments
ColorTone Aerosols (optional)

Old Insides
What You'll Need
Low Tack Protective Tape
Mixing Cups
Plastic Pipettes
Potassium Permanganate
Nitrile Gloves
Safety Goggles
Large Brush
Large Brush

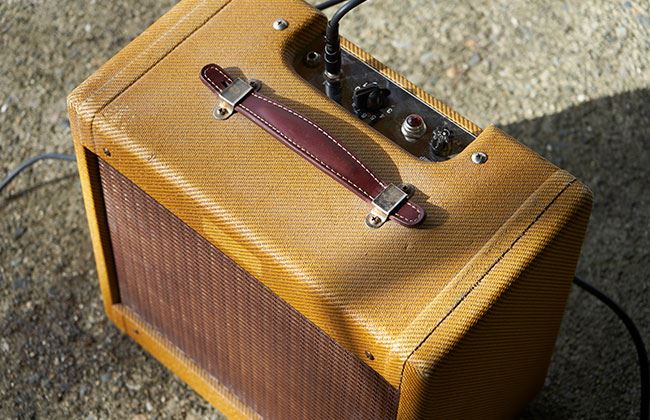
Breaking it in
What You'll Need
Strip of Denim
Piece of Leather
Wood for Backer Board
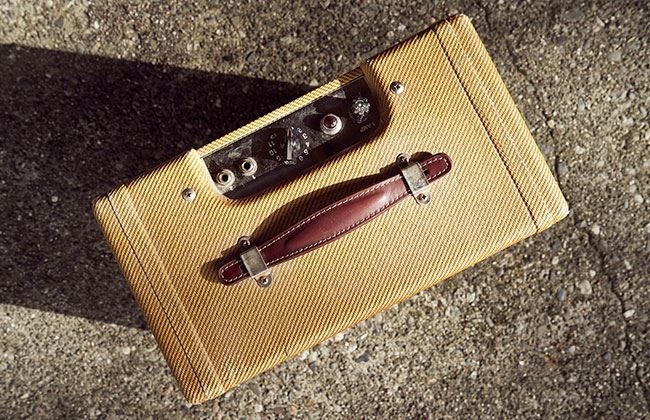
Hard-worn Hardware
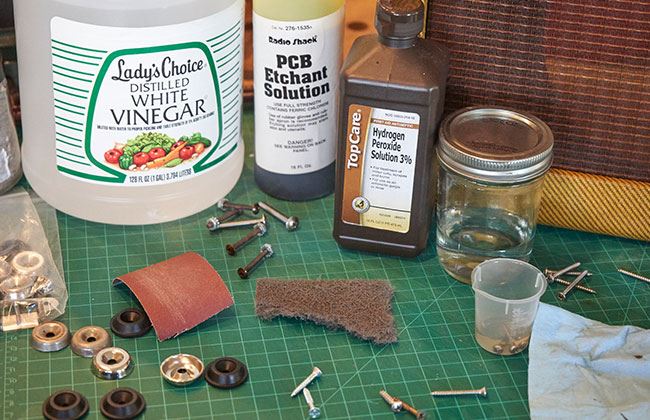
What You'll Need
PCB Etchant Solution
Hydrogen Peroxide
White Vinegar
Table Salt
Rubbing Alcohol
What You'll Need
3M Scotch-Brite Pads
ColorTone Waterbase Pigment
Dust Bunnies and Dryer Lint
What You'll Need
Ash
Charcoal Powder
Dryer Lint
Stiff Bristle Brush