Using Neck Set Sandpaper
Match the neck heel contour to an acoustic guitar body.
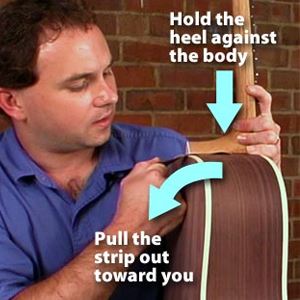
Use this sandpaper as the final step in matching the neck heel contour to an acoustic guitar body, for a new build or a neck reset. The following technique works on both bolt-on and dovetail necks. After you've removed the neck and determined the required new neck angle (see our Neck Set Gauge instructions for details), transfer your measurements to the neck heel. With a sharp chisel, remove about half of the measured amount of wood. Don't overdo it: set the neck into the body and check the fit. Loosen the neck joint and slide a strip of the sandpaper between the guitar body and the "cheek" of the neck heel, with the abrasive side facing the cheek. Slide the strip almost to the top edge of the heel; this top edge should be left intact. Be sure to angle down to keep the heel cap in contact with the sides. Hold the heel against the guitar body and pull the strip out toward you. This removes a little bit of wood while conforming to the shape of the guitar body. Shake the sawdust off the sanding strip and repeat the procedure on the opposite cheek. Sand equally from side to side. If you need to remove a lot of wood, make two or three passes before changing to the other cheek. The fit will change rapidly, so check your progress frequently. A small ledge of unsanded wood will remain on the bottom of the heel between the sanded cheeks. Either pull-sand it with the strip, or use a sharp chisel to remove it. Now that the neck fits the body correctly, a thin wooden shim or two can be added to the dovetail mortise as needed to maintain a snug fit.