Neck Set Gauge Instructions
How to use the Neck Set Gauge for a neck reset, to calculate a new bridge thickness, and setting the neck for a newly built guitar.
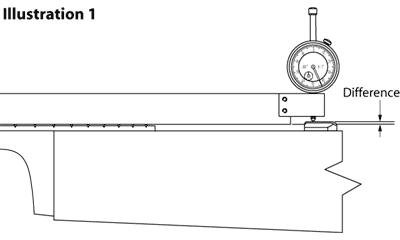
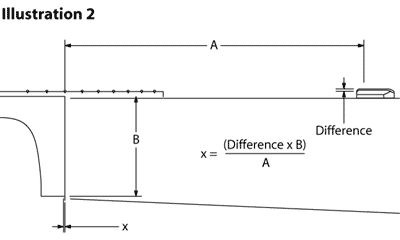
The Neck Set Gauge was brought to us by builder and repairman Bryan Galloup. This tool aids in the planning of a neck reset, aids in determining the necessary bridge thickness for a guitar when a neck reset is not planned, and helps calculate the bridge thickness and neck setting information for a newly built guitar. The Neck Set Gauge is designed for use with our #3799 Precision Straight Edge. Attach the dial indicator block to the end of the straight edge, so that the top of the aluminum indicator block is aligned with the top of the straight edge (see illustration 1). Tighten the two allen set screws which hold the block on the straight edge. Place the Neck Set Gauge on a good flat surface, such as a table saw or jointer table, and check the zero. Hold the straight edge vertically on the surface. Tipping the straight edge to one side or the other can give a false reading on the dial indicator. Use the rotating bezel to zero the gauge. The dial indicator should be approximately in the middle of its range. Record this reading, and note the reading on the small dial scale as well. Before removing the neck from the instrument, take a measurement of the high point of the bridge top relative to the neck. Place the straight edge down the center of the neck, on top of the frets. (For accuracy, and to take into account the pull-up of the soundboard, this should be done with the strings installed and the instrument tuned to pitch. Be sure the neck is as straight as possible; adjust the truss rod if necessary.) Record this reading and compare it to the zero reading recorded in Step 1. This comparison is the difference (see illustration 1) between the plane of the fret tops and the top of the bridge. If the guitar neck needs to be reset, the measurement of the bridge should be significantly less (.050" to .075" or more) than the zero point. The difference between the two readings can be used to determine how much wood to remove from the heel to get the proper neck set angle. If there is no difference, or if the top of the bridge is slightly above the plane of the fret tops, the guitar neck does not need to be reset, and the bridge will have a sufficiently tall saddle as is. Once you have determined the distance from the plane of the frets to the top of the bridge, you can calculate the amount of wood you need to remove from the heel of the neck (see illustration 2). For example, let's choose .100" as the difference. Using the formula: x = (Diff. x B)/A, plug in the numbers to get: x = (.100 x 3.625)/11.5; therefore, x = .032". "A" is the distance from the neck/body joint to the center of the saddle slot on the bridge, and "B" is the height of the neck heel. The Neck Set Gauge quickly and accurately gives you the number you need for a precise neck reset. Now shave .032" off the bottom of the heel, gradually removing less and less as you move up the heel, until nothing is removed where the fingerboard joins the neck. We recommend that you be conservative and start out a little less than .032", fit the neck in place, and use the Neck Set Gauge to check your work. Aim for a zero reading on the gauge. (To be absolutely correct, you will need to use a prop inside the guitar under the bridge to simulate the amount of soundboard pull-up that occurs when the guitar is tuned to pitch). With the bridge removed, and prior to making a new one, you can use the Neck Set Gauge to determine the proper thickness for the new bridge. This time, position the dial indicator block at the bottom of the straight edge (see illustration 3). Hold the straight edge on a flat surface, with the attaching block also resting on that surface. The indicator should be near zero and the dial fully rotated, approaching the limit of its travel. Tighten the set screws in this position. Once tightened, recheck zero, and adjust the bezel. Now measure down from zero to find the bridge thickness. Notice that the dial indicator reads backwards, so take this into account. Some dial faces have reverse-reading numbers (the small colored ones). This measurement is a very good number to use for your bridge height, and should put the top of the bridge right at the level of the fret tops. (Again, figure soundboard pull-up. We recommend using .025" as a good average number if you aren't going to measure your particular guitar). If you are building a new guitar, you will have to do both operations, namely set the neck, and make a bridge or fit a pre-made bridge. Setup the Neck Set Gauge as you did for making a new bridge, with the indicator attachment block at the bottom of the straight edge (see illustration 3). Set the neck for the height of the bridge you are using, working as you would for a neck reset. With the neck in place, measure down from zero to the top of the guitar. If the fingerboard is not yet fretted, take into account the additional height of the frets, which is usually about .040". Compare this measurement to the height of the bridge. This will be the difference number to use in the formula. If this measurement is greater than the thickness of the bridge, you might have to remove wood from the top of the dovetail. Be sure to notice if this difference is positive or negative. That will determine where to remove wood to get a good neck set. Remember to always align the straight edge with the centerline of the guitar's fingerboard. Once the neck is set, work on the bridge. If you are making the bridge, proceed as described in "Making a new bridge." If you are using a pre-made bridge, the Neck Set Gauge will help you determine if you should modify its thickness prior to gluing it onto the top.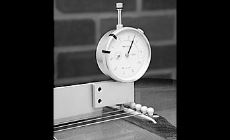
Neck resetting
Step 1.
Step 2.
Step 3.
Making a new bridge

Building a new guitar

