Rare black Dan Armstrong bass: fretboard repair
Issue 183 January 31, 2013
Dan Erlewine's working on a black lucite Dan Armstrong bass -- one of only eight that Ampeg ever made. The fretboard has a nasty crunch. Step-by-step, Dan details how he does this tricky fix.
- A damaged fingerboard requires minor surgery.
- An unexpected use for our Saddle Routing Jig.
- Hot Tip! Create match-color epoxy for fills.
Video Transcription
[Dan Erlewine - Stewart-MacDonald]
Dan Erlewine: Here's a cool guitar. It's a 1968 black Dan Armstrong plexi bass. Very rare, I think they made four of them [on-screen text reads: Correction: Ampeg made eight of these]. It's got a new owner and he's bugged by a chip of wood that's missing on the edge of the fretboard. Maybe somebody caught it on their shirt, I don't know, and he'd like me to put wood back in there and smooth it out. I think I'll route a little ledge with my Dremel tool to inlay wood in there.
To guide the tool, I'm going to use the saddle slotting jig. That's a tool that we have for clamping to an acoustic guitar and cutting a perfectly straight saddle slot. I'm just using it in a different way here. I'll show you how I do it.
Route out the damaged section of fretboard
I drill four holes in my jig for drywall screws, and two blocks that are three quarter inch thick was the perfect height to shim this up so it rests on the fingerboard and supports the work. I'm using a variable speed Dremel on 10 with the spiral down cut bit one eighth of an inch, and I'm doing my cutting with a foot pedal down here on the floor. That lets me go very slow if I want to, and creep right up to the wood and I can actually feel the cut and hear it.
[Dan routes the damaged fretboard wood out with the Dremel and makes a clean square cut]
Cut out and shape a filler piece of rosewood
There's a clean route right down to the glue joint, now I'll cut a piece of rosewood to fit it.
[Dan uses a Japanese Fret Saw to cut out a small piece of rosewood to fit the damaged fretboard section he removed]
That's all I need. We've got a block of wood as a cutting board and some sharp chisels [Dan's favorite wood chisels - Two Cherries Wood Chisels from StewMac], and I'm just knocking the corners off of this little teensy piece, getting it round to fit into that route. This is the super sharp file of a snap filer and it acts like a joiner. I'm thinning the piece of wood and getting a flat edge on it.
Now, I'm down to a file and just rounding it so it fits into those ends. It's got to be pretty exact in the length or you're going to see it. This is all temporary right now. I'm taping it in place so I can trim it closer. I'm marking it out with the pencil. There's too much wood, it's too tall and too thick, so before I even start, I'm going to get closer shaving it down with the X-acto knife. Not to final height, because I'm going to file that later.
Mixing the epoxy and color
I'm using two hour epoxy to put that in, that's what I call it, it's a slow cure. I'm going to color it with a little bit of a pigment ColorTone [on-screen text reads: Brilliant concentrated colors! - ColorTone Liquid Pigment]. Brown lacquer soluble pigment. It doesn't take much.
Applying the colored glue
Now I've got clear epoxy that I used first and that's what you see along the ledge, and then I colored it brown and I'm putting it on the ends here. That way when you look along the glue joint, you'll see a brown glue instead of a clear, and if I don't get a perfect joint, it's going to be a better look. But I didn't want brown on the bottom because it would show or stain into that maple.
[Dan places the replacement piece onto the fretboard into the area where he cut out the damaged section]
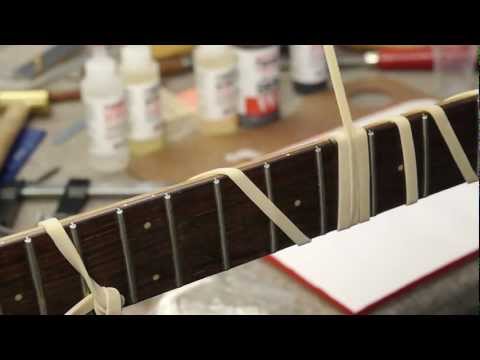
Installing the new piece of fretboard
Here we go. Doesn't take much. It's a good fit. So I'm going to wrap it with rubber bands. I've got two going this way and I'm going to get one up the middle [on-screen text reads: Bands are handy in the shop - Rubber Clamping Bands from StewMac].
Filing the new fretboard piece
I let that glue dry about two hours. Sometimes I'd go overnight, it'll even be harder. But two hours on the slow cure and it started to shape on. The scraper is a good way to come close to the wood without touching the surrounding fingerboard because it's got that age on it.
Scotch tape is 2000s of an inch thick, so that protects the finish. In a case like this, when you hit that tape, you stop.
Doesn't look bad, does it? Feels good too. It's amazing how much work goes into a little chip like that. I don't think a lot of our customers realize that.


