Don't be nervous about adjusting that truss rod!
Players: it's no big deal!
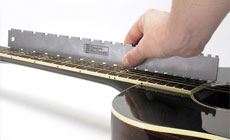
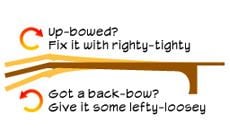
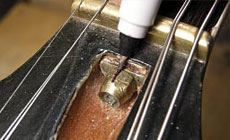
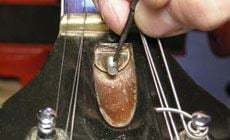
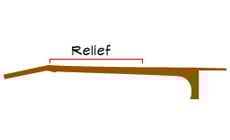
Tighten the truss rod adjusting nut to straighten a neck that has an up-bow. Loosen the nut if the neck is back-bowed. The trick is knowing when you’ve got the neck the way you want it. Here’s how to evaluate and adjust your electric or acoustic neck with a minimum of tools. Sight the neck to see what condition it’s in. With the guitar on its side, look down the fingerboard to check it for straightness. Also look for humps, low spots, uneven frets or other problems. This’ll give you a good idea of the neck’s current state. Mark the adjusting nut to indicate your starting point, and to show how far the nut gets turned. At this point, I like to loosen and remove the truss rod nut to clean and lubricate the threads before making any adjustments. This might not apply in your case: not all truss rod nuts are removable. Some are soldered on. Even when you don’t have a removable adjusting nut, always start by loosening it first. This way, you’ll know how smoothly the nut will turn, and you’ll have a better feel for it when you do your adjustments. This also means you’re less likely to overtighten the nut by cranking away on it if it’s already used up all the available threads. With the nut removed, use a sharp scribe or small brush to remove any built-up debris from the threads and parts. When everything’s clean, add a little bit of lubricant like Guitar Grease or petroleum jelly. Keep the grease off of the exposed wood. Now you’re ready to reinstall the nut and return it to its original position using your alignment marks. “Relief” refers to a very slight, intentional up-bow that lifts the strings a little higher than they’d be on a perfectly straight neck. Some players (like me) prefer a perfectly straight neck, but a dead-straight neck may not work for someone who really plays hard but still wants to have very low string action. For those players, a bit of relief is a good idea. Whichever setup you prefer, a straight neck is a good starting point. With a properly functioning truss rod, you probably won’t need more than 1/8-turn in either direction to get what you’re after. A little truss rod adjustment goes a long way, as you can see by measuring your string height before and after with a string action gauge. You might also want to check out the setup specs of famous players in the last chapter of How to Make Your Electric Guitar Play Great! And there’s a great tip for clamping the neck to take tension off the truss rod on page 18 of The Guitar Player Repair Guide. Tune the guitar to pitch and hold the guitar in the playing position (not laying on its back), then use an 18" precision straightedge to see if the neck’s straight. If it rises with some relief, tighten the nut until the straightedge lays as flat as possible on the frets. If it’s in a back-bow, loosen the nut until the straightedge lays flat on the frets. Doing this sometimes also reveals loose or uneven frets that need attention. After adjusting the rod I’ll usually let the instrument “settle” into the adjustment for a few hours and then I’ll evaluate it again and tweak it if necessary. Follow these steps and you’ll have your axe playing sweet! In a pinch you can use a string as a straightedge. Press the string down firmly at two points: the first fret and the 17th fret. Look for a gap under the string to see if you have an up-bow. If the frets are too uneven to read with a straightedge, a notched straightedge sits over the frets, letting you read the wood of the fingerboard.Players: it's no big deal!

Is your neck up-bowed or back-bowed?

Let's talk about relief
Tip