Want Your Guitar to Sound Better? Master These 6 Techniques!
If you want to get the best performance possible out of your guitar, there are a handful of simple maintenance tasks that will help you get the most for your tone and playability. Dan Erlewine, Tomo Fujita and Gene Imbody walk you through all 6 in this video (and they are easier than you might think). Check it out!
Video Transcription
[on-screen text reads: StewMac]
6 Things every player should know
Gene Imbody: Hey folks. I'm Gene Imbody. I'm one of the head techs here at Stewart MacDonald. I'm here today with, of course, Dan Erlewine, and Tomo Fuijita.
Tomo Fujita: How are you?
Gene: He's a professor at the Berklee College of Music, for 30 years now. Of course Dan, world-class repairman. So we're here today to talk about six things that you, the musician, the player, can benefit from. Ways to keep your guitar in tune, ways to make it play better, ways to keep it in shape over the years.
Tomo: I think every guitar player should know how to maintain their equipment. I have about 30 students each semester. At least 10 of them, settings are horrible. So they want to learn, but settings are horrible, so they're very difficult to learn. Sometimes, guitar neck is bowed like this, you know - half an inch, almost a slide guitar. And then, students say, "I don't know, I can't get really good intonation." And because they don't know how to move saddle or string height. Every time I say string height, "Yeah, it's easy. You should get the tools." "Oh, I'm afraid I'll break it." You can't break it. You can't break it, you just go for it. So anyway, each part is really important, but a lot of people think, "My guitar is okay because I maintained this a year before," something like that. But one year, just like health, it keeps moving, especially Boston weather. It's really hot in summer and winter is really cold and dry. Exactly. That's why neck always moves a little bit.
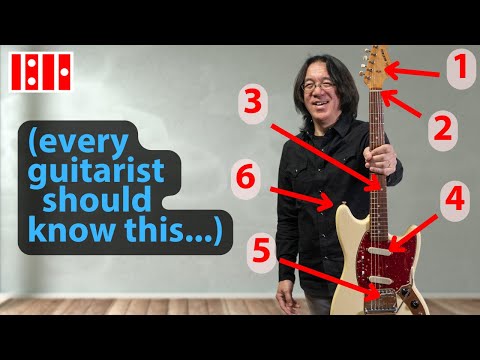
1. Changing strings
Gene: Right.
Well let's start with the most basic, changing your strings. Would you guys agree that's something everybody should know?
Dan Erlewine: I'd like to know how Tomo does it.
Gene: Yeah.
Tomo: All right.
Dan: Because you don't go out of tune, you're playing like crazy and, like yesterday.
Tomo: Well, I bend a lot of notes, so even like this sometime I just go, just make sure straight and then yes, this is how I do it. Usually I take about two or three of those poles around here is good.
Gene: So you're going a few posts past where you need to be?
Tomo: Yeah, yeah. All depends on the guitar, but sometime at least two, sometime a little bit more. And again, everybody has different opinion about this one, but I like a little bit more tension around the post that way I believe it's really ringing all the way. And also make sure that you put this all the way in and then you turn.
Gene: Then that extra couple of posts gives you the amount of extra string to create the number of winds you're looking for.
Tomo: Yes, exactly. So like that, then hold the here tightly and just go all the way.
[Tomo uses a StewMac String Winder to tighten the string]
Gene: And you don't cross over, you don't do anything fancy?
Tomo: No, the reason is, if I'm on a gig and what if I break a string? It happens. Somebody does really lock in something like that, I can't take it out because they're too good. So I do just very simple. And then I just stretch.
[Tomo moves up the guitar string towards the headstock pulling out on the string]
Gene: You're just pulling out the extra slack.
Tomo: Yeah. So here, here, everywhere, even this.
Gene: That's going to help you stay in tune quicker.
Tomo: Like that. See, but then that's not enough. That's one time. So I do two, three times like that.
[Tomo starts pulling on the string working his way towards the headstock again]
Gene: It takes a few times.
Tomo: Yeah, a few times. Yeah, definitely. So now here's a very important thing. It is even less and very close, but then sometimes I stretch, they want to move back a little bit. So sometime pitch become a little sharp. So just in case, stretch three, four times. And just in case, tune 2, 3, 4 times.
Gene: And you're able to hear that because you exercise your ear, you don't rely just on an electronic tuner?
Tomo: Yes. So everything I do by ear, then finally I plug into the tuner.
Gene: Yeah. I always recommend to people that use an Electronic Tuner to check their ear. When you're playing live, it's different, but when you're stringing your own guitar, exercise your ear.
Tomo: I do just all the way like that. So this one, maybe these two poles at least. Then gradually I go a little longer because string is thinner, so I want to go each one a little bit more winds.
Gene: More winds on the unwound strings.
Tomo: Yes. This last one probably I have at least five times like that. That way my guitar stay in tune and really great. So that's how I teach my students.
Dan: I'd like to see you do the same thing on a Gibson guitar.
Tomo: All right.
Gene: That's a good one. This is something that a lot of students, a good entry-level guitar that you see a lot.
Tomo: So Gibson's style a little bit different because the Fender style just stick in, just turn so smooth. But Gibson's style I have to do slightly different way.
Gene: The hole in the post is coming from the side on a tuner like this.
Tomo: Yeah. So go through the post like that. Then again, almost like a similar, but you don't cut it, you just go back a little bit like that.
Gene: So you're pretending there's another post about the same distance from that last one?
Tomo: Yeah, I do usually just like this much [Tomo uses his fingers to show 2-3 inches] and go back a little bit and then you have to hold a little tighter here. And then because it moves I do usually go above the string.
[Tomo uses the string winder to take the slack out of the string]
Gene: I do too on the first string.
Tomo: And then I pull this a little bit like this straight.
Gene: Tomo, it looks like the bushing on that tuner is a little loose.
Tomo: Yeah, I saw a little bit, a little bit of moving.
Gene: It's pretty common. It's a good opportunity. A spanner wrench is great for that kind of stuff.
Tomo: Oh, I never seen this one.
Gene: Yeah. That will right in there under the string.
Tomo: Oh, like that. Wow.
Gene: One side will be loosened and one is tightened.
Tomo: Oh wow. This is great.
[Tomo tightens the loose post with an ESP Multi Spanner]
Gene: That's a very handy tool to have.
Tomo: Wow. Yeah, because a lot of students too always will wiggle like that.
Gene: Well when you change strings, it's a good opportunity to check to make sure all your hardware is tight.
Tomo: Wow, this is really great. I don't have it because I used to do with something similar to this and I scratched it.
So this is how I do it.
Gene: So your first wrap, you come above the tail and then for the rest you're going below. Is there a certain number of winds of wraps you're looking for on the post?
Tomo: Looks like a two. One or two. That way, strong. That's good. Like that.
Gene: Yeah.
Tomo: Oh yeah, that's right.
Dan: Don't poke your eye out.
Tomo: Right, right. This is the important part too.
[Tomo uses a String Cutter to cut off the strings tag end]
Gene: And you just cut right down as short as you can get it. So that's a basic way of stringing a guitar. That's the way I do it. Dan, is that pretty much how you do it?
Dan: That's how I do it.
Tomo: You do? Oh, good.
Gene: So what kind of mistakes do you see when you-
Dan: Strings on backwards.
Gene: Backwards meaning on the wrong side of the post?
Tomo: Yeah. I see.
Dan: Too much, the whole string put on sometimes.
Gene: You're not winding to the inside?
Dan: Going opposite direction, sometimes the right direction in the same guitar.
Gene: Or how about winding up the post instead of moving down? I know that one of the things that I hate the most when I see a guitar coming into my shop is I've seen people tie knots. Like actually-
Tomo: Oh, tie. Yeah.
Gene: Run the string through the post several times and tie it. I'm sure you've seen that a lot too, where you need dental picks to pull it apart. I cut myself. There's a lot of mistakes, but really I think keeping it simple is what works the best and the way everybody should learn.
Tomo: Everybody should try. Just try and don't worry about the mistakes. Just buy another set of strings.
[on-screen text reads: Suggested: Guitar Strings Guide]
Gene: Yeah, there are millions of different strings and more coming out all the time. How do people know what string to use?
Tomo: To me, I've been playing many, many years and I try so many different way and I always like to learn every detail. So I try to do thin strings, heavy strings, but ended up 10-46. So basically regular guitar, I think 10-46 is great, but if you use more distortion, sometimes 9-42 sounds good. But if you like more jazz stuff, yeah, 11-49, like that.
Gene: Dan, do you find heavier strings tend to change the tone of the guitar?
Dan: Sure, absolutely. I used to love elevens 11-49, 50 and now I'm playing tens and I agree on the nines. Sometimes I'll get a guitar that's got nines on it and I can play better. Bends are better. It doesn't go out of tune as much.
Gene: Right. Yeah, I think it's a matter of experimenting to find what you like.
Tomo: And playing point, thicker strings is definitely, as you said, tone is better sometimes thicker-
Dan: Louder.
Tomo: Louder, but easy to pick harder because the strings can handle more tensions, more abuse. That's why I play 10 because I like to use a lot of dynamics. If I have more heavy strings, I can hit a little harder, then I lose my dynamic.
Gene: So there's really no right or wrong answer to it.
Tomo: Exactly.
Gene: It's a balance of what you like, what feels good, what your guitar is set up to handle.
Tomo: Acoustic I use 12-52, normally. Sometimes I try 13-56, it sounds great, but then I can play bends or anything like that.
Dan: And it can be hard on the guitar too.
Tomo: Oh yeah, that's right.
Dan: A lot of acoustic guitars.
Tomo: Yeah, especially old guitar or a new guitar sometimes. Yeah, they cannot handle 13-56 too much.
Gene: It's the energy of that string that's driving the top and creating your tone so you can overdo it or under do it.
Tomo: Basically, like 12-52 is normal.
2. Adjusting the truss rod
Gene: Okay, so that's changing strings. Let's go on to number two. And this is an important one and one that scares a lot of players. Adjusting your truss rod. We're lucky to have the master of truss rod adjustment with us. So Dan, take us through it.
Dan: Well, let's get a guitar out here, something with a truss rod, hopefully.
Gene: Okay, so Dan, if you looked at this and you checked with the string and you see a big gap there, are you looking for dead straight? Do you want a little bit of a gap for most people?
Dan: I like to be able to get it dead straight and then if somebody thinks it's buzzing or wants relief, loosen it to give a little up bow. That's what a truss rod can do.
Gene: So if you see a large gap here now-
Dan: Then you want to tighten the truss rod and straighten the neck out because it's pulling upwards.
Gene: Let's take a look at this one.
Dan: Sure.
Gene: Let's grab our screwdriver here and take the truss rod cover off. We're going to use this guitar because the truss rod on a Gibson is really easy to get to. A lot of Fenders, you have to take the neck off if it's at that end. So we'll use this because it's a great example.
Dan: This is what I like to see on a truss rod. When I see a lot of rod poking out at the end with threads, that's not so normal. That's happening more on newer guitars. If you see a quarter inch of thread pulling out on a truss rod, it could be moving back here. If you see all that thread, you might be totally maxed out and you won't be able to tighten it. You tightened it so much, it's pulling this anchor forward, squishing the wood and it can't do anymore. So then you take the nut off, StewMac has extra washers and spacers. You put a spacer on it, put the nut back on and you get a whole new grip.
Tomo: I see. Dan, could you show me which equipment do you use?
Dan: We use a wrench this size [Dan grabs a hex truss rod wrench from the StewMac Truss Rod Wrench Set]. There's all kinds it could be.
Tomo: Oh, that's very easy.
Dan: Fit right on there.
Gene: It's a 5/16's.
Dan: We call this a Popeye wrench. Popeye the sailor man. Loosening, tightening.
Gene: Lots of new guitars adjust with an Allen wrench, just a regular 4 millimeter or 5 millimeter hex wrench. And on an acoustic guitar you're coming in through the soundhole. We have extra wrenches that are long and bent to get around the braces.
Dan: But you can buy one wrench. If you have a guitar, you can always buy just what you need. Shops like ours, we have 20 different wrenches.
Gene: I think a lot of people are scared to adjust their truss rod. Just don't force anything. Make sure you have the right size wrench and if the guitar doesn't want to do what you want it to do, if it doesn't want to loosen, if it doesn't want to tighten, don't force anything. That's probably a time to go see a repair man. But otherwise, if you have a new guitar, a guitar that's in good shape, adjusting the truss rod is really no big deal. And just about anybody should be able to do it.
Dan: When the truss rod is tightened and not really loose, the guitar sounds way better. There's no comparison. You can take a guitar with a dead sounding note to it and see that the truss rod is rather loose and tighten it, and all of a sudden that guitar has life.
Gene: Okay, so that's setting your neck relief, that's straightening your neck with a truss rod. And that brings us into the next stage because before you can set your guitar up, you need to straighten the neck or get the relief where you want it. And that leads us into your action. What do we mean by action, Dan?
3. Setting the action
Dan: To me, action is how hard or easy the guitar plays and the measurements of how tall the strings are from the frets, how well the strings are set to the radius of the fretboard, all the things that make it play well.
Gene: This is our String Action Gauge. It measures in thousandths of an inch, fractional measurements down to the 64th. On the back of it we have a conversion chart to switch from decimal to fraction to metric. This gauge is also available in metric for those who prefer to measure in metric. We're going to lay it on the frets and you can see which line is lining up at the bottom of the string to give you a measurement of your action height, a necessity if you want to set up your guitar.
Dan: Tomo's guitar with the string action gauge, you're looking underneath the string, the bottom of the string to the top of the fret. And I can see the line of a 0.100. That's less than 1/8th of an inch. I see on the first string between 0.08 to 0.09. If you measure that in inches, it's about 5/64's of an inch. This is a very playable action.
Tomo: Thank you.
Dan: Some people would consider it high, but the frets are pretty tall.
Tomo: This way I can pick a little harder, strumming.
Dan: No, I like this one.
Tomo: Yeah, thank you.
Gene: Well, I think that's a good point is that there is no right or wrong.
Tomo: That's right.
Gene: I think a capo is really invaluable for a lot of this. I like to check with a capo at the first fret. I kind of call that my zero point. So then I'm measuring without factoring in the nut. It frees up another hand. If you're going to check with a string, then I have one hand to kind of be able to move the string. But I think a capo is important for setup work. Anybody can adjust their action. It takes a little practice. It takes some experimentation to figure out what you like, what works best on your guitar. And it does take a little bit of an investment in some tools like Radius Gauges. So as Tomo was saying, he sees a lot of his players where the saddles are kind of up and down.
Tomo: Up and down, right.
Gene: For those who don't know, the fretboard isn't flat from side to side. They all have a different radius.
Tomo: That's right.
Gene: That's why we sell notched radius gauges so you can get around the strings and check the board or the top of the frets.
Tomo: Oh, that's a nice one. Yeah.
Gene: And what did you say you thought this one was, Tomo?
Tomo: I think 9.5" to 12" supposedly.
Gene: Okay, so it's a compound radius. A compound radius is one that changes. We're talking about a piece of a circle, the radius measurement of a circle. So if we're 7-1/4" or 9-1/2", that's this chunk of the radius of the circle.
Tomo: Roundness, right.
Gene: And it flattens out towards this end. Well, as it flattens out towards this end, it makes bending notes cleaner and easier.
Tomo: That's correct.
Gene: But tighter on this end, your hand wants to curve.
Tomo: I play more chords on lower side. I play more higher side bend notes. And especially I bend two whole step like Oliver King. So this is great.
Gene: So flatter radius is great for bends?
Tomo: Yes.
Gene: Tighter radius is great for chords.
Tomo: Cords, right.
Gene: So this is kind of-
Tomo: In between.
Gene: In between. You get both.
Tomo: That's right.
Dan: There's a radius.
Gene: Yeah, you can see that curve.
Dan: That's a 9.5". That means this board is curved like that and it's ending up at a 12". And if you put these two together, you can see the difference.
Gene: So then we're using these gauges to check the radius of our board. But Dan, we've got Understring Radius Gauges to measure-
Dan: The radius of the bridges.
Gene: You want the radius of your bridge to match the radius of your neck.
Dan: Right. And Fenders are individually adjustable, so you have to adjust each one. In this case it would be, if it starts at a 9.5" hits the 12", it's going to keep flattening out.
Tomo: Especially, I play little funkier, I play bends, so I do not use exactly 12". I just use that to get the basic measurement and I raise other side a little bit higher. So that way guitar rings, you need to know what radius your guitar and use that to measure so that you are in a really good spot. And after that you can use your taste to lower or higher.
Dan: Let's look at this with an under string gauge. Here you go. Now that's a 20".
Gene: So it does get more difficult on a compound radius because the radius is changing-
Dan: All the way to the end.
Gene: It's getting flatter all the way to the end.
On a lot of necks, most necks it's going to be the same radius.
Tomo: I see I see.
Gene: If it was a 7-1/4" the whole way, we would just be setting this at a 7-1/4".
Tomo: So basically keep going.
Dan: On a Les Paul or Gibson guitars, you won't find a compound radius, whatever the board radius is, that's what you'd set under the strings up here. But you don't have individual adjustable sound.
Tomo: Yes, that's right.
Dan: It's easy at that because it's already made to have that radius.
But you can change the radius on a Gibson by how deep you cut the slot for the string. So during setup you have to be very careful how deep the slots in the saddles are because one string could be higher or lower.
Gene: One thing I'll do too at the bridge is set the radius a little bit flatter than the actual board because that boosts the bass side up a little bit. People tend to like the bass side action a little bit higher than the treble. So if you set a little bit flatter at the bridge, that's basically you're keeping the radius the same and then it's bringing it up slightly on this side, towards that side. There's a lot that goes into a setup. This is a lot to take in. So we have a lot of different videos that will take you through all the details of how to do a setup. We're just kind of giving you a basic overview that this is something just about anybody can do with a little bit of work, a little practice, some basic tools you can set up your guitar.
Tons of videos we have check them out. But this is totally doable. So that leads us into number four.
4. Adjusting pickup height
Let's talk about setting pickup height. In case you don't know, your pickup heights are adjustable. You can raise or lower them, that will affect the sound. You tend to get, I think a clearer sound if they're lower, but boosting them will also boost the volume. It's a balancing act, right Tomo? And I know you have a great video on your channel about this and I can see you have a way of doing this. Walk us through how you determine this.
Tomo: Sure, each part moves going up and down and then the more you go higher, definitely you gain more volume. Early days, I thought higher is I can get more gain. So I set up a high, but then somebody told me this magnet really pulls the strings. So if you play 10th frets, listen to the sound, you as kind of a moving a little bit, then lower, listen to the sound. Wow, sustained. So I didn't know lower sounds better than higher. Not just because the height, but just less magnet pull. So they're sustained. So this is my setup, this side lower, this is higher. Gradually going a little bit higher just because pretty much the same output of pickup. But then rear, I want to have a little bit more loudness.
Gene: So you're boosting the height of this pickup [Gene points to the pickup closest to the bridge] to get a little more volume out.
Tomo: Just a little bit. And especially when I play two pickups together, it's kind of mild sounding. So this way when I play front, when I go to middle and rear the same volume.
Gene: Okay.
Tomo: Yeah, that's what I do.
Gene: So a lot of people don't realize your magnet has an attraction to the metal and the string.
Tomo: That's right.
Gene: And the closer you get it to the string, the more it's going to pick up that string. But you get it too close, it will interfere with the movement of that string.
Tomo: Right.
Gene: So you could have it too high, you could also have it too low. It's about finding a balance between the tone and what you like and the strength of the magnet in your pickup.
Tomo: So once again, you can try to raise as high as you can, listen to it. Low as you can, listen to it. You can hear the difference.
Gene: So this is an easy thing that anybody can do, right?
Tomo: That's right. And you can make guitar sounds better, really.
Gene: You can make a pretty good change.
Tomo: I want you to really try this. It's fun.
Gene: So experiment with your pickup height, however you do it. If you measure it to get it in the ballpark, but ultimately it's what you want to hear.
Tomo: That's right.
Gene: That should be the deciding factor.
Tomo: That's right.
Gene: Yeah.
Tomo: So to me, play around 10th frets, lower notes, pick the note, make sure it's sustained really well.
Gene: Okay.
Tomo: Yeah. So that's how I decide.
5. Adjusting intonation
Gene: Okay, so number five, let's talk about intonation. I think that's something all players and musicians have at least heard of. If you're new to this, it might be confusing, but it's really easy to adjust. It's something everybody should be able to do.
Dan: For the intonation to be right is very important if you want to play in tune. It's sitting the bridge saddle so as the string rises up on a long angle and you press the string, it's going to go out of tune. The string isn't laying on a flat plane.
Tomo: That's a great expression.
Dan: The higher you go, the higher up the neck when you press, you're going to push the string a little out of tune. Therefore, you have saddles that can go forward or backwards to account for that until when you get to the octave at the 12th fret, the open string makes the same sound as the closed string. See how those saddles are all, they're going like this? That's because they're set to play in tune in that position. These two are set very much the same. The G-string is set back this way. That's where it's playing in tune. If you're setting up a new guitar, putting new strings on, a good thing might be to bring the saddles backwards when you string it up so that as you set the intonation and you're moving forward and you won't have a kink in that string. If you have all your saddles up to the front, put on new strings, it'll probably play very sharp. And then you bring the saddles back and you already have a kink in front of it.
Gene: That's a good point. So there's a little bend in the string where it goes over the saddle and if you start out too far forward and you move back, then that kink is then in front of the saddle and can affect your string. That's a good point.
Dan: If you have a Stratocaster, right here you'd get a very good example of where your saddles should look like. Depending on the gauge of strings, that would be a good place to start.
Gene: So then when we set intonation, we're comparing, like Tomo said, the open note against the octave at the 12th fret.
Tomo: That's the one I'm not just using my ear. I use a tuner just because I can't trust my ear. More detail. And one more thing is people tend to press a little harder. So I do not sit perfectly, I go slightly lower when have 12th fret.
Gene: That's a good point. Yeah. I do the same thing to account for the pressure. The harder you squeeze, the more you're going to raise the pitch of the note and you can compensate for that in these saddles. So you're checking the open note on your tuner and then you're comparing that to the 12th.
Tomo: Yep.
Gene: Okay.
And then you're adjusting the length of the string at the saddle so that the two notes match.
Tomo: Exactly. If you can as a player, you have to do it by yourself because you have your own tone, your touch. That's how you decide.
Gene: That's a running theme we've got going through this is that there are some basic rules that we all kind of go by, but ultimately it's up to the player. It's what works for you. It's what you want to hear. It's what works on your guitar. It's all going to be different. One thing I'd like to do is just fret chords along the whole length.
Tomo: That's right.
Gene: And I will adjust away from the 12th fret to correct some notes that might-
Tomo: Oh, that's great.
Gene: Bother me more in this position or in this position. I think people get married to the fact that it has to be perfect at the 12th fret. It doesn't. It's a good place to start but let your playing style, let your ear be the judge. You can correct intonation wherever I think it needs it most. So what kind of tools do we need to do this? We need a screwdriver of some sort and just a good quality tuner.
Tomo: Tuner, yeah.
Gene: A strobe tuner is nice. That's what we use in the repair shop, but just a good accurate tuner. Most modern tuners are pretty accurate.
Tomo: So I don't use clip tuners, I just use plug-ins so that the signal goes really strong and I can hear it.
Dan: I like my iPhone. There's a lot-.
Gene: I have a strobe tuner app.
Dan: There's a strobe tuner in that. Guitartuna. When you get that one, it chimes, when you hit the note.
Gene: Okay.
Dan: I must have four different ones. It's always your ear because you could hear the finest guitar player. You're at a club and they say, let's get so-and-so up here, and you might walk up on a guitar that's perfectly in tune and start to play and change something just because you hear it a little bit different.
Tomo: That's great about electric guitar because this is not a piano, it's just imperfect instrument.
Dan: It is.
Tomo: That makes more human sound. That's why we love guitar.
Gene: Well, that's a good point too. That brings us into, well what about an acoustic guitar? How do you set the intonation on an acoustic? It's a little more difficult. That is something you would probably want to talk to a repair shop about, because it's about changing the carve of your saddle, the compensation on your saddle. That gets to be a little bit much. But on an electric guitar, this is a piece of cake.
Tomo: We're talking electric.
Gene: On an electric guitar, you can adjust your intonation.
Tomo: So this is really fun part, you can adjust everything by yourself.
Gene: Yeah. Check your open note against the fretted 12th. Start there. Adjust the length of your saddle until the two match. If you want more detail on it, like always, we have plenty of videos about it [on-screen text reads: Suggested: How to Intonate a Guitar]. Check out our videos and ideas section. You'll find lots of info.
6. General maintenance
Okay. So for number six, we're just going to call this general maintenance, just an umbrella term for the care and feeding of your guitar. Things like cleaning, adjusting hardware, humidity, just the overall sense of how to care for your guitar. Tomo, what is important to you? What kind of things do you look for?
Tomo: I travel a lot. So just in case any screws, it's not loosened. So I just tighten just a little bit like that. And every time I change the strings, I use dry cloth and just wipe each frets in between so that way everything clean so that I can play really well. It's not just for looks.
Gene: So to keep the top of your frets clean. Feels smoother to the strings.
Dan: And the wood.
Gene: And the wood.
Tomo: That's right.
Gene: If you stay on top of things like that, it stays clean. It's a much harder, if you go two years without cleaning and then suddenly you have a bunch of gunk you have to remove.
Tomo: That's right.
Gene: And you're just doing this dry, you don't even necessarily need a chemical or a cleaner if you stay on top of it.
Tomo: So also I have a lot of vintage guitars. If I put the cleaner, I don't want to take everything off. So just everything just dry, like that.
Gene: Yes. I think that's a good point. We deal with that a lot in the tech department here. People take in a vintage guitar and they go and they put a polishing compound on it.
Tomo: Oh, compound.
Gene: And then-
Tomo: You don't want to take away everything.
Gene: Yeah, you're removing all years of build-up. If you want a nice clean, shiny guitar, maybe. But that gets to be a pretty intense thing to do to an old guitar.
So keep up on these things, keep the guitar clean and you'll be better off.
Tomo: How about here? I see a lot of students sometimes connection is really loose. And what type of equipment do you use this to tighten?
Gene: You're talking about your output jack here-
Tomo: Yes.
Gene: Attached to your cup.
Tomo: This is where you plug in and out every day. And over the time this gets so loose, even inside the cup, keep moving. And so I can hear the signal go in and out.
Gene: It will affect the connection of your plug.
Tomo: That's right.
Gene: To the instrument.
Tomo: Almost break inside of a cable.
Gene: Yeah. So Dan, I'm sure you use a tool that I like to use a lot too.
Dan: The Frank Ford.
Gene: The Frank Ford Gripper [on-screen text reads: Jack The Gripper Tool]. Yeah. We sell that.
Dan: It's a tool that has a threaded piece on a cam that can go in and grab the inside of the jack, but you're also putting it through a wrench. The wrench holds here. So you're holding the jack and tightening it.
Gene: What we're talking about here, for those who don't know, is the jack will spin. So as you want to tighten the nut, the jack will want to turn too. And you're not getting anywhere. You're actually, then you're twisting up the wires inside.
Tomo: Yes, break the wire.
Gene: And you can cause damage. So the tool Dan and I are referring to is one made by Frank Ford that goes on the inside of the jack and will grip that from the inside and keep it from spinning. And then on the outside there will be an actual wrench to tighten the nut. So it's holding the jack. It's gripping the jack and giving you a means to tighten the nut. So that's just into checking your hardware, making sure your strap buttons are tight, your jack is tight.
Tomo: So strap button, another thing you have to check because this part always you're using and then getting loose. And what happens is if you tighten, that screw sometimes goes around.
Gene: It stops gripping.
Tomo: Exactly. No gripping. So then I take this off and I use toothpick stick in then I put the screw again. So that way adding the wood inside to catch it.
Gene: Yeah, I'm sure we've seen that-
Dan: A million times.
Gene: A million times in the shop.
Tomo: That's what I learned there. Same way I do sometime with these.
Gene: So it's just a way if a screw is kind of stripped out in the wood, gaining a little bit of grip into the wood again.
Tomo: Exactly. Exactly. So make sure I tighten this, make sure that not spinning. Same way. And one more thing, I usually check.
Gene: Your mounting screws.
Tomo: Mounting screws, because this could be a little loose. So I use tools to tighten, but when I hold this, I tell students, you don't want to go like this because then you tighten a little too much. So I hold like that, light [Tomo holds the screwdriver handle wth just the tips of his fingers], then almost kind of give up a little bit.
Gene: You want it tight, but you don't want to overdo it.
Tomo: Exactly. That's the key.
Gene: You can cause damage, you can strip those screws going too tight. In general, you just want to check to make sure anything that needs tightening is tight and snug.
Dan: Well, for my 2 cents worth, I'd say it's always important to remember that you want your guitar to rest in a place that you'd want to rest yourself. Humidity, dryness, wetness, guitar case humidifiers are good. In a guitar shop we spend a lot of time trying to keep our humidity between 40 and 50% year round. It's not easy to do, but it's very doable. And the same goes with your home. You'll be lucky if you have a humidifier, all-home humidifiers, they're great, but you don't want to leave your guitar out in the car in the freezing cold and say, oh, I'll get it tomorrow. I do not take my guitars out in the rain and I don't like to take my good acoustic guitars or even electrics outdoors in the spring when it's just starting to be so humid down here in Ohio. Take care of your guitar like you would yourself.
Tomo: Right. That's a good point.
Gene: Especially yeah, if we're talking an acoustic guitar that's very sensitive to humidity. So invest in a humidity gauge, that's fair to say. If you have an acoustic guitar and you live somewhere where the weather gets dry, especially in the winter, a lot of people don't realize there's snow everywhere. But that doesn't mean there's moisture in the air.
Tomo: The room is heated.
Gene: Heating will dry out a guitar very, very quickly. So a soundhole humidifier is good if you have an acoustic guitar that's got solid wood, we should say that.
Tomo: Maybe one more time. What humidity level is good? 40, 60?
Dan: Between 40 and 50.
Tomo: 50. Okay.
Gene: 40 to 60 if you have to, but as close to 50 as you can get. General cleaning, tightening your hardware, being aware of humidity, just kind of general maintenance, care and feeding of your guitar. Treat it like you would your pet, like yourself. Just be on top of it, stay ahead of it and you'll be better off. Okay. So that's six things right there. Those are six basic things that everybody, we think everybody should know. Right? Every player.
Tomo: I really think so. These things really helps your playing.
Dan: Every day. If your guitar is not set up right, you're not going to play right. Everything we said here is something that is important for you.
Gene: And I think important too that there are things that everybody can do.
Dan: Yes, that's right.
Gene: This doesn't require an enormous investment in tools or lessons or studying. You can get this stuff down with some videos and tools that we have out there.
Tomo: Don't be afraid. Just you do it.
Gene: Don't be afraid. It'll make you a better player. You'll spend less time with guys like me and Dan paying to get your guitar fixed and more time with guys like Tomo learning how to play the guitar.
Tomo: But I have to learn a little bit so that I can maintain.
Gene: Yeah. Every player should be able to do these things. So thank you so much for joining us. Thank you so much, Tomo, for coming all the way from Boston.
Tomo: You're welcome.
Dan: Great time, man.
Tomo: Thank you.
Gene: It's been a pleasure meeting you and showing you around and a real honor to work on your guitar.
Tomo: Thank you. Likewise, likewise. Thank you so much guys. That's amazing.
Gene: Thank you guys for joining us and we will see you next time.
Dan: Bye folks. Thanks for being with us.
[Tomo plays fast paced electric guitar music]


