StewMac Crack Repair Tool Instructions
Repair cracks in tops and sides of an acoustic guitar.
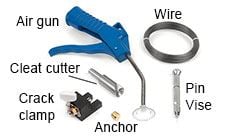
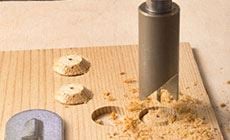
These tools are for repairing stubborn cracks, splits and punctures in acoustic guitars. Use this kit to: Our hardened-steel Cleat Cutter creates thin round cleats of wood to be glued across a crack on the inside of a guitar. The Crack Clamp uses a thin wire to pull the cleat into place. The cleat's woodgrain runs across the crack, not parallel to it, creating a strong repair that's also very small. Use the Cleat Cutter in a drill press to make cleats from wood that's similar to what you're repairing. The thickness of the wood should be no less than 3/32" and no more than 1/8". On the outside of the repair, a caul applies even pressure to make both sides of the crack uniformly level. Every crack repair is different in length and shape, so each repair job needs a caul that's sized to fit. You'll need to make a caul shaped to fit your repair. Make cauls out of acrylic, or wood wrapped in nonstick plastic or waxed paper. The size depends on the shape of the crack and whether it requires one Crack Clamp or several. Inspect the crack for dirt, lacquer chips or other debris. Use compressed air to remove particles. Put a short length of our .014" wire supplied into the pin vise, leaving about 1/4" exposed. Use this to pierce a hole through the crack where the Crack Clamp will be placed. Cut a piece of wire long enough to run in through the pierced hole and back out through the guitar's soundhole. A piece of tape on this wire will keep it from slipping into the guitar. Thread a wooden cleat onto the end of the wire. The non-beveled side is the gluing surface that will contact the repair. Add the brass anchor. Thread the wire through lengthwise, then add a couple loops through the cross holes to secure it. At this stage, do dry-clamp test. A dry run shows you how much tension it takes to close the crack. Find this out before applying glue, so you have no surprises later when working fast with wet glue. Work glue into the crack from the outside, using the air gun. Pressure of 10psi is sufficient to push most glues. Don't overdo the pressure: you don't want glue running out the opposite side of the repair. Paper towels inside the guitar will catch drips. Clean up any excess glue, inside and outside. Apply glue to the cleat and pull the wire to bring the cleat into contact with the crack on the inside of the guitar. On the outside, thread the caul onto the wire. Wrap the wire around the tuner shaft and carefully tighten the wire, pulling the crack together until the two sides are level. You want the grain on the cleat to sit at approximately 45 degrees to the crack, providing strength to resist the forces that created the crack originally. Use a mirror inside the guitar to see that it's oriented this way before you finish tightening. Clean up any glue squeezeout. When your glue has dried, the crack repair is complete, with the small wooden cleat(s) holding it shut permanently. The small hole left by the wire can be patched with glue or matching filler. After removing the clamp and wire there will be a small hole(s) left from where the wire passed through the repair if it was a tight crack. This hole can be patched with glue or matching filler. Sometimes, a crack that's been repaired is still missing bits of wood. A gap like this can be filled with a sliver of matching wood or wood filler.
Crack repair using wooden repair cleats
How to use the crack repair tools
Cut your repair cleats from matching wood
Make a caul to level the sides of the crack
Keep the surfaces clean
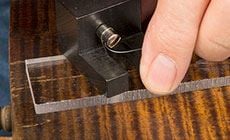
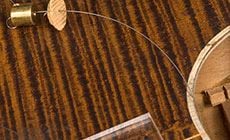
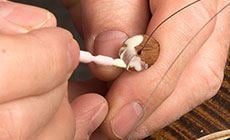
Thread the wire
Do a dry run
Pump glue into the crack

Glue the cleat
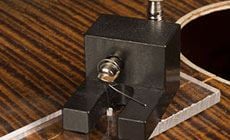
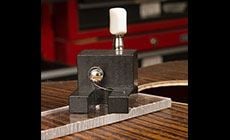
Tighten the Crack Clamp