Brace Gluing Wedge Instructions
Shim open the glue joint under the brace and inject glue where you want it.
Brace repair on acoustic guitars is an awkward job, involving reaching through the guitar soundhole into body and working blind. (The larger your arm, the tougher this is!) The Brace Gluing Wedge helps by letting you do two things at once, using one hand. It shims open the glue joint under the brace and injects glue where you want it.
The Gluing Wedge uses replaceable plastic pipettes as glue reservoirs. Squeezing the pipette sends the glue through a channel on the bottom of the tool. It is designed for use with water soluble glues like Titebond or hot hide glue. (Do not use super glue.)
The gluing area of the wedge is 1-1/8" long for use on many brace sizes, and also on bridge plates.
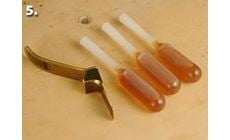
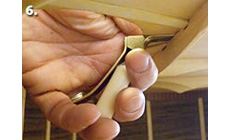
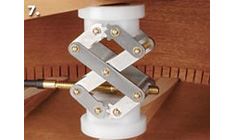
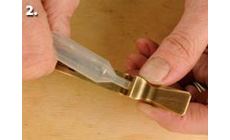
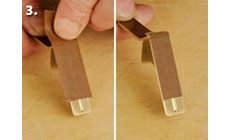
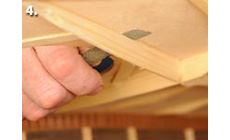
1. Cut the pipette stem about 1/2" (13mm) from the bulb. The remaining stem is used to attach the bulb to the wedge. 2. Thread the stem of the trimmed pipette into the wedge. The access hole in the wedge is threaded inside, and these threads will cut into the stem to secure the bulb. The pipette will now screw in and out of the wedge for filling with glue. 3. The glue channel runs the length of the wedge. A piece of tape is used to define the exposed gluing area to match the brace you're working on. Our binding tape is shown in these photos; masking tape works well also. Determine the width of the brace you will be repairing and tape over the channel, leaving an opening that matches the area you want to glue. This tape keeps glue from going where you don't want it. 4. Carefully remove any old dried glue from the surfaces to be glued. A strip of sandpaper is useful for this, and a metal feeler gauge works as a very thin scraper. Have your clamps ready for clamping the brace after gluing. Make your plan for clamping the brace and do a dry run to practice positioning the clamps. This way you won't risk running into snags while the glue is setting. Use a water soluble glue. Titebond is a good choice, and so is traditional hot hide glue. Tip: Glue flows best when it's warm. Heat is essential for hot hide glue, but it's also good for Titebond. A bottle of glue placed in a water-filled electric glue pot will stay heated to 150°–155° F (65°–68° C). You can approximate this with a pan of heated, not boiling, water. 5. Tip: Fill extra pipettes and keep them warm in the water to have a bulb of hot glue ready when one starts to cool. You can stopper the pipettes with our tapered nylon Bridge Locating Pins. Keep your Gluing Wedge and any feeler gauges hot in the hot water too: when metal tools are hot, they help extend the glue's working time. 6. Carefully insert the wedge into the gap under the loose brace. Don't push in any farther than necessary; you don't want to pry the brace loose. Gently squeeze the bulb to inject the glue. After injecting glue, on some braces it may be useful to let the wedge hold the gap open while spreading glue to the remote edges with a thin feeler gauge. 7. Remove the wedge and do a preliminary cleanup of excess glue. Apply your clamp to hold the repair while the glue dries. After clamping, wipe up any remaining glue squeeze-out.Reglue loose braces single-handedly
Preparing the Gluing Wedge

Preparing the work area
Gluing