Spray Guns: Getting Started
An introduction to spray guns, including use, care, and troubleshooting.
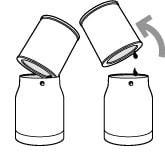
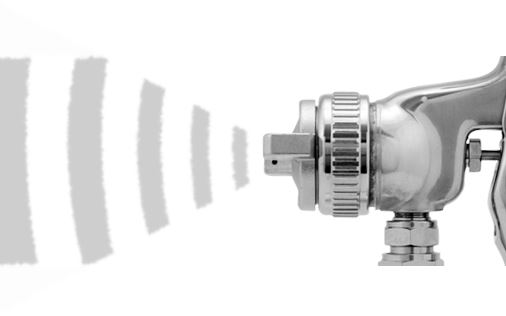
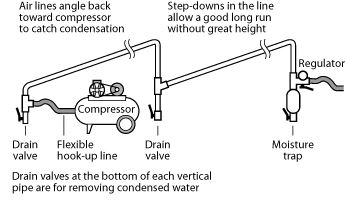
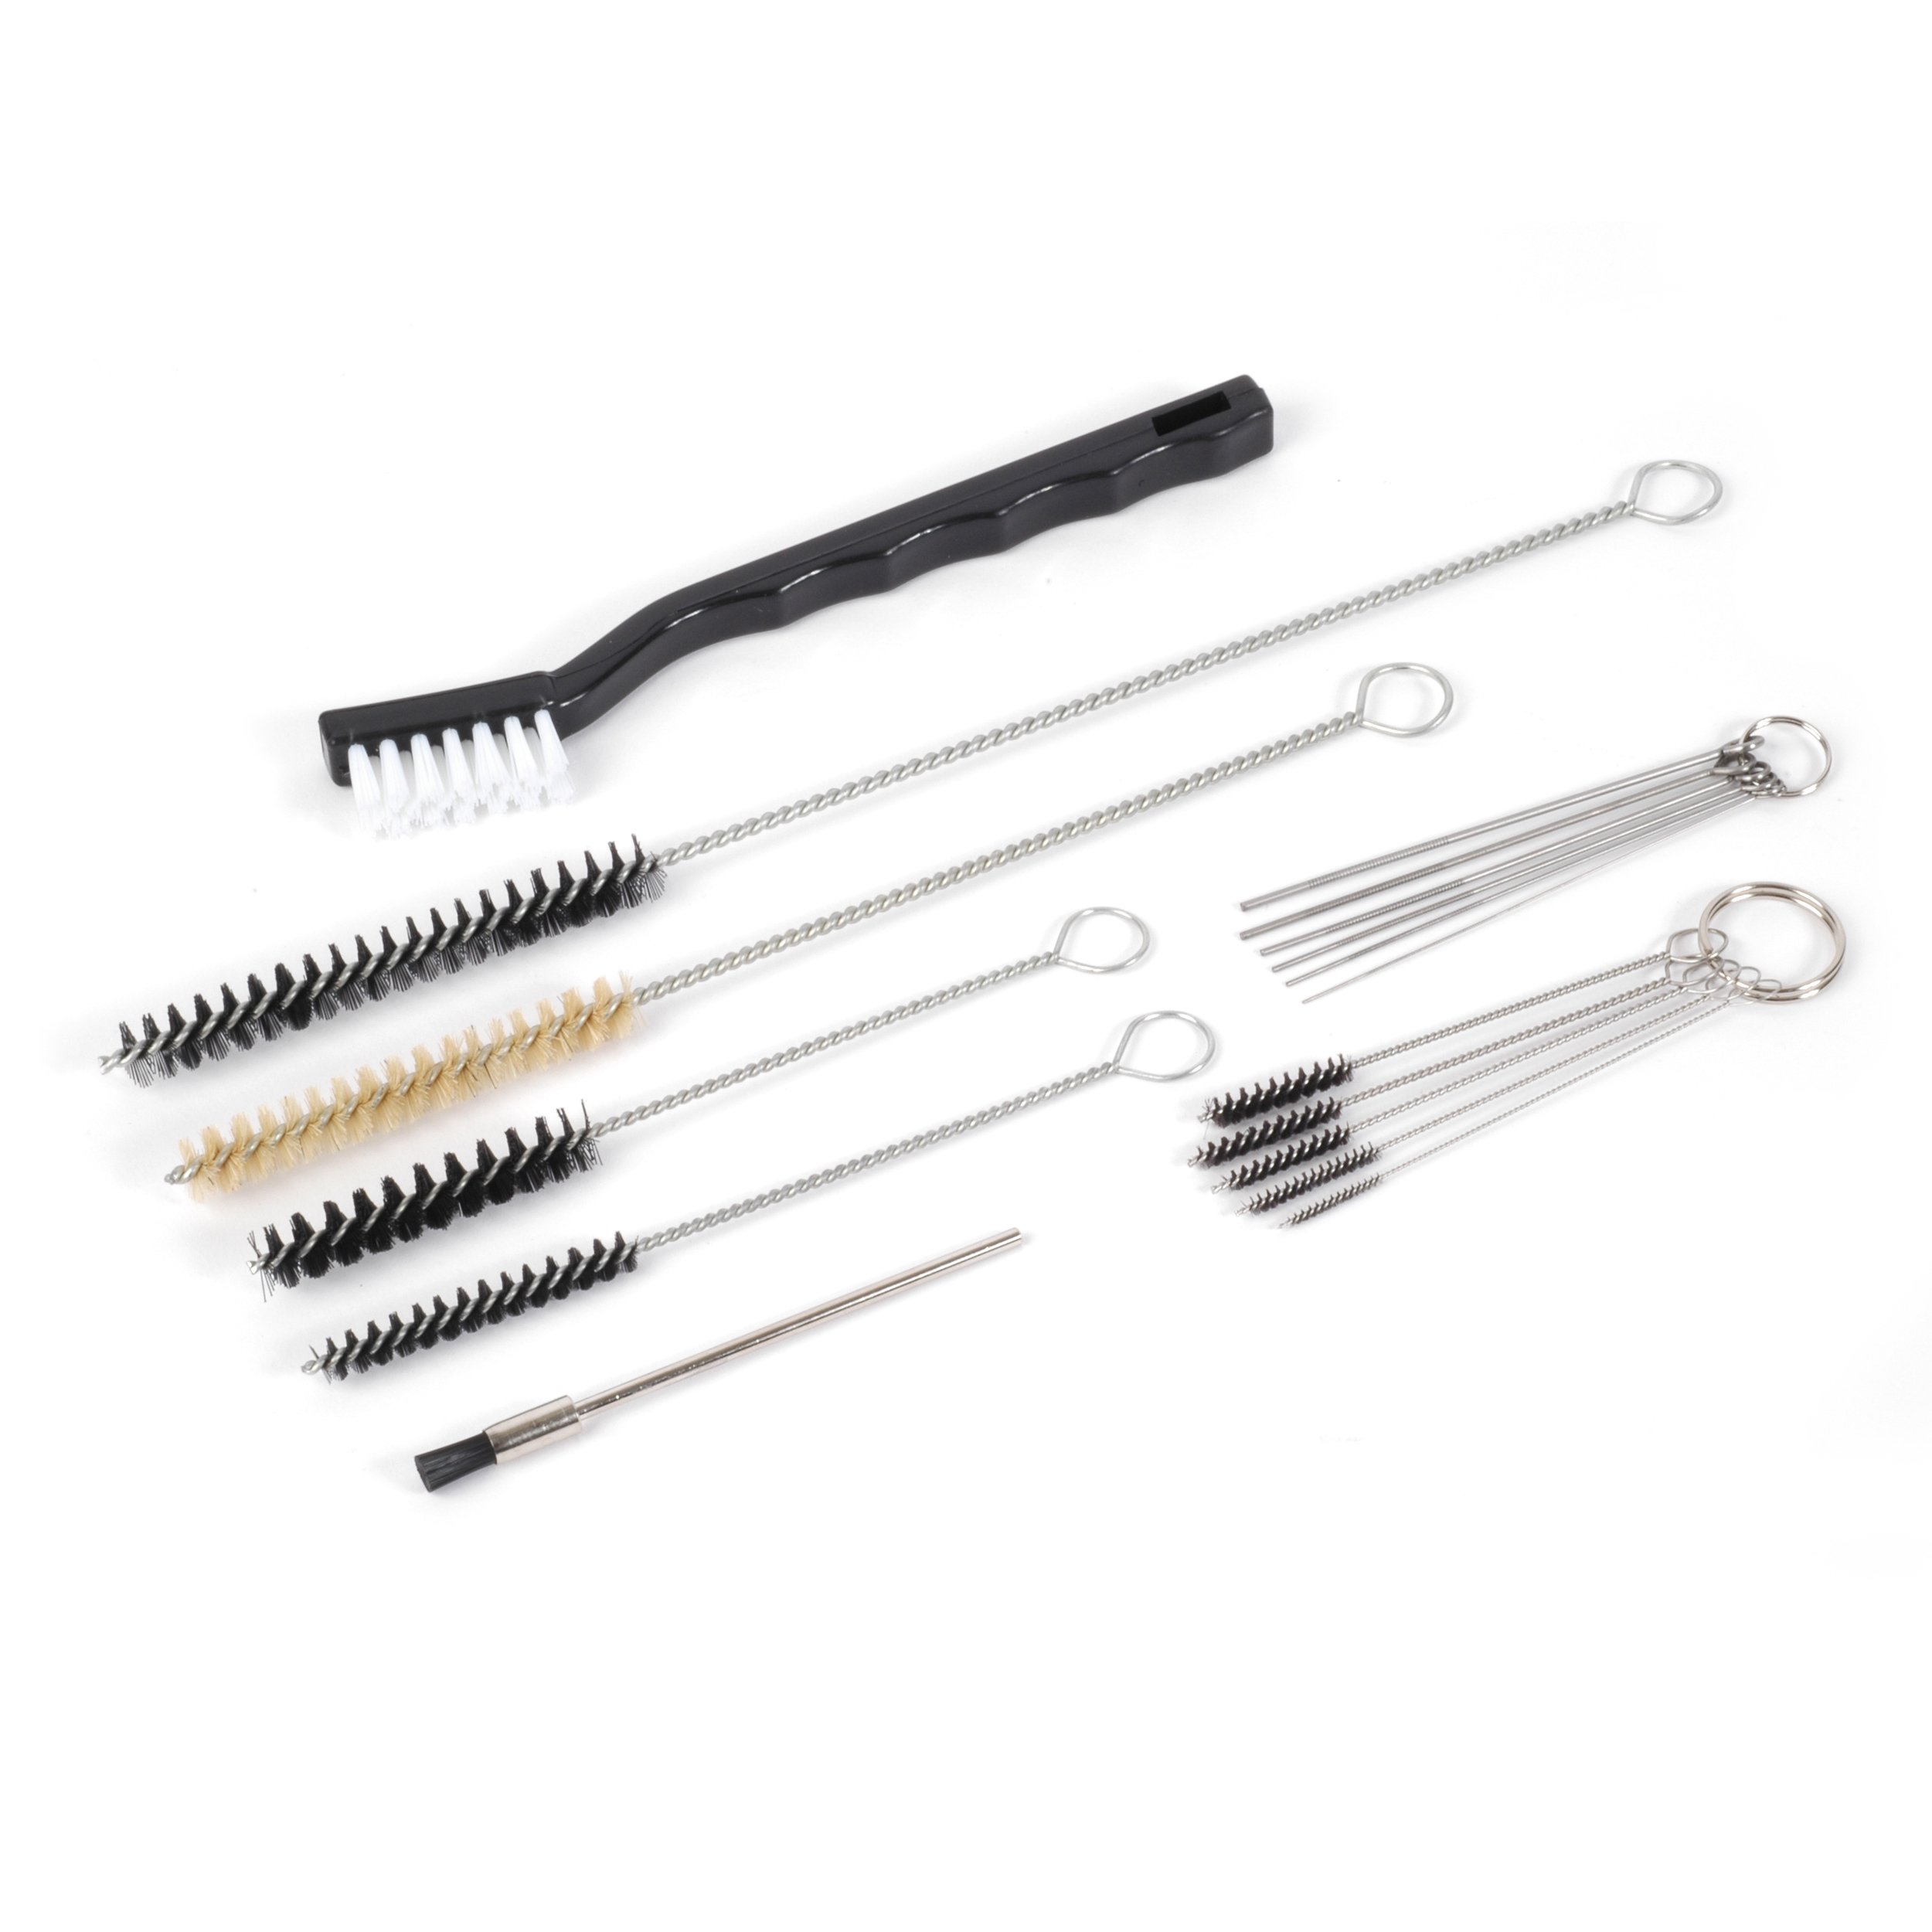
When you unpack the gun, it's protected with anti-corrosion oil, and needs to be cleaned before use. Remove the air nozzle and flush it clean in a jar of thinner. Keep this as your "For Cleaning" jar. Using and reusing as little thinner as possible conserves materials, conserves the environment, and leaves you with very little waste to dispose of. Carefully clean the threads on the nozzle and the gun to remove grease or metal particles left by the manufacturer. Fill the cup halfway with warm soapy water, fasten it to the gun, and then shake it vigorously to wash the cup and syphon tube. Spray the soapy mixture to clean and degrease the workings of the gun (follow the steps in "Using the controls" below). Next, clean the gun with lacquer thinner or denatured alcohol to remove what the soapy water couldn't. Wear protective gloves, a respirator, and work in a well-ventilated area — just as you must for all spraying. Note: Experienced finishers use the smallest possible amount of thinner or solvent when they clean a spray gun. This applies to both nitrocellulose lacquer and waterbase. As little as 1 oz. of thinner or water will clean a quart-size gun if you're careful; 2 oz. is more than enough. Rather than spraying thinner through the gun for cleaning, disconnect the hose and use a turkey baster to flush out the gun, siphon tube, and nozzle. Hold the gun upside down and let the fluid flow out the tip into your For Cleaning jar. Repeat the process with another rinse. Wipe the gun and cup dry. From time to time, the small amount of thinner in your For Cleaning jar will become too dirty to reuse. Never pour finishing materials into the sink or onto the ground. To dispose of small quantities of used thinner, evaporation is the best method — or perhaps spray it into the filter of your vent fan (where it will also evaporate). Use caution when handling flammable materials, and don't allow flammable rags to accumulate. The best place for them is outdoors in a metal container made specifically for this purpose. To connect to your compressor's air hose, your spray gun will need the proper connector. A male air hose coupling from an automotive supplier or hardware store can be threaded onto the gun's air connector (1/4" NPT thread). Use Teflon pipe tape on the threads. Common air hose sizes are 5/16" and 3/8" (Inner Diameter). For hoses up to 25' long, choose a 5/16" ID. For 50' hoses, a 3/8" ID is preferred. Adjust your air pressure regulator based on the hose length: The first time you use a spray gun, practice with water instead of solvent. Fill the cup 1/2 full, and blow all the gun parts dry afterward. The working range is between 15 and 50 psi, with smaller patterns requiring lower pressure. No two sprayers are likely to agree on the same settings, so it's a matter of personal feel. Some typical settings: Use the lowest pressure needed to atomize the finish and have it flow out. Start at low pressure, and if you see a pebbly look ("orange peel"), increase the pressure. The nozzle's 1.8mm orifice can spray many finishes without thinning, working fine for waterbase clears and sealers, solvent lacquers, and some thin varnishes. There are many approaches to thinning finishes, from "ready-to-spray" (no thinning) to a common mixture of 1 part thinner to 2 parts finish. Much more thinner will be needed for spraying light stains or for "melting in" (blending finishes on repairs). Before thinning, try spraying the material unthinned. If the gun sputters or spits, thin gradually until you get a fine spray pattern with no large drops. You may also need to increase the air pressure. After gently stirring sealer or lacquer, pour the entire quart into your Production Gun's spray cup. Stand the dripping can on end for a minute as shown, then flip the can over so any drips will fall into the cup — keeping the rim of the can clean. Put the lid on the can to keep it from gumming and drying. Spray with the gun held about 6-8 inches away from the workpiece and depress the trigger until it lays down a correct swath of finish (a "wet" look for nitrocellulose lacquer, a "half dry" look for waterbase lacquer). Hold the gun perpendicular to the surface being sprayed and move it parallel to the surface, keeping the same distance from the work throughout the spray stroke. Don't swing it in an arc, which will produce light coverage toward each side and heavy coverage in the center. Each pass should overlap the previous one by about a third. Moving the gun too slowly will cause the finish to puddle; moving too fast will leave the surface rough when it dries. To hold a guitar body while spraying, attach a handle to the neck pocket and spray with the neck joint toward the floor, butt end up. Start spraying along one side at the butt end, moving toward the neck joint. Spray the other side, starting at the butt end and again moving toward the neck joint. On the top or back, start at the butt end and spray across the surface from left to right with a vertical spray pattern (the spray pattern is changed from horizontal to vertical by rotating the air cap 90°). Overlap each pass by 1/3, and continue until the entire top or back is coated. By working from the top downward, any overspray droplets that fall downward are dissolved by the wet coat sprayed over them. Moving from the bottom up risks having this overspray land on the finish coat after it's sprayed. When spraying onto a vertical surface, move quickly enough to avoid sagging or runs from too-heavy coverage. If you're spraying nitrocellulose lacquer on and off throughout the day, you don't have to clean the gun until you're done spraying for the day. At that time, detach the gun from the air hose and release the gun from the cup. Pull the trigger so the lacquer in the gun body drips back into the cup. Then follow the cleaning instructions described above. Very likely, some thinner will remain in the cup; leave it in there and fasten the gun back onto the cup until next time. Don't pull the gun's trigger after you're done, so the little bit of thinner in the gun's body stays there, keeping the parts clean and free from sticking. This approach doesn't work for waterbase finishes, however. After every use, waterbase lacquer should be returned to the can, and the gun should be flushed and cleaned with water. Drain the finish from the gun, then add a little water to the spray cup. Swish it around, then spray some through the gun to empty it of finish. Wipe any finish off the parts; then the gun is ready for rinsing in a sink. Hold the gun upside down and flush it with warm water running through the siphon tube and out through the spray nozzle. Dry all parts before putting the gun away. Option: If you have a spray cup cover (available at most automotive finish suppliers), you can leave either nitrocellulose or waterbase lacquer in the cup and cover it — cleaning only the gun. Before covering the cup, release the finish from the gun body into it. Lightly lubricate your spray gun at the four areas marked "OIL" in the photo on page 2. Use a very small amount of light machine oil, and never use a lubricant containing silicone. Oil these parts regularly, to keep them working freely. Most spraying problems are the result of finish building up at the air nozzle or because a fitting is loose. If your gun won't spray correctly, the likely causes and solutions are listed below. Problem: A dry coat, spitting, or no spray at all. Cause/Solution: Blocked air vent hole in the cup lid. The anti-drip hose and nipples need to be cleaned. Use a toothpick or small brush to remove any dried finish. Soak the lid and anti-drip hose in solvent if necessary. Problem: Finish bubbles inside the cup, or spits around the air nozzle-retaining ring. Cause/Solution: Air leaks. Usually an air leak simply means the air nozzle is loose — tighten its retaining ring. Air leaks also occur if threaded connections are loose. Use Teflon tape on the gun's threaded air input before fastening your hose connector and on the threaded coupling between the gun body and the fluid nipple. Finally, the needle-packing washer may be dry and worn, or the hex-nut cap that tightens the packing may be loose. Problem:Spray pattern is curved into a sausage shape. Cause/Solution: Material buildup on the air nozzle. One of the side-port holes is blocked, so air is coming only from the opposite (clean) port. This forces the fan pattern in the direction of the blocked horn. This problem may also be caused by a partially-plugged fluid nozzle. Remove the air nozzle and soak it in thinner. Squirt thinner through the blocked side-port holes until they are clean. You may need to poke a toothpick or broom straw into the holes to clear them, but never use a metal object to clean them. Problem: Pattern is heavy and wet toward one end. Cause/Solution: Material buildup around the outside of the fluid nozzle orifice, or a partially-plugged fluid nozzle orifice. A loose air nozzle may also be the cause. Remove the air nozzle, soak it in thinner, wipe it clean, and be sure to keep it tight. Problem: Spray wet and heavy in the center. Cause/Solution: Too much material, or the material is too thick. Reduce the air pressure, or increase the material flow. Thin the material. Problem: Spray is split, or heavy and wet on the ends of the fan pattern and weak and dry in the middle. Cause/Solution: Air pressure is too high and you're not spraying enough material. Or, you may be spraying a thin material and attempting to get a fan pattern that is too wide for thin material. Reduce the air pressure, or increase the material flow. Also, with the fluid needle wide open you can reduce the spray pattern size by turning the fan control valve inward clockwise. Perhaps you should stop, and start over, adjusting the spray gun from ground zero. Problem: Spray fan is intermittent and pulsating. Cause/Solution: There may not be enough material in the cup, and if you tip the gun excessively, the siphon tube sucks in air and causes sputtering. The material may be too heavy for the gun. Often there's an obstruction of dried finish somewhere — look for it. Check for a loose fluid nozzle, or a damaged or dirty fluid nozzle seat. A loose or cracked siphon tube may be the culprit. Look for a dried needle packing, or perhaps a loose or defective swivel hex-nut that connects the gun body to the cup. Fill the cup 1/2 to 2/3 full, and don't over-tip the gun. Back out the needle packing hex-nut and put a drop or two of light oil on the packing (or replace the packing if it can no longer make a seal). Tighten the fluid nozzle, or remove it to clean the contact areas with thinner. Thin material that is too heavy to spray. Note: The factory seats the fluid nozzle very tightly. When removing the fluid needle for the first time, hold the gun in a padded vise and use either a 22mm open-end wrench or an adjustable Crescent wrench to loosen it. When you re-install the tip, apply just enough torque to snug it. However, the fluid nozzle seldom needs to be removed for cleaning if you are conscientious about cleaning the gun regularly. Problem: When triggered, fluid needle moves sluggishly or not at all. Cause/Solution: Finish buildup between fluid nozzle orifice and needle — sealing them together; dirty, gummy needle shaft or packing. Remove the air nozzle and submerse the fluid nozzle portion of the gun in thinner until the hardened finish softens. Then back out the needle packing hex-nut; if the needle is stuck in the packing, squirt some thinner into the packing to loosen it (otherwise you can't remove the needle). To remove the needle, back out the fluid adjustment valve all the way and remove the compression spring. Pull out the needle, and clean it with thinner. Sight through the needle passageway and out through the fluid tip— if it's blocked, clean the passage using a thinner-drenched pipe cleaner. Clean or replace the needle packing before reinstalling it, and put a drop or two of light oil in the packing hole. Every so often, remove the spray gun head from the lid/siphon tube and run a bristle cleaning brush dipped in thinner through the top of the of the siphon tube at the swivel hex-connector, and out the other end. Clean off any residue from the bristles, dip the brush in thinner, and pull it back through the siphon tube. Repeat this several times. At times, when removing, cleaning, and replacing threaded fittings, put a small amount of lithium, white grease, or gun lube on the threaded parts. This makes removing them later much easier and provides a more airtight fit. The nozzle should be seated firmly; if not, the gun may sputter when using it. Air lines can be iron, copper, or flexible rubber hose. Our preference is galvanized iron pipe with plumbing fittings as connectors. The heat of compressed air allows it to hold more moisture than cooler air. As the compressed air cools, the moisture condenses in the tank and air lines. As the pressure is released at the gun, the air is cooled even more, further contributing to condensation. Condensation can cause "blushing" in a sprayed finish (blushing is a blueish-white haze indicating moisture trapped beneath the finish — it usually goes away when dry). So run your air lines at a slight uphill angle to drain back toward the compressor, and include drain points with valves. Drain the compressor tank and the drain points frequently. Also, a long run between the compressor and the spray gun is better than a short run (a 50- to 100-foot line is ideal). Don't lay flexible rubber air hose on a concrete floor (as so many do) because it adds to the condensation problem. To further decrease moisture problems, install a regulator, filter, and moisture trap at the end of the air run, near the spray gun. There are a variety of setups available, including combination regulator-filter-moisture traps. The regulator adjusts the spray pressure, and the filter and moisture trap remove oil and water from the compressed air.
Cleaning and setup
Connecting the air hose
Using the controls
Air pressure affects results
Thinning
Filling the spray gun

Spraying
Cleaning up after nitrocellulose lacquer
Cleaning up after waterbase lacquer
Maintenance
Troubleshooting

Occasional Cleaning:
Occasional Lubricating:
Air-compressor Setup

