Build this bypass pedal to turn your stompboxes OFF!
Are your inline effects ever REALLY off?
Build this bypass pedal to turn your stompboxes OFF!
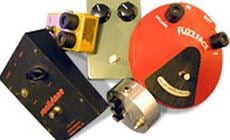
Some effects pedals aren’t true bypass.
Some effects pedals aren’t true bypass. Even when the pedal is off, the guitar’s signal still passes through the circuitry, causing a slight coloration of the tone. This is especially true of vintage style boxes. The more pedals in your effects chain, the more tone is sucked out of your signal to the amp.
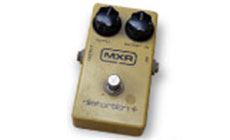
This old MXR Distortion+ pedal is a good example.
It’s been a regular part of my live rig for years. It’s not a true bypass pedal; I can hear a difference in my tone when it’s in line but not in use.
So I wanted a stomp switch to take this pedal completely out of my signal when not in use. (You probably need this pedal, too.) I turned to my friend Dr. Tony Balls for help. The good Doctor’s been building me custom pedals for a long time, so I asked him how to wire up a simple, bulletproof, true bypass.

Here’s what the Doctor ordered
Tony told me how to make this simple wiring project that’s fun to build. Following his instructions, here’s how I made myself one:
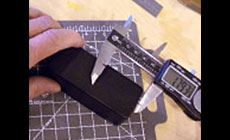
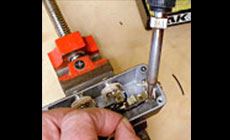
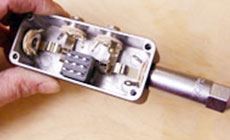
I started with a small project box from an electronics supply. This box is a Hammond 1590A-BK. I measured and marked locations for five holes (4 input/output jacks and 1 stomp switch). Using brad point bits, I drilled 3/8" holes for the jacks and a 1/2" hole for the switch.

I decided not to include an indicator light. Adding a lamp circuit would mean making room for a battery and more wiring. I wanted a super-compact pedal.
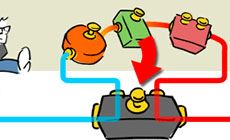
The wiring diagram is super-simple, and not much wire is needed.
The photo below shows why it's important to measure before drilling holes: these jacks are just barely far enough apart to avoid shorting against each other! Notice too that there’s no wire connecting the ground lugs of the jacks. There’s no need to wire them because they’re mounted in an electrically conductive metal case. The case supplies the common ground, keeping things tidy inside the box.
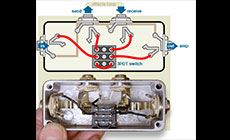
If you use a box made of high impact plastic or other non-conductive material you'll need to add that ground wire (indicated in tan on the diagram).
Speaking of other boxes...
You don’t need a project box like mine to build this pedal. Just to prove the point, here’s one I made from a can of bean dip!


Here’s my finished pedal.
Kinda dull compared to the bean can, but a lot more stompworthy. I plug my guitar in from the right, the signal to the amp goes out the left, and the effects loop through the other two jacks. A quick stomp, and the pedals are in or out — really out — of my signal. Pretty cool huh?
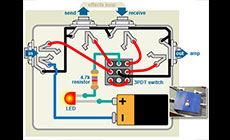
Want to add an LED indicator?
This diagram adds a light to tell you when the loop’s in use. You’ll need a stereo jack for the input, 3 mono jacks, a battery mounting clip and connector, a standard indicator lamp and a 4.7K resistor.
To fit the battery along with the switch and four jacks, you'll need something bigger than a bean dip can. Hmmm, I’ll think of something...