Acoustic guitar pickups: installation problems to avoid
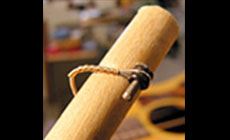
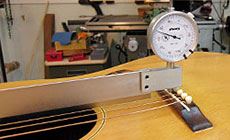
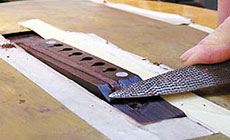
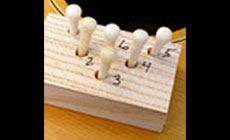
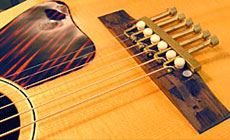
I had a visitor Friday night: Jorma Kaukonen (of Jefferson Airplane and Hot Tuna fame) brought over his Gibson J-35: "Dan, my saddle pickup isn't sounding right. Some strings sound weak, and others are too strong. And this guitar sure could use a refret, too." Jorma hoped to pick the guitar up Monday morning to take it to Nashville for recording. That's a lot of work for one weekend! But Jorma's a pal, and I'm happy to help. I managed to get it all done, and also came up with this important tip for everybody who uses undersaddle acoustic pickups... An undersaddle pickup needs firm contact with the entire saddle from end-to-end. The bottom of the saddle has to be flat, and so does the slot... Otherwise, you'll have gaps that deaden the response. Also, the saddle has to sit upright in the slot with some freedom to move, like a piston in a cylinder. If it's tipped at an angle, it'll bind up in the slot, and that's another way to ruin the sound. Jorma's J-35 had a problem I've seen before: when the pickup was installed, the strings were removed (of course), and when the guitar was strung back up, the top became arched from string tension. Also, the saddle was loose, and it leaned forward from the pull of the strings. This was double-trouble: bad contact with the pickup, and a saddle that's jammed at an angle and can't move. I used a brace repair jack inside the guitar to lift the bridge and simulate string tension while routing the new saddle slot. This way, the slot is flat when it's supposed to be: when the guitar's tuned back up to pitch. The best Gibson flattops have lightly-braced, thin tops. Under string tension they curve into a dome, sometimes forcing their bridges to tilt forward. When the saddle is too tall (3/16" or more), it can't help but lean forward. To make matters worse, if thesaddle is loose it tips forward, making poor contact with the transducer under it. The result is unbalanced, unpleasant sound. Before taking the strings off, I took some measurements: with a neck set gauge mounted on a straightedge, I checked the height of the bridge under string tension. (With the strings off, the top sank down by .024".) I also noted that the saddle was tipping forward by about 4 degrees. That's bad! We'll want the new saddle to sit up straight. I wanted to start fresh by cutting a new slot, so I routed the old slot clean and filled it with Brazilian rosewood to match the bridge. I glued my rosewood patch with slow setting epoxy (8 hour cure time) and went to bed. Up-and-at-'em on Saturday morning, I leveled the rosewood patch with coarse and fine Dragon rasps. (Notice my sheet brass "bib" surrounding the bridge: always protect the guitar top!) I followed the rasps with a scraper blade, leaving a smooth surface that'll make this patch almost invisible. My neck set gauge fastens to a 24" precision straightedge, and is held upright by a slotted block of wood (above). Another block keeps the bridge pins in order: Now it's time to establish the saddle position: The Intonator handles that. To avoid the previous installer's mistake, let's not rout the slot with the top "at rest" again. Here's where the brace jack comes in: I'd recorded the height of the bridgeunder string tension, so now I returned the bridge to that state by lifting it from inside with the jack. With the top arched as if it were strung up, I routed the slot. This new slot will have a flat bottom when the guitar's tuned to pitch. We know the strings are going to pull the saddle 4° forward on this guitar, so we'll compensate by cutting a slot that leans back 4° toward the bridge pins. When it's strung up, the saddle will sit upright and move in the slot, transferring string vibrations to the pickup underneath. To create a back-tilted slot, I put a shim under the front edge of my saddle routing jig. This tipped the Dremel tool 4° while I cut the new slot. In this photo, you can see the tilt of the new saddle blank in the slot. When strung back up, the bridge tipped forward as planned, and this new saddle sat perpendicular to the strings and was able to move like a piston above Jorma’s Fishman Acoustic Matrix transducer. The hard work was done, and I moved on to the new nut, new saddle, and new bridge pins. Jorma's choice for tone on all of these is bone. The J-35’s warped plastic bridge pins went straight into the wastebasket. The new bone pins sat a little tall, so I slightly reamed each hole with a 5° pin hole reamer, giving each hole just a twist, not even a full turn. I gave each pin a custom slot to match string sizes, using a bridge pin slotter. With the head of each pin well seated, each string is held snug, with its ball end firmly against the bridge plate below. I notched these custom-slotted pins with tiny nicks from a nut file (I, II, III, IIII, IIIII, no mark on the 6th). This way, Jorma will know which pin goes where when he changes strings (he uses Gibson Bronze-wound lights, gauged from .012" to .052"). Along with a careful refret, the nut and saddle were replaced with vintage bone. All the work went faster than I expected, and the guitar was finished by mid-afternoon Sunday. That gave it some time to settle in and get comfortable with all these changes it just went through! Monday morning it was ready to come out singin' when Jorma took it to Nashville! Success! I pre-bend strings before installing, so the ball ends sit right up against the bridge pad. My string-bending stick is a wood dowel with an L-hook made from a #4 finish nail.Acoustic guitar pickup doesn't sound right? Don't blame the pickup, blame the installation!

Solving an acoustic pickup's sound problems
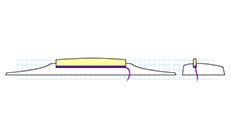

That saddle slot might have been flat when it was routed, but under tension it wasn't flat anymore.
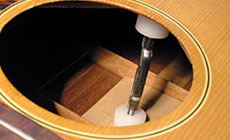
Neat trick: Jack up the top to simulate string tension
Flattops aren't flat.

Measuring bridge height
Shaping the replacement patch


Install the new saddle
Now let's deal with that forward-leaning saddle
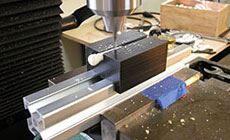
Routing the slot — with an added angle

Bone for tone