3PDT Stomp Switch Instructions
How to install the 3PDT Stomp Switch as a true bypass in old and new effects pedals.
Ever notice how a wah-wah and other vintage effects color your sound and mess with the tone of your other pedals, even when turned off? That's because many guitar effects aren't wired for a true bypass. This will muddy your tone, and cause other effects in the signal chain to lose volume. The 3PDT switch (triple-pole, double-throw) allows you to modify your effects for true bypass and lets you wire a status indicator LED. This is useful for stage performers, as it leaves no question if the "box" is on or off. Here are some diagrams for the true bypass modification. They work for most wah-wahs from the 1960s through the '90s. All you need are basic soldering skills and this switch. 1) Unsolder the wires to the SPDT stock switch, remove it, and install the new 3PDT. 2) Find the input jack terminal "tip," and unsolder and disconnect only the short wire that connects to the circuit input (marked #1 on the circuit board diagram). Unsolder and remove it here as well. Leave the long wire on the input jack "tip" terminal and re-solder it to make sure there's a good connection. 3) Run this wire from input jack "tip" to 3PDT terminal #4, but do not solder it yet. 4) Attach the wire from the 3PDT terminal #4 and jumper it to #3. Solder both terminals. 5) Attach a wire from the output jack "tip" to 3PDT terminal #5 and solder. 6) Run a wire from PCB terminal #1 up to 3PDT terminal #2 and solder. 7) Attach a short wire from wah pot terminal #3 to 3PDT terminal #6 and solder. 8) Attach a short (ground) wire from wah pot terminal #1 to 3PDT terminal #1 and solder. Congratulations, you're done! Note: with this wiring, no 1-meg "pop suppression" resistors are necessary. 1) Unsolder the wires to the SPDT stock switch, and install the new 3PDT. 2) Cut the brown wire at "X" where it meets the PCB quick disconnect, and tape off the cut-off wire coming from the connector. 3) Re-route the brown wire to the 3PDT terminal #3. Do not solder it yet. 4) Jumper a short wire from 3PDT terminal #4 to 3PDT terminal #3 and solder them both. 5) Attach a wire from the output jack "tip" to 3PDT terminal #5 and solder. 6) Run the green wire from the PCB disconnect to 3PDT terminal #2 and solder. 7) Attach a wire from wah-pot terminal #3 to 3PDT terminal #6 and solder. 8) Attach a ground wire from wah-pot terminal #1 to 3PDT terminal #1 and solder. Congratulations, you're done! To wire an LED status indicator, you'll need a resistor, some insulated hookup wire, a LED, and soldering supplies. All of these items are available at your local Radio Shack or other electronic parts supply stores. Refer to diagram #3 to wire a single color LED, and diagram #4 for a 2-color, 3-lead LED. Before connecting the LED, be sure to check the manufacturer's specs on which lead is the cathode (-) and the anode (+). You must also be sure to use the proper value resistor to supply the correct amount of current to the LED. To calculate the correct size resistor, subtract the LED voltage from the battery voltage, then divide by the LED's current consumption (in amps) to give the necessary resistance. For example, a red LED normally runs at 20 milliamps at 2.2-volts. If you use a 9-volt battery you have (9V - 2.2V) / 0.02 amps = 340 ohms. 100 to 330 ohm resistor usually work fine. Depending upon your calculations, you may want to choose a resistor a little smaller to account for the battery running down. Have fun!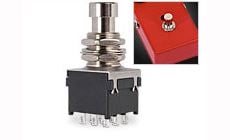
True bypass for 1960s-'80s wah-wahs and other effects (diagram 1)

True bypass conversion for printed circuit board effects (diagram 2)

Wiring a status indicator LED


