Nut Making and Setup
How to replace a nut and setup your guitar, with setup specs from different players and factories.
"There are two parts to this booklet. First is a short guide to making a nut. This is from my new DVD Nut Making Step-by-Step and includes images taken from the DVD. The second part is A Guide to the Great Setups — setup specs for famous players. These come from the last chapter of the book, How To Make Your Electric Guitar Play Great. It took me a while before my skills got good at nut making and setup, but I hope this info helps you make a perfect nut on your first try!" — Dan Erlewine
Adjust the truss rod
Before doing anything, adjust the neck until it's straight. If you make a nut when the neck is up-bowed, the slots could be too deep if you straighten the neck later. Loosen the truss rod adjusting nut (remove it if possible), clean rust and dirt from the nut and truss rod threads, then lubricate both parts with some paste wax or Vaseline before replacing the nut.
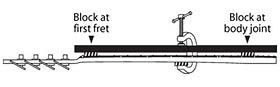
TIP: I always help the neck to adjust by leaving the truss rod nut loose while back-bowing the neck. I do this with a long bar resting on two spacers and clamped toward the center, with a curved caul on the back of the neck.
| Remove the old nut First, use a sharp blade to score a line on the finish around the nut. This way, when the nut breaks free chipping of the finish will be at a minimum. With a hammer, gently but firmly tap a hard solid object against the fretboard side of the old nut. (I use a 4" x 2" x 1" steel block, but a hardwood block works, too.) Tap from the front (fretboard) side, then from the back (peghead) side. Repeat tapping front/back, front/back, until the nut loosens and you can wiggle it out. |
 |
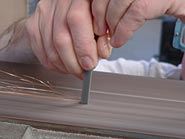
| Nuts tap out easily on old guitars, but not on new heavily finished ones; sometimes you'll need to saw through the nut lengthwise (across the string slots), stopping when you're almost down to the bottom. With this gap cut into it, you can collapse the nut inward on itself and remove the pieces. I use Fret End Nippers to squeeze the split nut together, but a pair of pliers will do. |
 |
| TIP: By placing a small mirror on the opposite side of the nut, you can watch the depth of your saw cut from both sides at once. Mirrors are handy in lots of ways — like looking at both ends of a fret as you work on it. (You'll probably be doing this after you learn to make a nut, because you'll get hooked on setup work just like I did!) |
 |
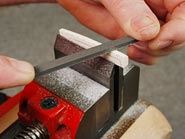
| Clean the nut slot Scrape, cut, or file away any old glue or finish residue from the sides and bottom of the nut slot. Make the slot square and clean, but don't remove wood or any of the finish at the edges! Our nut-shaping files are good for cleaning up the sidewalls of the slot: the smooth untoothed edge of the file rests on the bottom of the slot. These files are sharp, though, so if you use them for slot-cleaning you'll first want to blunt their outer edges on a stone, sandpaper, grinder, or belt-sander. A professional might also use Micro Chisels and Nut Seating Files to prep the slot bottom. However, you can do the job by sharpening the end of a nut-shaping file, turning it into a chisel/scraper: TIP: Use a belt sander or grinder to put a square, sharp, flat end on the file. Then use the sharpened end like a bulldozer to push through the dirty slot. It will scrape and chisel away dried glue from the nut slot bottom, and file the sidewalls at the same time if you like. With this or any tool, make your cutting/filing strokes inward from the edges to the center. Don't cut out toward the edges, because you might catch the lacquer and chip it. Choose your nut material I like bone nut blanks, except when used with a tremolo. Tremolos work well with slippery nut materials like Slip-Stone and Graph Tech, although a smooth-bottomed, perfectly shaped and polished nut made of bone can work as well. Vintage bone is unbleached, and it's my all-around favorite. I'll use it unless a customer asks for the white look of bleached bone. The bleaching process seems to soften the bone considerably as it whitens it. Vintage bone is significantly harder, and in my opinion it produces a better tone. Sometimes its amber color isn't what the customer wants, but generally I think it's better looking than white. Try dropping a vintage bone nut a few inches onto a hard table; compare its ringing sound to a nut of synthetic material. Whatever material you use, start with a nut blank that's close to the final thickness and length you need, to eliminate needless sanding and wasted sandpaper. |
 |
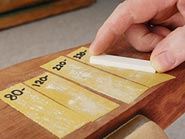
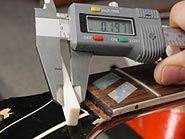
| Fit the blank to the slot Carefully square up the nut blank to fit the slot by sanding its bottom and sides on a flat surface. Use double-stick tape or self-stick sandpaper to make a sanding surface. Don't spend any longer on one grit than is needed: keep an eye on the blank's thickness, and always switch to the next finer grit slightly before you think you actually need to. Avoid making the blank too thin for the slot. Start with 120-150 grit for flattening, and switch to 220 grit just before the nut fits the slot. Then 320-grit will add just enough smoothing to let the blank drop into the slot. Any sandpaper will work for this, although my favorite is the Mylar/adhesive-backed Stikit gold sandpaper. In my shop we say that we like to "hear the nut click into the slot" (don't expect that to happen first time around, but it might). A series of sandpapers fastened to a flat sanding board is handy. Each grit you need is right there every time. Don't sand the ends of the blank—you want it to hang out of each side of the slot. You'll trim and final-sand it later. By leaving the ends plenty long, you have the option of tapping either end to shift the position of the nut as you work. Calipers are a big help in sizing the nut blank accurately, but a simple ruler that measures in 64ths, coupled with a good eye, will do. Rough in the nut height and shape The top of the nut is shaped to follow the radius of the fretboard, and the string slots also follow this curve. To allow the strings to clear the top of the first fret, the bottoms of the slots should be .030" higher than the fret height. Use your feeler gauges to find the fret height by laying a straightedge across two frets and combining the gauges in a stack until they barely slide under the straightedge. Add the .030" gauge to this stack (if you're already using the .030" gauge, recombine the feeler gauges so you have a stack that's .030" higher than the fret height). Lay your stack of feeler gauges on the fretboard against the nut, bending them to match the fretboard radius. With a sharp pencil, draw a line on the nut that follows this curve. This line indicates where the bottom of the string slots should be. Draw one more line to mark the top of the nut: this distance should be one-half the diameter of the thickest string. This leaves enough bone for a slot that holds the strings without being too deep. It's best to leave a little too much height; later, you'll fine-tune the string heights by lowering one string slot at a time. (A radius gauge is also a good tool for drawing these curved lines on the face of the nut.) |
  |
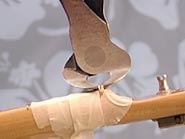
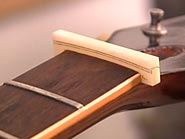
| Finally, pencil-in the approximate shape of the nut when viewed end-on from the bass or treble side. The back edge of the nut—facing the peghead—is angled, and later will be smoothed and rounded. Shape the nut top and backside Use the Nut and Saddle Vise to hold the nut blank, and file the blank to the shape you've drawn, using the coarse and medium files (in that order). Don't try to finalize the shape yet; instead, leave some material to work with when you're final-shaping later. At this point, the width of the nut is still oversize (if placed in the nut slot, the ends overhang). Lay out the E string positions Determine the width you want between the two outside E strings. A good measurement is about 1/16" in from each end of the first fret (measuring from the top of the beveled fret ends). Put the two outside E strings on the guitar and, looking straight down on the top of the nut, move these strings together or apart until their spacing is correct for you. With a very sharp pencil, mark the nut on each side of both strings (four marks total). Loosen the strings and slide them aside. Mark a thin centerline between the two marks for each string. |
  |
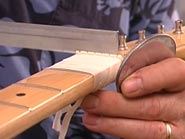
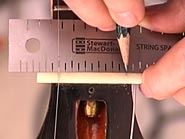
| Use the String Spacing Rule Match these two slots to the String Spacing Rule, and use it to find the proper spacing for the remaining four strings. The String Spacing Rule locates string positions so that heavier strings get the wider spacing they need. The Rule's spacing is progressive, so each space differs from the next by exactly .004". This creates the comfortable string spacing that players expect from quality instruments, and eliminates the need for laying out the spacing by eye. There are two sets of marks on the rule — one set is located in the spaces between the other set. Also, the slots in one set are close to the rule's edge, while the other set is slotted farther from the edge. Use either set of marks, but don't mix the two: choose your string locations from the same set. If you mix the two, your strings will be irregularly spaced. Align any slot on the rule with your mark for the treble E string. Count out size marks to the left (for a banjo or bass, count four marks). If the sixth mark in the same set doesn't exactly match your other E string position, slide the rule right or left until you find a series of six marks that are a perfect match (you might find it in either of the two sets of marks). Again, be sure all of the marks are from the same set. When you've found the set of six marks to fit your spacing, pencil in the location of the four middle strings. Place the rule on top of the nut and use a very sharp pencil or a scribe to mark through the slots. The advantage of using a scribe is that it will scratch a shallow groove that's easy for a file or saw to follow. |
 |
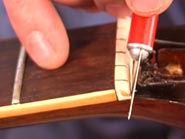
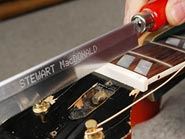
| Cut starter slots Now you're ready to cut small starter slots. Be careful not to cut too deep. A good tool for this is your .010" Gauged Saw. If your starter slot strays from the mark, tip the saw at an angle to move the slot back as you cut. Be careful: a saw removes material fast, so work slowly. You shouldn't rush this job in the first place! Use the vise to protect the guitar To avoid marring the guitar, put the nut back in the vise while filing the string slots. Use the Double-edge Nut File size that most closely matches the string. As the slots deepen, use Nut Shaping Files occasionally to remove excess nut material from the top to keep the slotting file from binding in the slot and possibly chipping out a chunk of bone (this does happen). Lowering the top also lets you see what you're doing. Use the String Spacing Rule frequently to check the slot locations, and move the slots from side to side if needed. When the slots are well defined, and their bottoms meet the .030" string clearance line, put the nut back in the slot and string the guitar to pitch to see how the action feels. It should be on the high side at this point. Sometimes the depth of a slot can be deceiving, and the string is actually lower than it looks. Then, as you final-shape the bottom of the slot the string suddenly drops too low and the string buzzes on the first fret. Avoid this by lowering the nut top even more than you feel like doing. You may have to take the strings in and out of the slots half a dozen times to lower the top on your first few nuts; later, with experience you'll cut that time in half as you gain confidence. Right now, working too fast is asking for trouble and risking that you'll "blow the nut." TIP: With the strings out of the way, lay the side of your head on the fretboard and, with back-lighting, look through each nut slot; you'll see the shape of the slot bottoms, and you may see a small uneven area that's holding a string up too high. Just removing that little obstruction alone can cause the string to settle into the slot, and there's no need to barge in with a file, taking material away where you'll wish you hadn't. (This kind of closeup is more than my eyes can do without a magnifier—that's why I'm wearing an Optivisor in so many pictures taken around my shop.) Back-file, and open up the slot Just before the slots reach the .030" clearance mark, you must angle the file slightly to create a shallow ramp that slopes down toward the peghead and tuners. An angle as shallow as 6°, and no steeper than 12-15° (or even just matching the slant of the peghead), will give the downward pressure needed to keep the strings from popping out of their slots. The angle of this ramp is not a straight, sharp line coming to a point at the front edge of the nut (which I call the "take-off point"); it's slightly rounded as it curves up the back of the nut, gradually meeting the string and adding strength to the take-off point. With a too-sharp take-off point, the strings (especially the wound stings) will wear away the front edge of the nut quickly. At the same time as back-filing, "open-up" the sidewalls on the back of the nut to ensure that the strings are not getting hung up in the rear of the slot. You want them unobstructed as they approach the take-off point. Use your Double-edge Nut Files to carefully remove a small amount of material from each slot. The D and G-string slots (on conventional 3-on-side tuners) will need some extra filing on one edge in the direction that the string angles toward the tuning post. Fender-style pegheads, with in-line string pull, don't need this touch. This shaping is subtle and hard to see, but when viewed from directly above, the sidewalls should open up very slightly from the narrower take-off point. |
 |
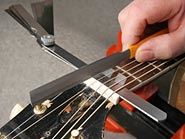
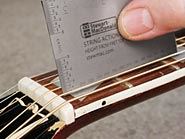
| Final slot height Take the slots to their final height with all the strings on and tuned to pitch. Use your Double-edge Nut Files for this job. De-tune one string at a time in order to file its slot, and then place it back in the slot and re-tune. As you get close, use your feeler gauges as an accurate way to stop at the string height you're after. Our frets in this example are .040" tall, so when we add .030" for string clearance we get a slot depth of .070". Stack the feeler gauges to this combined measurement, or close to it. File the slots until the file just nicks the feeler gauges and then stop. Now you've got a good general string height, and you're ready to fine-tune it if you like: leaving the heavier strings a bit high, while the treble strings get lowered, following the radius of the fretboard. Many pro players prefer the low-E string clearance to be set to about .020", and the treble E-string at about .010". The strings between are at graduated heights following the fretboard radius. Mark the final size Mark all around the overhanging nut edges with a scribe or razor-knife, then put it back in the vise to trim off the excess nut material. If there's much overhang, use your .010" Gauged Saw to trim the ends (you might rather use a hack saw for this, that saves the .010" saw for nut-slotting only). Then work carefully up to your scribed lines with the fine/extra-fine Nut Shaping File. Take your time — it's easy to "blow a nut" at this stage, at least in the looks department. A nut with a too-short end is still usable, but won't have a smooth professional look that's flush with the finish. Final shaping Final-sand and contour the nut using ever-finer sandpaper, 220, 320, 400, and all the way up to 1200 if you wish. If the sandpaper is resting on a surface such as felt, the "give" will follow the curves of the top, back, and ends as you sand. Follow this fine sanding by polishing with a soft rag and rubbing compound. At this stage, be careful whenever you move a string in or out of a slot. Don't scratch your handiwork! TIP: I use half-sheets of Gold sandpaper in grits ranging in order from 220-800, then half-sheets of 1000, 1200, and 1500-grit Unigrit Sandpaper (used dry). The last step is to buff the nut on a piece of felt that has been loaded with Medium Polishing Compound. The sandpapers and felt are in a stack on a clipboard, and can be gone through quickly: after using a sheet, lift it and use the next one below. At the bottom of this pad of sandpapers is the felt, and you're done. |
 |
| String it up! String the guitar to pitch, and final-check the string heights and nut shape. If you're happy, loosen the strings and glue the nut in lightly with 2 or 3 small drops of Titebond glue. Replace the strings quickly, tune back to pitch, and slide the nut from side-to-side to align it while the glue is wet and slippery. Leave the strings on to provide clamping pressure. After the glue dries for an hour, you‘re ready to play the guitar, or better yet, get on to your next nut-making job. Your customers will be standing in line! |
 |
| Part 2: A Guide to the Great Setups Here are over three dozen precise setup specs for guitars I've measured while interviewing and writing about the players who perform with them. This is pulled from the book, How To Make Your Electric Guitar Play Great! For more information, photos, and descriptions, check out the last chapter of that book. (It also includes a detailed "10-step Fender Setup.") These example specs are listed in the same order they appear in the book. |
|
     |
     |
    |
  |
    |
  |
    |
  |
