Tune-O-Matic setup: is the trouble with the bridge or the neck angle?
Let’s see if these common
questions apply to your
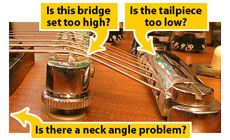
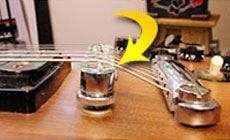
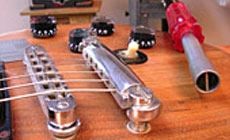
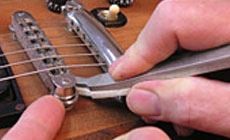
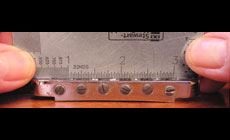
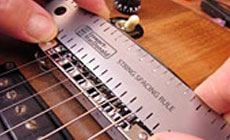
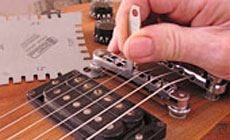
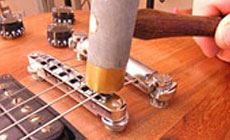
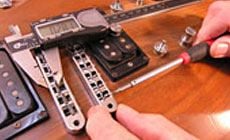
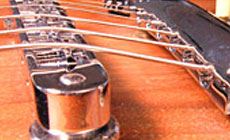
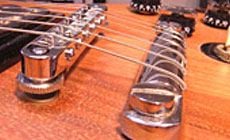
Tune-O-Matic bridge, too. Frank McDermott owns the Blue Eagle Music store here in Athens, Ohio. He does basic guitar setups right there in his shop, while sending repairs to my buddies at nearby United Lutherie. Frank did a good standard setup on this guitar, but an unhappy customer brought it back. When I stopped by Blue Eagle, Frank asked me to help him figure out what went wrong. The guitar is a 1979 Gibson “The Paul” flattop solidbody with a Les Paul shape. The problem: the strings were bending over the back of the bridge, instead of passing unobstructed to the tailpiece. (The arrow below marks the trouble spot.) “The customer thinks this is killing the tone. Is that a real problem?” asked Frank. The tailpiece was tightened down snug to the top, to solidly couple the hardware to the body for good tone. But when the strings touch the back of the bridge, I believe you’re losing tone because you're dampening the strings. It just has to reduce the natural, chimey, harmonic presence that we love to hear.* I always set the tailpiece high enough for the strings to clear the bridge. “I've seen plenty of Les Pauls with the tailpiece down low, and the strings don’t hit the bridge. What’s wrong with this guitar?” Its bridge has to be high because of the angle of the neck to the body. The optimum neck angle for a Les Paul is about 4°, but they vary between individual guitars from about 3° to 5°. This variation in angle is why the bridge and tailpiece need to be height-adjustable. The steeper the angle, the higher the bridge. That’s why you can’t crank the tailpiece down low without the strings hitting the bridge. I’ll set it up the way I think it should be, and let’s see if Frank’s customer gets happy. With a string action gauge, the top of the bridge measured about 11/16" off the body (to be fussy about it: 43/64”). With a stop tailpiece wrench, I raised the tailpiece until the strings cleared. (I always loosen the strings a bit before raising or lowering the tailpiece studs.) The guitar’s action over the fingerboard was set a little high, so I was able to lower the bridge slightly — and that gained a little more clearance. Under string tension, it’s hard to raise or lower a Tune-O-Matic bridge. Here I’m using a bridge jack to hoist the bridge up momentarily so I can turn the thumbwheels. I first saw this tool in the original Gibson shop in Kalamazoo, Michigan. They used it all the time, and it’s handy. This bridge, a Nashville Tune-O-Matic, had caved in from years of tension. It no longer had the proper saddle radius. The top of the bridge body should be straight like the edge of gauge in this photo, but look at it sag. StewMac stocks replacement parts and saddles for a bridge like this, but I decided to start fresh with our Nashville T-O-M bridge (an exact replica). I saved the old bridge in the guitar case (not that it’s of much value). Using the string spacing rule as my guide, I laid the strings out on the saddles for proportional spacing — the way I like it. Both the notched and understring radius gauges agreed that the saddle radius matched the 12" fretboard radius perfectly. To put string notches in the saddles, I used a shortcut I learned by visiting the Gibson shop: I simply tapped each string with the brass face of my fret hammer. The strings make their own notch. (Only do this with an old set of strings, since it ruins them! I’ll be putting new strings on.) This guitar didn’t have intonation problems, so I set the saddles in the new bridge to the same locations as the old bridge saddles. To do this, I quickly measured each saddle with a luthier's caliper and adjusted the new ones to match. The customer wanted the tailpiece tight against the body, believing it gives him “good sustain” (like “good tone,” that’s a highly subjective term, IMO). But there’s a way to get this kind of lock-down even when the tailpiece is raised up: I installed “jam nuts” — short 5/16" set screws — in the bushings for the tailpiece studs to contact. I measured with the depth gauge of my caliper to set the right depth, then cranked the studs down onto these set screws. This makes the studs tighter-than-factory. This new setup gave the customer what he was after — the strings don't touch the bridge any more. I can’t prove what getting those strings off the bridge did for the tone, but now he says he loves the way the guitar sounds. Frank’s happy now, too. And here's a simple way to raise those strings off the back of the bridge while keeping all original hardware: Lower the tailpiece back down to the body and run the strings through in the opposite direction. “Top-wrap” the strings up and over the the back of the tailpiece, and they’ll approach the bridge from a higher angle. If your fret hammer bangs and bounces against the
frets, it won’t keep those frets from springing back up.
Our new deadblow hammer’s shot-filled head (you can
hear the shot in there) strikes the fret with no bounce.
The energy goes to the fret, seating it with fewer
blows and less bounceback.Is this bridge set too high? Is the tailpiece too low? Is there a neck angle problem?

There's nothing wrong with this guitar.
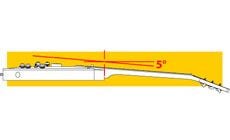
At 5°, this one’s on the steep side.

Quick Setup Tip
Lock down tight

Do you know why you want a dead blow hammer?