StewMac Acoustic Bridge Tools Instructions
These tools make difficult bridge repairs easier and more profitable.
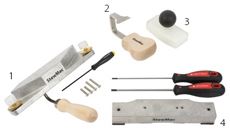
In a professional repair shop, these repairs are very profitable when you can do them quickly and accurately. With StewMac Acoustic Bridge Tools, you’ll do this work faster and better. The bridge plate (also called a bridge pad) is removed by applying heat to soften the glue, then separating it from the guitar top using the Bridge Plate Chisel. Heat is applied with the 3-In-One Caul, which has enough mass to work as a heating iron.
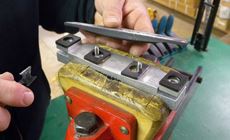
Before heating, remove the plastic-tipped brass thumbwheels from the 3-In-One Caul. The wheels aren’t needed for this procedure, and they could be damaged by the heat.
Follow all these steps as a dry run, without heat. Get familiar with the process, so you won’t fumble when you’re handling a hot caul.
Use a repair mirror to see the bridge plate inside the guitar. Note how near or far it is from the X-braces by the soundhole. Insert the 3-In-One Caul through the soundhole and move it forward to align it against the X-braces. Now move it back, positioning it over the bridge plate.
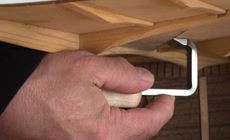
The threaded holes in the top of the caul will align with the bridge pin holes in the guitar bridge. Thread two of the provided machine screws through the bridge into the caul. This holds the caul in contact with the bridge plate. The series of holes in the caul let you fasten it toward the front or back of the bridge plate. Tighten the screws with the 5/64" hex wrench provided.
Now that you’ve done this dry run, remove the caul and you’re ready for heat.
Heat the 3-In-One Caul to 250° on a hotplate. Carefully move it into the guitar body; touching the soundhole edge can create scorch marks.
Align the caul with the X-braces as you did in the dry run. Don’t keep the heated caul on the X-braces longer than a few seconds, to avoid softening their glue. Position the caul over the back (wider) edge of the bridge plate and use the machine screws to tighten it in place. Heat the back edge of the plate for 2-5 minutes, then remove the screws and move the caul onto the front of the pad for another 5 minutes. Small bridge plates may not need to be heated front and back this way; they may be ready for removal after one heating.
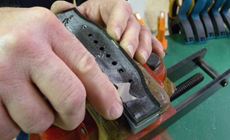
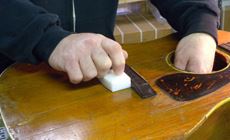
Remove the caul after heating the bridge plate. Try inserting the Bridge Plate Chisel between the heated plate and the guitar top, to see if the plate is ready to come off. If it doesn’t want to come loose, reheat the caul and repeat the glue-softening process. When working with the Bridge Plate Chisel, support the outside of the guitar top by pressing down with the Top Support Dolly. If you do not apply this counterpressure, you could accidentally crack the guitar top as you press against it with the chisel inside.
Some bridge plates release cleanly in one piece after heating, while some others will only come out in fragments. The 3-In-One Caul supports the bridge plate while gluing. It’s held in place with machine screws through two bridge pin holes. If your string spacing is 2-1/8", you’ll use the High-E and Low-E string holes; if you have a 2-3/16" string spacing, use the High-E and A string holes.
After cutting a new bridge plate to shape, hold it in place inside the guitar. From the outside, use a sharp pencil to mark the locations of the two bridge pin holes. Place the bridge plate on a backer board and drill out these two holes.
Spread glue on the plate and line it up with the holes. A repair mirror inside the guitar body makes it easier see what you’re doing.
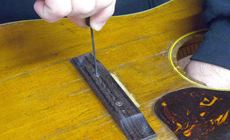
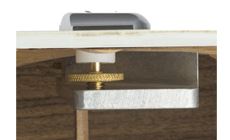
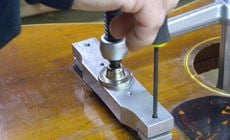
Position the 3-In-One Caul in the guitar. From outside the guitar, pass the machine screws through the bridge into the caul and tighten them down with a 5/64" hex wrench. Use the same clamping procedure shown for gluing a bridge below. There are two indexing screws for holding the bridge in place on the Bridge Clamping Caul. Determine the spacing that best works for your bridge. Use a 3/32" hex wrench to adjust the screws out just enough to hold the bridge without sticking through it. Clamp the caul in a vise while you scrape the bottom of the bridge clean and score it to add “tooth” for gluing. Our Japanese Fret Slot Cleaning Saw is a good tool for scoring the surface.
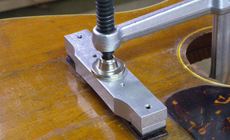
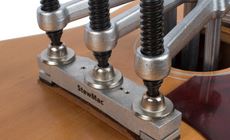
Spread an even layer of glue on the bottom of the bridge and put it in position. Attach the thumbwheels to the 3-In-One Caul.Position the caul inside of the guitar with the thumbwheels under the wings of the bridge. Run the attachment screws through the corresponding bridge pin holes and tighten them with a 5/64" hex wrench. Inside the guitar, raise the thumbwheels on the 3-In-One Caul so they are just snug under the wings. Use care not to overtighten and dimple the wood. Position the Bridge Clamping Caul onto the bridge with a sturdy clamp appying pressure to the center of the caul. Use a 1/8" hex wrench to apply downward pressure with the two wing clamps. Add another two or more clamps to get firm, even clamping pressure across the bridge.
Clean off any glue squeeze-out before it has a chance to dry.
Removing a bridge plate
First, do a dry run
Heat the caul
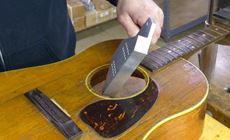
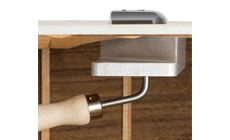
Use the Chisel and Dolly
Installing a bridge plate
Gluing a bridge