Fixing a 1937 Martin bridge. The first step is fixing a sandwich!
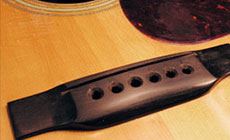
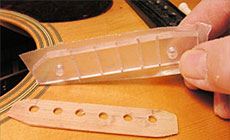
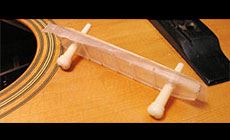
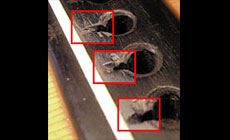
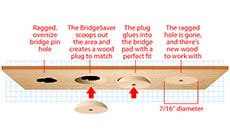
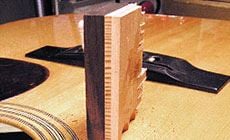
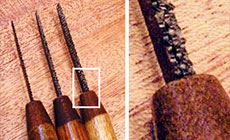
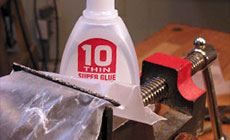
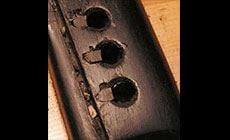
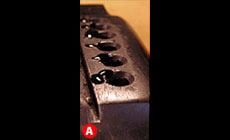
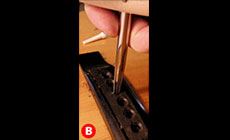
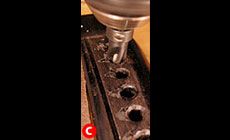
First, I’ll make myself a sandwich Usually the BridgeSaver handles bridge plate repairs, but not this time. This oddball needed me to feed it a wood sandwich... Notice how the string windings were creeping up onto the saddle in the photo above. That was only half of the problem: those string slots were reaching way too close to the saddle. Maybe this was from years of wear, or maybe someone sawed or filed them that way. That’s what showed on the outside. Inside it was even worse. These worn slots are the tip of the iceberg: the bridge pin holes underneath were so ratty that they could no longer seat the strings’ ball ends correctly. Worn bridge pin holes turn up often in repair shops, which led me to come up with the BridgeSaver tool. It replaces the damaged holes in the bridge plate with fresh new wood like so: But these supersize slots were too far gone for the wooden plugs to cover them. The solution to fixing this mess started with my wood sandwich. I glued this up from wood that matches the bridge and bridge plate (ebony and maple), with a slice of top wood in the middle. The idea is to cut pieces from this sandwich to fill the oversize string slots. This way, all three wood layers are patched at once. Then I can cut new slots the way they ought to be. Our bridge pin hole saw is sized to fit a proper string slot (below). For these extra-wide slots, I wanted an extra-wide saw. So I super-glued three saw blades together and put them in the handle for a triple-wide cutter. While I was at it, I made a double-wide, so I have Mama, Papa, and Baby saws. With waxed paper on the jaws, my nut & saddle vise held the blades tight. I filled the saw teeth with wax before dribbling #10 super glue onto the blades. I let this dry a half-hour, then I fit the blades back into the wooden handle. These saws worked better than I could have dreamed of. Using a mirror to watch inside, I squared the slots with my extra-wide “Papa” Saw, then used hot hide glue to fill these with bites from the sandwich. There was still a lot of ugliness around each hole: A. The fix for this was black epoxy. I cleaned the chipped and worn areas with acetone, then mixed slow setting black epoxy with ebony dust. This went onto each patch and was left to dry overnight. B. After leveling the epoxy fill to the bridge top, I used a 5° bridge pin reamer to true each hole — flutes facing forward and cutting only that part of the sandwich bites that caused the hole to be less than round. I didn’t want to enlarge the holes, just true them. C. Next I re-chamfered the plugged and filled holes with the bridge hole chamfering tool — its pilot keeps the cutter concentric with the hole regardless of string slots. I removed the pilot sleeve here, which gives a good look at the cutting blades. Dan Erlewine’s Bridge Repairs NEW on DVD: Learn how to fix an acoustic guitar bridge or make one from scratch Dan’s latest lessons on DVD provide two hours of training with Dan in his shop. He shows you how to do the bridge work that's so critical to making acoustics play their best. Vol. 1 focuses on repairs. Vol 2. goes into advanced repair work and creating a bridge from scratch. More information online (including images from the DVDs). As a final step, I glued a thin piece of hard maple over the bridge plate inside the guitar. This gave the string ball ends something solid to bear against I used an acrylic caul faced with wax paper to clamp the patch in place with hide glue. A pair of bridge pins kept everything aligned inside the guitar. So the wood sandwich is today’s special from Dan’s Deli. Now I’m going go get cooking on my next recipe!
Recently I replaced the too-low saddle on this 1937 Martin.

Rigging up a custom saw

Check it out!

Hey! It looks pretty good!