Correct saddle intonation with The Intonator
The Intonator finds the correct locations for acoustic flattop guitar bridge saddle placement.
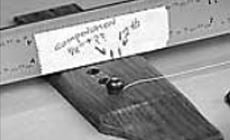
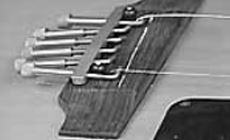
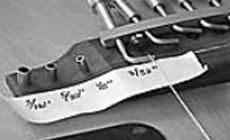
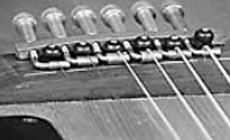
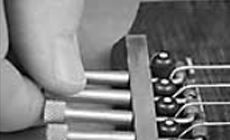
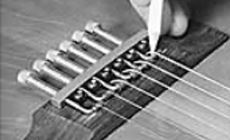
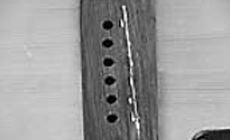
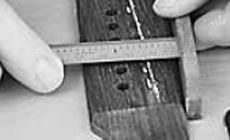
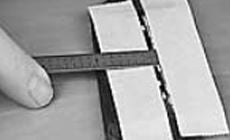
The Intonator finds the correct locations for acoustic flattop guitar bridge saddle placement. We designed it for use prior to cutting saddle slots in new bridges, or when filling and recutting existing saddle slots (methods such as placing dowels or pins under the strings can be inaccurate, because string pressure tends to move the dowels forward). We recommend using the Intonator with an electronic tuner for optimum results. 1. Measure down the center of the guitar neck from the nut to the 12th fret, add approximately 1/8" for compensation, and mark this position on the center of the bridge (Photo 1). Pencil in an approximate saddle line from this position, at the 3-1/2 degree angle you would normally see on a steel string guitar. This is a starting reference line to aid in locating the saddle. 2. Install the outer two E-strings and tune them slack. Set the Intonator in place on the bridge with L-saddles under those two strings. All the saddles should point in the same direction. The brass bar rests against the back of the bridge pins (Photo 2). 3.The E-string saddles can be used without the saddle sleeves, or you can install one or more of the sleeves, depending on the arch of the bridge top and the desired string height. 4. Install the remaining strings with only enough tension to hold the saddles. 5. By using the L-saddles without the sleeves, or with any number of the three telescoping sleeves, four different saddle height options are available. This lets you approximate any saddle radius, flat or arched, and any saddle height. The four saddle height options are: the L-saddle without sleeves (3/32" / .093" / 2.4mm); the small sleeve (1/8" / .125" / 3.2mm); the medium sleeve (5/32" / .156" / 4.0mm), and the large sleeve (3/16" / .187" / 4.8mm) (Photo 3). Install sleeves on the four inside saddles as necessary (Photo 4). 6. While the strings are at low tension, turn the thumbscrews to adjust all the saddles behind your penciled reference line. This will keep string kinks behind the saddle and prevent them from causing incorrect intonation (Photo 5). 7. Tune each string to pitch using the electronic tuner for reference. Adjust each L-saddle so that the fretted note at the 12th fret matches the tuner when set one octave above the open note. As you move the L-saddle, you must retune the string to the electronic tuner—keep the open string in tune as you continue moving the L-saddle, and match the 12th fret note to the tuner. 8. When all the strings are correctly intonated, pencil the position of the front and back edges of each saddle on the top of the bridge. Look straight down from overhead and mark perpendicular to the bridge top (Photo 6). 9. Remove the strings and the Intonator. The peak of each L-saddle is halfway between the two marks, and this point should be the peak of the permanent saddle. Mark the bridge to indicate the saddle peaks (Photo 7). 10. Butt a square-edge piece of wood against the front edge of the bridge, and measure from the edge of the wood to the marks for the saddle peaks. Record these measurements (Photo 8). 11. The following are four ways to proceed in making the permanent saddle: