Use your drill press as a planer to make custom bindings
In 1971 I built a guitar for blues great Albert King: a black walnut Flying V with maple-rosewood-maple bindings. I built a similar guitar recently, and was reminded how tough it is to bend hardwood bindings into the tight corners of a "V" shape. Years ago I'd never used a temperature-controlled bending iron (I only had a blowtorch for heat), and I didn't know about bending straps to keep the moisture in the wood. But even today with the right tools, I was breaking more strips of maple than I wanted to. I asked my pal Don MacRostie how to bend strips without breaking them. The head of our R&D team here at StewMac, Don also builds Red Diamond mandolins. After decades of working on the tight peghead scrolls of F-style mandolins, Don’s bent more maple — expensive curly maple — than anyone I know.
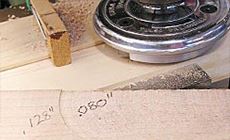
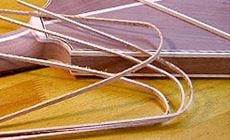
Don gave me this tip: “Dan, it’s tough to bend skinny little 1/4" binding strips like that; some of them are going to break for sure. It’s much easier to bend a wider board into the shape of your guitar, then afterward you can saw that bent piece into narrow binding strips, all the same shape.” But how am I going to cut this guitar-shaped strip of bent wood into narrow bindings? Don's answer: "First things first: find your piece of maple that's long enough, is the right thickness, and is about 1-1/2" wide. See how it bends, then bring that bent piece to me and I'll let you in on a little Trade Secret." If Don's offering me a Trade Secret it's going to be good, so I went to work on my assignment... Over the years I’ve collected lots of guitar wood scraps, mostly maple, mahogany and rosewood. I found a stick of curly maple that was .128" thick (about 1/8"). I needed a thickness of .080" for my binding, so I planed this piece down. I don't have a planer in my shop, but I have a drill press, so this was an easy job using a Wagner Safe-T-Planer. Here’s how: In my drill press vise, I set up a flat board to use as a work surface. I clamped a simple fence to it: a piece of wood just slightly thicker than the .080" thickness I’m after. I lowered the Safe-T-Planer until it was just barely cutting the top of the fence. Here’s a neat little clamp I rigged up using a clothespin. One side of the pin is superglued to my wooden fence, leaving the upper “jaw” free to move on its spring like usual. On this top jaw I superglued a “finger” of wood that presses down on the workpiece. I ran the maple through the planer four times, lowering the cutter a little each time until I had the .080" thickness I was after. That’s it! I have my extra-wide piece of wood planed down and ready for bending. This is a great way to handle lots of small planing jobs in a guitar shop, like thicknessing stock for making a bridge, or for constructing soundboard braces. I bent the wood to match the guitar's shape, and the next step was to go back to Don and find out about slicing the bent-to-shape pieces into binding widths. We’ll show you that tip next week in Part 2 when Don tells his Trade Secret.Use your drill press to make custom hardwood bindings
For super-tight bends, don't try to bend matching strips — bend one board, then cut it into strips
Using a drill press to thickness plane the binding wood
1. Fence
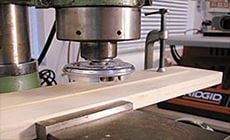
2. Hold-down clamp
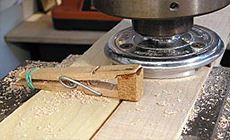
3. Planing to .080"