Scraping, not sanding, to prepare wood for finishing
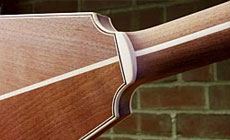
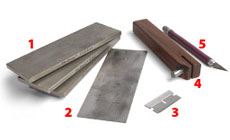
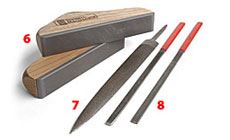
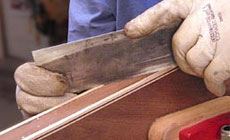
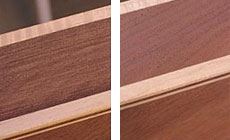
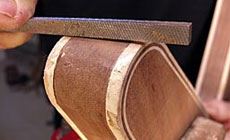
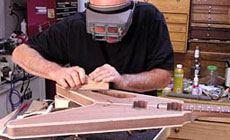
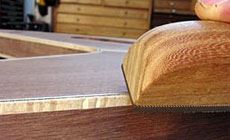
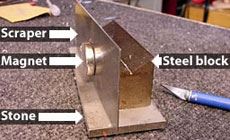
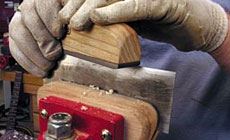
I’ll bet you’ve used lots of sandpaper, but I wonder if you use scrapers? It surprises me that many luthiers have missed out on the idea of scrapers. Let’s fix that... I use sandpaper throughout the building process, but for final smoothing I like to file and scrape the wood clean and flat. For me, sandpaper’s a last resort when scraping and filing don’t do the trick. Recently I made some Flying V style guitars from black walnut. I built one just like this for Albert King, but that was back in 1971 and I’d forgotten how hard it is to bend wood bindings around the radical curves of the Flying V shape! I wound up with some split bindings and gaps to fix. Time for scrapers and files... 1. Diamond fret levelers for sharpening the scraper. 2. Scraper blade. 3. Good ol’ razor blade. 4. Burnisher for putting the burr on the scraper’s edge. 5. X-Acto knife. 6. Fingerboard leveler file and a fret leveling file (6" length). 7. Smooth double-radius rasp. 8. Nut and saddle shaping files. These two files have a different cut on each side, giving me four different cuts. The rougher of the two is my favorite. For me, prepping the wood before finishing starts with filing and scraping to remove high spots and sandpaper scratches, and leveling the binding to make it flush with the surrounding wood. This is especially necessary when scraping fancy-grained wood like the curly maple binding that I used. You can see the scraper working as a plane, removing high spots and leveling the surface. The scratches in the black walnut are from sanding, and after the scraper makes the maple binding flush it will remove those scratches next. On the left side of this image, the wood was leveled with sandpaper which left scratches. The glassy smooth surface on the right is the scraper’s work. Here’s a really rough spot: the rounded end of the Flying V shape had some gaps packed with filler. The coarse/medium saddle shaping file excels at leveling this kind of hard-to-scrape area, bringing the wood filler down to the point that it’s flush with the surrounding wood and ready to scrape. When the bindings are sanded almost flush with the body, I switch to 6" leveling files. I use both the coarser fingerboard leveler and the finer fret leveler. The coarse file glides over smooth, flat wood without marring it, only cutting off the high spots. Here I'm using the fine grit to remove any sanding scratches on the body. The smooth fret leveler is perfect for knocking off the sharp edges of the binding. See the two spots of light wood putty just ahead of the file? I’ll color those to match the binding before finishing. Clean your files often as they begin to load up with sawdust. I clean and sharpen the two wide, flat sides of the scraper on diamond stones held in my vise, progressing through all three grits. A repair magnet makes a perfect handle for holding on to the thin steel scraper. By pressing a little harder on the edges of the scraper I can clean up the outer edges fast — not worrying about cleaning and flattening the entire surface of the blade, since it's only the edges that need to be clean and sharp. To hold the scraper at 90° for sharpening, I use a steel block with a piece of double-stick tape on the bottom (I leave the tape’s protective cover on the underside so the block slides easily). A magnet holds the scraper to the block, at a right angle to the whetstone. Once the edge is sharp, I use a scraper burnisher to draw out the microscopic burr that accomplishes the scraping. This two-step process is easy with the burnisher, and is explained well in the instructions that come with the tool. They even include a DVD to show how to draw out a burr and “turn the hook.” The DVD’s a nice touch, but this tool is easy to use and the printed instructions are plenty clear. If I'm in a hurry or scraping rough work, the way I sharpen my scraper is to hold it in a vise and swipe the edge with a fret leveler. This shortcut will make many woodworkers cringe, since I’m not taking the time to draw out the burr and turn the hook, but the truth is it’s working well for me! Use this scraper burnisher to keep your scrapers micro-sharp. A free mini DVD comes with the tool. In just a few minutes of viewing you’ll see exactly how to create the tiny hooked burr that gets super sharp results from any scraper blade.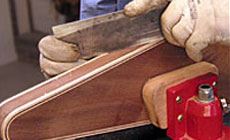
Scrapers give smoother results than sandpaper
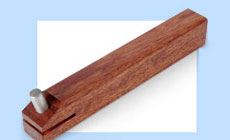
Scraping tools
Files
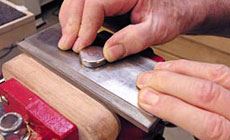
Hold the scraper at an angle to the grain.
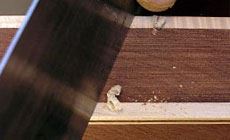
Before / after
I use a file to level rough spots before scraping.
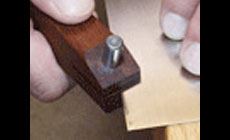
Here's how I sharpen a scraper:
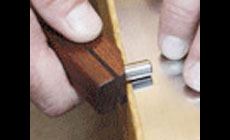
The thin edges must be square to the sides.
Somtimes I cheat
Check it out!