Go-bar decks: fast, flexible gluing
If you haven’t used a go-bar deck, this is an idea you’ll be glad to know about. I’ve asked Todd Sams to show us how he uses go-bars (he manages StewMac’s production shop, and he’s a fine guitarmaker). Here’s Todd...
First things first: what’s a go-bar deck?
1. A go-bar deck is an open-sided box with a plywood top and bottom.
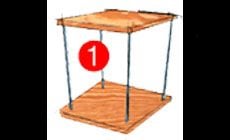
2. The peices being glued sit on the bottom, and the flexible go-bars bend to apply pressure by pushing against the top.
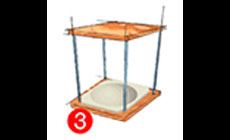
3. Add a dish-shaped mold at the bottom, and you can glue soundbards or backs with a precise radius built in!
Go-bars are a simple idea.
Production builders use them because they're fast and flexible, but they’re a good fit for a small shop like mine, too.
I build a dozen or more acoustic guitars a year in my home shop. I couldn’t build that many in my limited spare time without using go-bars. Gluing braces on tops and backs is a slow process, with lots of glue-up sessions. One session used to take me two hours, but with go-bars it’s less than twenty minutes.
Note: Yellow rods pictured are no longer available. Our preferred white Go-bar Clamping Rods with rubber tip protectors are now included in all the Go-bar Clamping Systems.
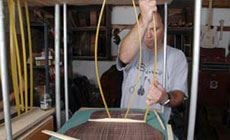
I use hot hide glue, which means I’m working fast to get clamped up before it cools. This is no problem with go-bars.
Here’s a go-bar session:
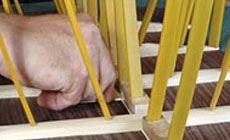
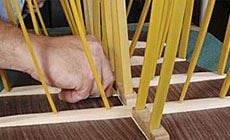
I’ve got my braces all ready, and I’ve penciled in the brace locations on the back. I've done a dry run, and I'm ready to go. I use a glue brush to spread a thin even coat of glue on the brace.
Two go-bars hold down the center of the brace first, then one goes on each end. That makes four, then I add one more on each side between these braces — a total of six go-bars on one brace. Clean up the glue squeeze-out and move on to the next brace.
The back braces go on in no time at all.
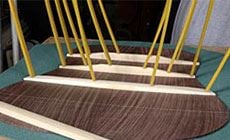
A caul of scrap plywood acts as a straightedge to align the center strips as I glue them in between the braces. This caul is held with two go-bars that have been cut short for the height of the caul.
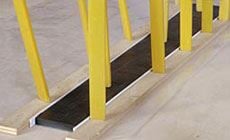
Todd has two decks in his shop.
The bases store go-bars and braces. To add more pressure to all the bars at once, he slides a piece of 1/2" plywood under the bottom deck, raising it slightly.
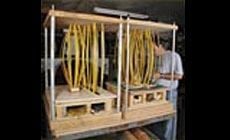
Cutting a go-bar makes it stiffer, which creates greater pressure.
This can be just right for cauls, but I wouldn’t want too much pressure on the delicate braces themselves.
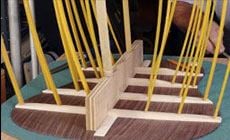
Each small piece of the center strip is dry-fit before any glue’s applied, and they're glued in place with small wood cauls to protect these thin strips from being dented.
All this is done with the plywood straightedge in place (photo below). After they’re glued the straightedge is removed and I clean up the glue squeeze-out. (I'm doing that cleanup here with a utility knife blade.)
I have two Go-Bar decks, so while this back is drying I'll glue the top braces in the other deck.
Check It Out!
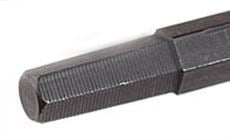
New truss rod wrench idea!
I was working on a guitar with a banged-up truss rod nut, and my hex wrench wouldn’t fit. I wound up having to custom-grind a wrench, and that led to this new tool: a tapered hex wrench that really grips a damaged truss rod nut. The gripper tip fits right in, then you give it a light tap: Presto! It grabs the nut solid as anything! It's from our whole new line of truss rod wrenches. —Dan
Fretboard binding
Here’s a nice go-bar trick: with a thin sheet of plastic or waxed paper on my flat deck (so I don't glue the fretboard to the deck), I clamp the fretboard down. Next I put Weld-On #16 on the binding strips, stick them to the sides of the fretboard (making sure that the binding is pushed down flush to the bottom of the fretboard). Add the side cauls and hold them with go-bars.
Peghead overlay
There’s lots more space on the go-bar deck, so I'll glue my peghead overlay at the same time. Prepare the neck and overlay as you normally would. Lay the overlay face down on the plastic, and apply glue to the peghead. Use a plywood caul and clamp with about 8 go-bars.
Thanks, Todd! And here’s the key to being a happy clamper:
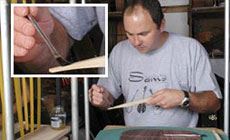
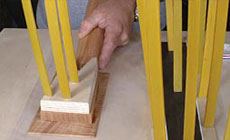
Do a dry run every time!
The photo below shows Todd marking and cutting the pieces for his back strip during his dry run. He gets everything fitted perfectly and clamped up before he takes the lid off the glue. This run-through doesn't add much time because you’ll fly through the actual glue-up after you've done a "dress rehearsal!"


