Fine tuning a bolt-on replacement neck
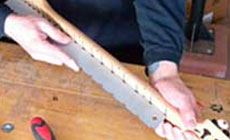
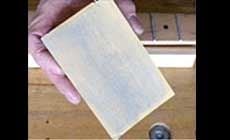
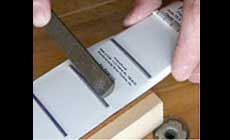
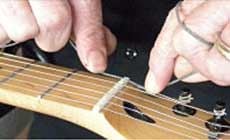
Reviving my old Strat My old Frankenstrat needed a new neck, and here’s what the neck needed before it was ready to play. This old Strat was my main guitar for many years. My pal Tyler Tribby assembled it from parts in the early 90s, when we worked together at Roadworthy Guitar & Amp in Bloomington, Indiana. To buy it, I sold a really nice old Les Paul Custom, which my friends said was crazy. But considering the mileage I got from this guitar, I have no regrets. I toured the world with this thing, and even made a few records — and it still sounds great. The neck Tyler installed back then was unfinished (today’s replacement necks are sealer-sprayed at the factory). I left that old neck unfinished because I liked the feel and sound of the bare wood That was a mistake. After hundreds of shows the naked wood was soaked in sweat and grime. The wood became soft, and the neck wouldn't hold truss rod adjustments anymore. So the guitar sat unplayed for years. New generation, new neck! My son Declan’s getting interested in guitar, so I pulled this Strat out of retirement for him. Rather than wrestle with that old neck, I'm installing a new one. Parts is parts, right? What a new neck needs I’d never expect to install a replacement neck without some setup. For one thing, it goes through a humidity change as it arrives in my shop. Also, a factory fret job is designed for every possible player — they leave enough metal to allow for filing and shaping to suit yourself. And I like my frets to be tailored to my preference. I adjusted the neck to make sure it's straight as I can get it, checking with a notched straightedge. A little bit of filing The person who installed these frets did a good job. They’re uniformly seated, with plenty of height to work with. I used two of the interchangeable files on a Snapfile to be sure the fret end bevels are nice and smooth, and I gave the fret tops a few leveling strokes. That’s all they needed. Back issues of Trade Secrets are available for free online. (At stewmac.com, there’s a link halfway down the page.) Here’s a direct link to issue #31where I showed how to install tuners in a replacement neck. The photo below shows sandpaper on a radius block after sanding the fret tops. The uniform coating of powdered metal tells me my fret tops are truly level across the board. In the photo below, I’m dressing the fret ends to give them the rounded shape that feels right to my hands. I protected the board with a fret dressing mask before using a large three-corner file to round the frets into a crowned shape, leaving just the tiniest bit of the leveled centers untouched. Before removing the mask, I polished my frets with 3M polishing papers. (For more detail, I covered all this in our recently revised FretWork Step-By-Step book.) At this point, I installed the neck and strung it up. A few strums told me it's pretty close to what I’m after. I just needed to lower the nut slots a touch. I tend to play pretty hard, so I didn't lower the slots much: I left a gap of .024" between the top of the fret and the bottom of the string for the wound strings. I filed down to .020" for the unwound strings. I like to use guitar strings (in this case .024" & .020") as under-string feeler gauges, to keep from cutting the slots too low. Work slowly, checking the slots frequently — if you cut them too low you’ll end up with string buzz problems. The last step was to smooth the slots with a few strokes of abrasive cord.
Here's Declan, trying it out through the guitar’s old noisemaking buddy, my 50 watt Laney amp. I've made a lot of noise over the decades with that guitar/amp combination, and it looks like there’s a lot more noise-making to come!


Check it out!

While we’re talking about replacement necks.


Ready to rock!
The new neck came with a light satin sealer coat. I could have scuff-sanded it and added more finish for a high gloss, but the feel of the factory finish reminded me of what I liked about the bare wood before. I left it as-is but this time it’s sealed, so I don’t have to worry about moisture causing problems