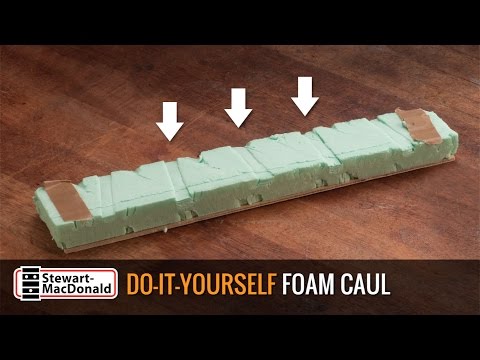
Custom-fit styrofoam clamping caul
Issue 231 December 04, 2014
How to clamp a guitar bridge without crushing the braces inside: Dan Erlewine uses a chunk of insulation from the home improvement center. In this short video, Dan shares a trick for custom-shaping the foam to fit any guitar.
- Regluing a guitar bridge that luckily doesn’t need to be removed.
- Foam insulation works as both a mold and a caul.
- Magnets hold the caul in place while you position the clamps.
Video Transcription
[on-screen text reads: Stewart-MacDonald - Trade Secrets!]
Do-it-yourself foam caul
Dan Erlewine: I keep a chunk of this two inch closed cell foam that I buy at Lowe's around the shop for making molds and making cauls. It comes in very handy, as in the case of this classical guitar. The bridge was loose on the back edge. All along here for about three eighths of an inch I could slide this Feeler Gauge underneath there, I warmed it, put some hot water on it, and pulled out sticky glue. That told me that it was Hide Glue and hopefully I'd be able to re-glue it with fresh hide glue without removing the bridge. And I did. And it's been holding now for about a week so it was successful.
I needed a special delicate caul to do that with, and I made it with styrofoam. It had to span the fan braces and sit in between it and push up on the top while I clamped from above. And here's how I did it.
Making the mold and custom shaping the foam
I used a clean, sharp Seam Separation Knife to slice this foam off. It slices like tofu. This is a good knife because it's wedge shaped, sharp on the bottom edge and the wedge separates the part.
Now I'll take the foam and put it on a piece of hobbyist plywood an eighth inch thick and Double Stick Tape it down. Then I'm just taking a drill bit, this is a Brad point half inch and carving out a little notch there. It's a little crude. I just need a little hole to get started in there so I can put a Guitar Repair Magnet down in there and tape over it to hold it in. I don't want it to be permanent. And I'll do the same on the other side of the caul. I slide the caul inside, magnets up, and then maneuver that around where I want it into position and let the magnets find each other. I can slide it right into place. I want it centered under the bridge. And with that, I'm ready to come inside with a clamp, StewMac Soundhole Clamp, and put a crushing blow on this bridge. I'm going to squeeze it nice and tight so I get an imprint. I'm pulling that foam up against the braces, and when I'm done I'll be able to mark them out and cut them, and it'll be real slick.
One, two, three. You want to cut the next part pretty quickly before it puffs back up on you again. Use the knife to score the lines. Go a little bit wider than you need to so it sits over those braces and chisel out the center of it. I'm using a half inch chisel [on-screen text reads: Dan's favorite wood chisels - Two Cherries Wood Chisels from StewMac], a little bit wider than the braces to make sure I fit over them. Now that'll pop right over those braces. There you have a great little caul that's going to fit right in place and be held in place with magnets while you come in there and put your clamps on it.
That's the setup that I used when I glued it last week [on-screen text reads: Two 7" Soundhole Clamps and Two 9" Soundhole Clamps], and it's held so it was a good job. Four sound hole clamps and some insulation that I got at Lowe's and a little bit of hot hide glue.


