How to Install Guitar Bindings

Tools for the Job


Overview of binding, purfling, and other instrument trim, including binding recommendations and installation techniques.
Guitar bindings and purflings: an overview
The plastic or wood bindings around an instrument add good looks and protect it from bumps and nicks on the edges. They can be plain or fancy: a simple white strip or an intricate decoration made of many laminated pieces ("herringbone" is a popular example).
When bindings contain extra decorative strips that aren't exposed on the edges of the guitar, these strips are often called "purflings."
Bindings and purflings are installed during the building process, before a finish is put on the instrument. They are sanded and smoothed to make them level with the surrounding wood. They can be clear-finished along with the wood, or kept free of colored finishes so they provide a visual contrast.
These instructions cover the basic techniques used to bind guitars and other stringed instruments.
Safety cautions
Hand tools, power tools, finishes and glues are all hazardous if misused. Follow these safety precautions:
- Wear eye protection when using tools, glues, and finishes.
- Wear protective gloves when handling chemicals such as finishes.
- Keep the work area well-ventilated to evacuate dust and solvents.
- Fire Hazard! Plastic bindings, along with their shavings and dust, are very flammable. Acetone (a common solvent used with plastic), and other solvents used in finishing are also flammable. Dispose of these products properly.
Popular binding sizes
Plastic bindings are available in white, cream, or black in these widths:
- 0.040" - This narrow binding is often found on older vintage guitars, banjos, and mandolins. It doesn't provide much width to work with, so the channel holding it must be very uniform and accurate. If the binding sticks out over the edge of the instrument, it needs to be sanded or scraped flush, and this will show up as a thin spot in this already-thin binding.
- 0.060" - The difference in width between 0.040" and 0.060" is substantial, and the 0.060" width is popular. It makes a good outer binding when adding purfling (for example, a black/white/black inlay inside the binding). Also, 0.060" provides a good width when you want the fret crown to lay over the binding at the ends of the frets.
- 0.090" - This is a fairly wide binding that's often used alone, as a single strip of white or cream (on Les Paul Customs, for example). The 0.090" width is another good choice when you want to overhang the fret crown onto the binding.
- 0.120"- The width of 0.120" binding leaves a good safety margin for scraping and sanding. Because it's so wide, small variations in width produced by sanding and scraping aren't obvious (also true of 0.090" binding). If you install 0.120" binding in a slightly smaller channel, you can scrape away the excess and achieve in-between sizes.
Purflings and other trim
There are quite a number of decorative strip materials available to customize your bindings. Laminated wood and plastic trims come in laminated combinations such as black/white/black (referred to as b/w/b). Wood bindings are available in colors; for example, sometimes a very thin strip of red trim is used amongst black and white bindings. Often, just the addition of a piece of trim creates outstanding binding.
Herringbone and "zipper" patterns of wood are available ready-made, and are sometimes inlaid as a center stripe on a guitar back. These examples of fancy wood marquetry are delicate and somewhat difficult to install on curved areas, but easy to install in straight channels (such as the back stripe). Pre-bent herringbone is available to make a difficult task easier.
Many purflings are combinations of alternating black and white strips. Some are sold already glued together (laminated). You can also glue single strips of purfling to create your own laminations.
It's simplest to use pre-laminated purflings rather than gluing black and white strips together, but it's certainly possible to make your own unique binding laminations. Stewart-MacDonald's Binding Binding Laminator simplifies this, and comes with instructions. For the purposes of this introduction to binding, we'll assume you're using prepared bindings. [One note of advice: if you do decide to create your own effects by combining strips, it's best to laminate them into a single piece before installing. This saves you a great deal of trouble in trying to bend and glue several separate pieces, each with a mind of its own!]
Body binding recommendations
A single ply of white or ivoroid plastic is the most common choice in binding around the body. It has simple good looks, and is easiest for a first-time binding job. In wood bindings, popular choices are maple, koa, and rosewood (these are also available with contrasting fiber laminations added).
Body binding generally ranges in width from 0.060" to 0.090". Sometimes 0.120" is used for its "forgiving" width, which makes it harder to see variations in thickness from uneven channel widths.
Peghead binding recommendations
Many pegheads are bound with a single piece of binding (usually white or ivoroid). Plastic is easier to use than wood for this because it's more flexible, and pegheads often have tight curves and sharp points.
Starting in the 1930s and continuing today, many Gibson pegheads are bound with a single strip of 0.040" width. This adds a simple line of contrast to accent the shape of the peghead, but its thinness means that the channel must be cut very accurately.
Another popular choice is 0.060" with an additional trim piece on the inside (b/w, b/w/b, etc.). A really fancy peghead may have a 0.090" binding on the edge, with four lines of interior b/w/b/w trim.
Relatively wide bindings (0.060" or 0.090") are a good choice for pegheads for another reason: in production, Gibson and many other makers often spray black lacquer on the peghead and right over the bindings. Later, they scrape the black off the bindings to reveal as much or little of the actual binding as desired. This gives the choice of a thin or thick binding, while the black lacquer hides the binding glue line. (Masking the binding with tape before spraying is another approach.)
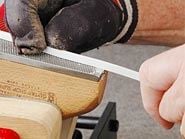
Cleaning the edge of the binding
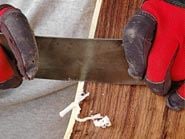
During manufacture, binding is band-sawed into strips from large sheets — leaving slightly rough edges. The bottom surface of binding should be cleaned up before installing. This is the gluing surface where the bottom of the binding meets the wood, and it will it be visible in the finished work. Cleaning up this gluing edge is simple: clamp a coarse-toothed file into a vise and hold the binding against the file with a gloved hand. With your other hand, pull the binding strip across the file to create a smooth surface. Our Fingerboard Leveler File is good for this, and cuts fast. Hold the binding squarely against the file's teeth while doing this.
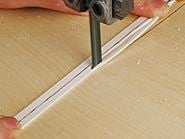
Cutting binding to size
Bindings are supplied in specific widths, but the height needed varies a great deal from instrument to instrument. The same binding that makes a very tall edge strip on one guitar will be cut down to show less height on another instrument. You can scrape installed bindings down level them with the surrounding wood, but you'll save a lot of work by cutting them to the right height before installing them.
Bindings can be trimmed on a band saw. Setting up a fence on your bandsaw table is a good way to guide the cut, but you can also simply guide the cut by hand (the saw-cut edge will be filed/scraped away after installation).
For band-sawing something as small as this, you must have very close support under the binding where it contacts the blade to keep from dragging the binding downward. Use a piece of plywood for this: by cutting halfway into the plywood and fastening it to the table with double-stick tape, you have a very close-fitting surface supporting the binding as it is cut.
Draw a line in pen down the length of the binding to mark the cut. Keep the strip you work with oversize so you have some extra binding height to be scraped flush with the wood later.
Fire hazard!
Plastic binding is flammable, and could catch on fire from heat and friction such as might be caused by power tools (saws, sanders, etc.). Keep this in mind always, and use a light touch if you're feeding plastic material into a blade or sanding belt.
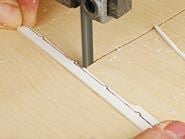
Shaping binding for Gibson-style fingerboards
Gibson binds some fingerboards with the binding glued flush to the ends of the frets. This requires "nibs" along the length of the binding to match these fret positions. To do this, tape the binding into the channel and trace the location of each fret with a sharp pen or pencil. Remove the binding and cut it to shape, nipping away between these nibs with a band saw.
Routing the channels for binding: Tools
A router is the most widely-used tool for cutting binding channels. Any hand-held router is suited to the job, but many builders prefer the slightly smaller laminate routers which are designed for trimming veneers and laminates.
Our Binding Router Bit Set uses a carbide-tipped cutter with interchangeable bearings to create channels for multiple binding widths from 0.040" to 0.210". All our bearings are now sized for exact cutting depth. Remember to allow for swelling of wood fibers from gluing, as well as for the thickness of the glue itself. Glued plastic binding will swell considerably as it absorbs the glue solvents. Wood bindings glued with wood glues that contain water will swell also. To minimize final scraping and sanding, we recommend installing a short length of binding on routed scrap wood first, to test the fit.
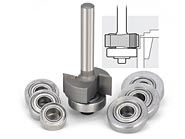
Another option for routing is a Dremel tool — used with our Precision Router Base or Binding Router Guide, it is light and maneuverable for cutting in tight spaces. Because a Dremel is a light-duty tool, make shallow cuts when using it — gradually working your way to the final depth through repeated passes. For working with hardwoods and cutting channels for guitar bodies, we recommend that you use a router with our Binding Router Bit Set.
Routing the channels
Start with clean, square edges where the sides meet the top and back. Examine the surfaces by holding a small straightedge against them to find gaps or bumps. The thing to keep in mind is that the router bit will faithfully follow every surface imperfection, and these will become part of the binding channel. Scrape and sand the top, sides, and back until surfaces are smooth. Check them again carefully before routing.
Don't leave any wood from the top or back overhanging the edges of the sides. A ball-bearing router bit for flush-cutting is a hardware store item that can trim away overhanging top and back wood.
"Flattop" guitars aren't really flat. Usually their tops are very slightly arched, and their backs have a definite arch. A router with a large base will be affected by this arch and will be tipped, causing the cutter to go out of square. This is another reason why small laminate routers are popular — they have small baseplates that don't extend far onto the arched top or back.
Generally, the arch of the top is not enough to cause a problem, but the back might. Before cutting, examine carefully to see if your router bit is parallel to the side of the guitar as it travels around the shape of the body. With the router unplugged, study the bit as you do a dry run. If it "toes in" due to an arched surface, your binding channel will be deeper at the bottom than it is at the top. To avoid this, it may be necessary to create a small wedge under the router base to adjust for the arch (see diagram).
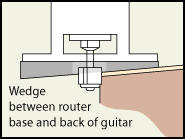
This wedge may be needed for some areas of the channel, and not needed for other areas. Most likely, it will be useful from the neck block to the lower body bout. At that point, you'll stop and remove the wedge because the curvature is less in that area. (Readjust the cutter depth after removing the wedge.)
Clamp the work firmly
You don't want the instrument to move while the router is cutting the channel. Plan ahead for this, and secure the work before you start routing. One method is to mount wood blocks to your benchtop, snugly fitting against the instrument and preventing it from moving. Of course, these will need to be low enough not to interfere with the router bit.
Avoiding wood tear-out
Running a router around the entire guitar body in one pass is not a good idea; at various points, the cutter bit will face end grain from a direction that's likely to tear out wood. Wood tear-out is always possible when routing, but it's especially likely with long-grain tonewoods such as spruce tops. The solution to this problem is to cut the channel in a planned series of passes. Referring to Diagram A , first cut the four areas marked with arrows, cutting in the direction of the arrows. These are the spots where tear-out is most likely, and cutting in the direction shown minimizes the possibility.
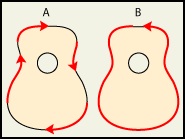
After making these four cuts, make one long cut around the entire guitar moving in the other direction, Diagram B. Because the first four areas are already cut, the router won't encounter likely tear-out spots on this long pass.
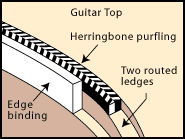
Routing two channels for herringbone
Edge binding with additional purfling beside it requires two channels. The cutaway drawing shows the stair-step shape of these two channels. This is a popular configuration: the guitar back is routed for a single strip of edge binding, while the top has an extra rout to accommodate herringbone purfling.
The first pass to cut is for the purfling — wide and shallow (typically, about 1/6" deep). The width is enough to hold both the purfling and the edge binding. If you have a dial caliper, it's a handy tool for setting the router depth. Make test cuts on scrap wood until you get the dimensions right. Check the fit of the trim strips on scrap before routing the actual channels. When you start routing the guitar body, stop and double-check the depth and width fit before going very far.
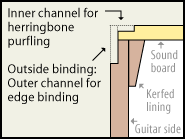
The second pass cuts the channel for the edge binding. On traditional guitars, this binding is no taller than 7/32". Again, test your cut on scrap wood! When your channels are cut, test-fit the binding pieces. The outside strip should extend slightly above the level of the top (it will be scraped flush after the binding is glued).
After routing the top and back, use a small file to smooth out irregularities in the routed channels.
Bending wood and plastic bindings
Pre-bent bindings make installation easy. Some intricate bindings, like herringbone, can be purchased in bent, ready-to-install shapes. When working with straight strips, bend them into shape before installing them.
Plastic bindings soften quickly for bending when heated with a hair dryer or a heat gun held 8" away from the plastic. Keep the heat moving back and forth along a short section (4" - 8"). The binding will start to droop when it softens, so check it often and don't let it soften too much!
Wood binding, or purfling, bends when lightly wetted and bent on a heat source such as our Bending Iron, or a homemade version using a piece of copper or aluminum tubing heated with a propane torch. Even multi-layered laminated bindings (b/w/b, etc.) will bend without delaminating if they're not over-wet. When heat-bending, don't hold wood bindings directly against the heat source. Protect the wood with a stainless steel bending strap (small 3/4" stainless strips can be found at most hardware stores).
Fit the wood or plastic binding into the body channel before it cools. Tape it in place until it cools and sets into the correct shape.
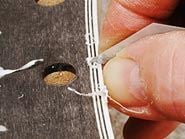
Be careful with tape on bare wood! Unfinished woods — especially spruce and other top woods — are easily damaged by incorrectly pulling tape from their surfaces. To reduce the risk of pulling up the soft fibers from between the grain lines, stick the tape to a cotton shirt to make it low tack before applying it to your work. Even with low-tack tape, remove it slowly and carefully: pulling it at an angle as pictured, lightly rubbing it with your index finger.

Joints in bindings
When two binding pieces meet end-to-end, there are a few styles of joint you can use.
Butt joints
Butt joints are a simple meeting of one square end against another. In plastic bindings, these can be invisible, because the glue can melt plastic of the two bindings together seamlessly. Brush acetone or Bind-ALL cement on each end and press them together to join. Practice on scrap pieces of binding before working on your full-length strips.
Butt joints are also simple to do with wood bindings. All elements must be clean in this gluing work: the binding ends, the channel, glue, tape, and your hands. Make sure the ends of the binding are cut very squarely.

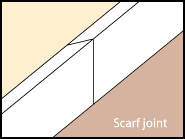
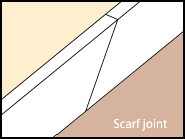
Scarf joints
Scarf joints are angled mating surfaces, and can be a good way to hide a joint since the glue line doesn't cut across the binding lines at a right angle. A scarf joint is also a good way to join two pieces of binding end to end to make a longer strip. Scarf joints can be angled across either the top or the side of the binding strip.
![]()
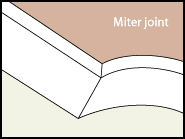
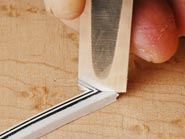
Miter joints
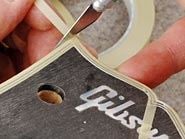
Miter joints are used when purflings and bindings meet on corners and angles. Trim and miters carefully for a good fit, trimming off small amounts with a sharp chisel. Trying to chop off a large amount of wood or plastic with one cut is likely slightly crush the binding. Hold the binding firmly on a cutting board and make small, vertical paring motions with the chisel. In the photo, notice that if the flat side of the chisel is polished to a mirror shine, the reflection shows you how the cut piece will fit its mate.
![]()
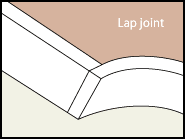
Lap joints
Lap joints are simple, and often used when binding a peghead with a solid color (where no laminated stripes need to meet as with a miter-joint). The two surfaces will melt together if a solvent-based glue is used.
Glues for binding
Several glues can be used to install bindings.
- StewMac Bind-ALL is best for plastic bindings, or for plastic and wood bindings used together. It sets extremely quickly, so practice on scrap to get a feel for it, and don't try to glue long sections at once. Clean up residue with acetone.
- Tite-Bond wood glue is best for gluing wood bindings, but it's not for plastic. Titebond offers a long working time, and easy cleanup with water.
Our advice is to use Tite-Bond and Bind-ALL, but here are three more glue options:
- Hot hide glue is excellent for wood bindings if they are simple, or if you're experienced in using hide glue. Hot hide glue gels within a couple of minutes, and you must have everything installed in place before it cools. Cleans up with water.
- Superglue (instant adhesives) can be used for binding instruments that are still in the rough, and will be sanded afterward. Be careful, though, because these glues soak into the surrounding wood and where that happens the wood won't accept stain. Superglue also sets very quickly, so it's not a good choice for your first binding jobs.
- Binding paste is made from clean binding shavings placed in a small lidded jar and wet with enough acetone to form a gooey paste after it melts. The melted plastic is the glue — no other glue is required — and the joint will be invisible. Keep the jar tightly closed when not in use.
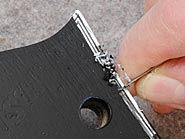
Gluing binding and purfling
Apply glue to a short section of the routed channel — about six to ten inches of channel, starting at the tail block seam. Set the purfling in place (with herringbone trim, the "arrow points" in the pattern should point toward the neck block). Apply a little more glue on the outer edge of the purfling, and place the edge strip against it in the outer channel. You'll be gluing both strips simultaneously.
Secure them tightly with tape, pressing the trim down firmly to be sure it's well seated. Repeat the procedure to complete one edge from the tail block to the neck block. Keep the channel clean at the tailblock end of the binding, for a clean joint with the opposing strip. Allow 6-8 hours drying time before gluing the next strip. Trim the bindings carefully where they meet at the tailblock seam.
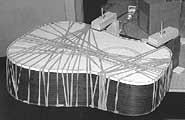
Holding binding in place after gluing
Binding needs to be held firmly in place while the glue sets. Rubber Clamping Bands wrapped around the binding makes a versatile clamp. Tape is also a good option. Our Binding Tape has a strong adhesive — good for applying pressure, but be cautious about using tape on soft top woods like spruce. With soft woods, first stick our binding tape to a cotton t-shirt to give it less tack before applying it. This will help reduce the possibility of any damage when you go to remove it. Once the glue is dry, remove any tape slowly and gently — pulling at an angle, as described previously. Warming the tape will also help it lift away easily without pulling out wood fibers.
Scraping
Wait at least two days before scraping the bindings flush to the wood, because you're likely to gouge the softened bindings. Also, plastic bindings will shrink slightly as the glue solvent evaporates, so it's necessary to wait for them to take their final width before scraping. When the binding's ready, use a binding scraper blade to make the bindings flush with the guitar's sides, back and top. Always scrape in the direction of the wood grain, and avoid digging into the wood.
A scraper is a piece of thin, flat steel with a long thin edge filed square and sharp. Sharpen your scraper by clamping it in a vice with the long edge facing up, and using a smooth mill file or carborundum stone to create the sharp edge. Hold a scraper with both hands for heavy scraping. For light, controlled work, use one hand with your index finger and thumb acting as a depth guide.
![]()
Filing
To remove more material faster, use coarse and medium files. Double-cut files work best. Be careful not to mar the wood (or the finish if doing a repair). Stop before the binding is level with the surrounding wood, and finish the job with a scraper.
Sanding
When the binding is scraped flush to the wood, you can sand it along with the wood itself as if they were one. Use 220-grit or finer sandpaper, working up to final sanding with Fre-Cut Open Coat sandpaper in 320-grit. With this paper, any sanding scratches will be tiny. Some builders prefer to sand to as fine as 400-grit before finishing.
Finishing over binding
Clear finishes are simply applied directly over binding as the instrument is being sprayed.
Solid-color finishes will of course hide the binding when sprayed over it. You can mask off the binding or spray color on it and scrape it clean after it dries. It's critical to remove the tape, or scrape off the color, at the right moment after finishing. The finish must be neither too soft nor too dry, so it won't tear or drag (too wet) or chip (too dry). You'll need to find the right moment by trial and error, but it should be somewhere from 20 minutes to 2 hours after spraying the finish.
The best tape to use for masking binding is latex pinstriper's tape from an auto supply store. It comes in many widths and it's very flexible. It follows curves easily.
![]()
With this introduction to binding, you're ready to try it for yourself. Whether your project is a simple single-strip edge, or something more complex, take your time, think it through, and do a dry run before each step. Best wishes from our shop to your shop! — StewMac


