Tuner Bushing Press Instructions
An overview of how to install and remove tuner bushings with the Tuner Bushing Press.
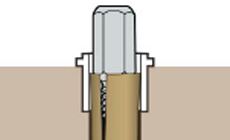
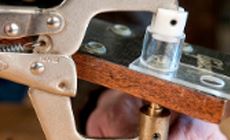
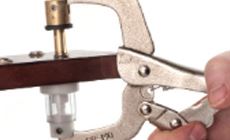
The StewMac Tuner Bushing Press provides a safe way to install and remove bushings. Its steady, controlled pressure protects your peghead's finish for professional results. Even stubborn bushings in counterbored pegholes can be removed using this tool. Test the fit of your bushings on a piece of scrap wood before installing them on an instrument. Screw the standard pin into the press. The provided Allen wrench can be used to gently tighten the pin, through the hole at its base. Slide the protective rubber washer over the pin. Make sure the white plastic anvil is screwed into the plastic side of the press. 1. Set the bushing into the peghole and insert the small end of the standard pin into the bushing. Position the plastic anvil on the back of the peghead directly behind the peghole. Turn the adjusting knob until a gentle pressure is applied to the bushing. You should be able to shut the press without pressing on the bushing at this point. 2. Open the press and adjust the pressure. Turn the knob only a little (about a quarter turn), and gently squeeze the press closed. Tiny adjustments like this give you good control, and a feel for the pressure being applied. Working too fast can cause cracks or chips in the lacquer around the bushing.
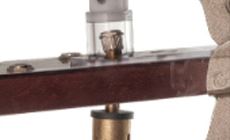
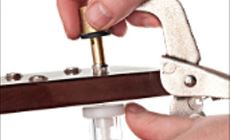
Press, loosen, adjust, press... Repeat this process as the bushing goes in. As soon as the underside of the bushing touches the peghead surface, stop. Either of the included pins can be used for removing bushings, depending on the kind of pegholes you're working with. If the peghole is a single diameter (not counterbored) you can use the standard pin to press directly on the bushing. If the peghole is counterbored, or too narrow for the standard pin, use the expansion pin to grab onto the inside of the bushing. Screw in the appropriate pin and tighten it with the included Allen wrench through the hole at the base of the pin. Slide the protective rubber washer over the pin. A clear acrylic caul with three holes is included to protect the finish around the bushing being removed. Place the caul on the peghead face, using the hole that most closely fits the bushing. This caul guards against the finish chipping as the bushing lifts up. 1. Insert the pin into the back side of the peghole. If you're using the expansion pin, you'll want the bolt head to stick up out of the bushing. Tighten the bolt with a small wrench to expand the pin until it is snug inside the bushing, but don't overtighten. 2. Lower the clear sleeve over the bushing. Close the press and adjust the knob until only light pressure is applied to the bushing. Open the press again and tighten the adjusting knob. 3. Press, loosen, adjust, press... Repeat this process until the bushing is out. Turn the adjusting knob no more than a quarter-turn at a time between pressing, for greater control and feel as the bushing is being pressed out.Installing bushings

Removing bushings