How not to mess up a soldering job
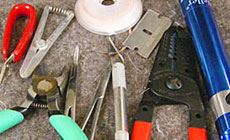
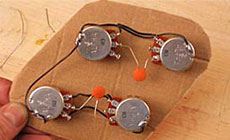
Take a look at this botched wiring job — probably done by a player, not a repair shop. It looks bad and the connections don’t work. Here’s how you can avoid this mess... A too-hot iron will toast your components. Too weak is just as bad: you don’t want to wait for solder to melt while the part you’re touching cooks. The right solder: 60/40 resin core. I won’t need a lot of tools for this Tele wiring kit I'm working on. Wire cutters and strippers, tweezers or hemostats, an X-Acto knife, and a couple of heat sinks. I use two solder removers: a blue "solder sucker" and a spool of desoldering braid. I have this “helping hands” tool to keep my hands free: After heating up the iron, “tin” the tip by touching it with solder, and then clean it on a damp sponge. This is critical with new irons — it prolongs the life of the tip and makes it give better solder joints. Keep an eye on the tip and keep it tinned while you’re working. Tin the tips of the wires and the lugs on your components. Be careful not to close up the lug holes so you can still insert the leads when it comes to actually wiring up the circuit. Heat the part first, then flow the solder over the part. This makes for quick, in-and-out connections without spending much time on the components. Keep in mind that most vintage push-back style wire is pre-tinned! Since you tinned your parts, you only need to touch the iron to them to reflow the solder and make the connection. Don't hang around on the part too long with your iron! The idea is to get in and out of there fast before any damage can occur. Don't blow on the solder. Let it cool on its own into a good shiny silver joint. (A dull-gray joint, called a cold joint, results from blowing on the hot solder. It’s a sign of a bad connection.) Don’t blow smoke away from the work. Use an exhaust fan to clear the air. Here's an instant guitar upgrade We’ve just introduced these new hand-wired pickguards featuring genuine Golden Age pickups (vintage and hotwired style). We’re wiring them up right here in Ohio, as carefully as if they were our own personal guitars. You get a first-rate professional wiring job, ready to go. Talk about easy! Hot solder can spit and damage pickguards and finishes. Make yourself a cardboard template to do your wiring off of the guitar. Shape it like your control cavity, and the wired-up parts will drop right into place! Use your wire strippers to take the insulation from a piece of single-strand wire and slide it over the leads of your tone capacitor before you connect it. This prevents those bare leads from touching something that they’re not supposed to and causing a short circuit. When soldering delicate components like this treble-bleed capacitor, it’s a good idea to use a heat sink to absorb some of the heat from the iron before it can damage the piece. There are a variety of commercially made sinks available, but any alligator clip works well. Now that your rewired circuit’s ready to roll, it's time to rock!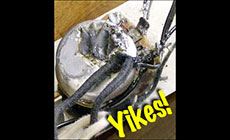
Soldering’s not so tough. Here’s what you need to know:
The right soldering iron: 25-40 watts.
A few helpful tools:
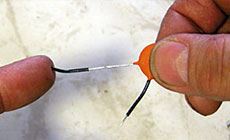
1st: Tin the iron

2nd: Tin the parts

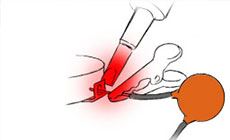
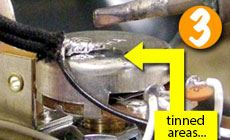
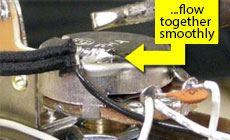
3rd: Solder the joint
Don’t blow on it!
Check It Out!
Golden Age Pre-wired Pickguards

Hot Tip #1
Hot Tip #2