Fixing a 1965 Gibson Firebird with holes in its head!
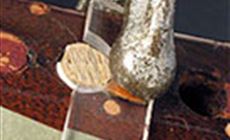
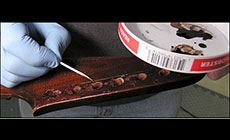
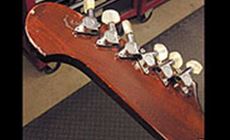
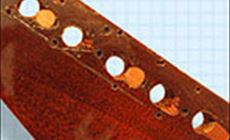
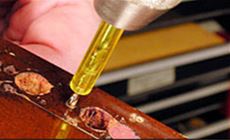
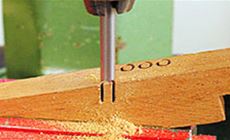
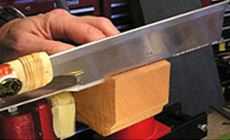
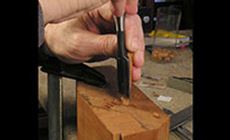
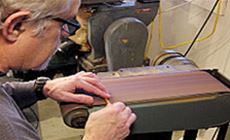
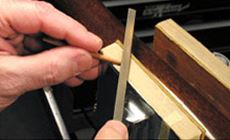
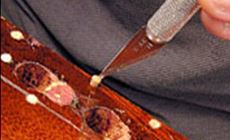
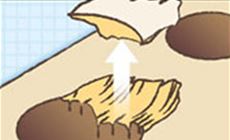
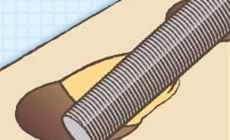
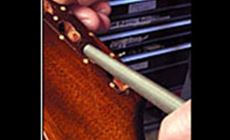
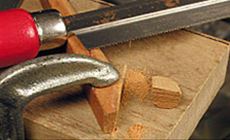
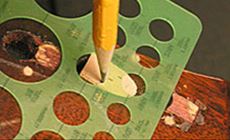
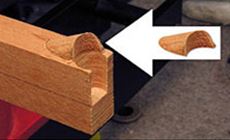
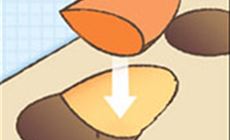
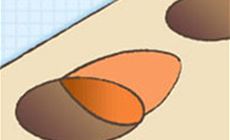
This isn't a voodoo doll. Those lines point to the 26 holes that riddle this peghead. My friend Bob Lazuka got a good deal on this 1965 Gibson Firebird. The low price might be because of this crazy tuner upgrade somebody did, replacing the original 6-in-line Kluson Deluxe tuners with a set of 3-right/3-left Schaller/Ovation diecast machines. They were screwed down at the cockamamie angles you see here: three pointing north, three pointing south. Whoever did this custom tuner upgrade went to town with their electric drill, chipping out a lot of wood in the process. Bob started replacing chips by doing some drilling himself, creating shallow round holes and plugging them with dowels. That worked up to a point, but midway through the work he brought the guitar over for ideas on repairing the remaining chips — and plugging all these mounting screw holes. The first step was to drill those little screw holes to a clean, uniform diameter so one plug size would fit them all. Bob used a .101" (2.57mm) bit — the yellow-sleeved bit from my set of depth-stop bits. I have this small plug cutter that works in my drill press to make perfectly sized dowels for plugging these holes, but Bob didn't want to use it. To build his lutherie skills, he wanted to make dowels the hard way: Using a Dozuki saw, Bob cut a 3/8"-square chunk from a block of mahogany. This gave him a stick with grain running across the end, similar to the grain on the peghead. By whittling down this stick, he'll create a face-grain dowel rather than a typical end-grain one. Using a chisel he rounded the blank, holding one end while shaping the other, then switching ends and repeating the process. With a little practice, you can get very good at this, creating very small dowels. The trick is to not break the piece, since it's very weak across the grain. Once the blank was round enough to twirl in his fingertips, Bob took it to the belt sander. An 80-grit belt brought it down to size fast. Now back to the hand work: final-sizing and slightly tapering the dowel with nut/saddle files. Bob speared the dowel pieces with a #11 X-Acto blade to start them into holes filled with hot hide glue, then pressed them home with the butt of the knife. Bob had already repaired some of the large chips beside the string post holes by drilling and plugging. But drilling a hole into some of these craters wasn’t working: the bit wanted to wander off into the nearby string post hole. For the tear-out next to the A string, here’s another approach I suggested. It’s tougher than drill-and-fill, but it resulted in a very clean patch. A large chip had torn out, leaving a ragged crater. The chip itself was long gone, so gluing it back in place wasn’t an option. Bob smoothed the crater into a rounded trough using a fat rattail file. Bob made a fill to fit this trough from matching mahogany, cutting at an angle so the grain looks about the same as on the peghead. He rounded the bottom to match the trough he made with the rattail file. From this rounded shape, he cut a wedge, roughly shaped to fill the area he filed. With this rounded wedge held in place, a circle template helped Bob trace the shape of the string post hole. This is the part that needs to be drilled away. A little super glue held this piece on some scrap wood, which in turn was held in a nut and saddle vise on the drill press table. Using a 3/8" end mill, Bob cut the rounded shape of the string post hole into the face of this plug. Then he cut the piece free from the scrap wood and had his final fill. The fill is just a little bit larger than needed, so when glued in place it will sit slightly proud of the peghead surface to be planed flat with a chisel. Here's the clamping setup: a protective caul on the face of the peghead, held with a spring clamp. A piece of 1/8" thick acrylic presses the fill down under a C clamp. The notch in the acrylic caul makes room for a dowel wrapped in Teflon fret dam material. This fills the string post hole, preventing the wedge-shaped fill from sliding forward under clamping pressure. Many of the small plugs will show along the edge of replacement 6-in-line tuners no matter what, so Bob did minimal touchup using a mix of Tobacco brown and Medium brown ColorTone stain thinned with Behkol. He finished over these spots with #20 super glue applied with a drop-fill toothpick. The 6-in-line Kluson Deluxe replacement tuners fit well although not exactly matching the footprint left in the lacquer from the 1965 Klusons, and as we knew would happen, some of the plugged holes showed. It was a good, honest, repair job however. After Bob put his tuners on, I got out my '91 Firebird V reissue and we had a go of it!Undoing a wild tuner installation
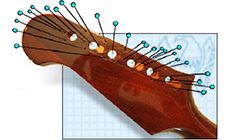
Way too many holes for one peghead!
Step 1 was easy
Hand-making dowels


Here’s where it gets tricky: patching a chip

Gluing