Video: Tips for installing fretboard side dots
Issue 237 February 26, 2015
Typically classical necks don’t have side dots, but Dan Erlewine’s adding them to this guitar. He shows the fast easy method, and explains why he’s using a different technique this time. Dan also shares some neat do-it-yourself jigs.
About the guitar in this video: This classical guitar was hand made in the 1960s. It was a gift from the maker to his daughter when she went off to college. After storing it for many years, she brought the guitar to Dan’s shop to get it playing again.
- Installing precut side dots in a neck that’s been finished already.
- A simple jig lets the strings stay on when the neck’s in a vise.
- Another little gizmo for quick-cutting side dot material.
- Solution to a tricky problem: homemade drill bit extender.
Video Transcription
Dan Erlewine: [on-screen text reads: Trade Secrets! - Stewart-MacDonald] You've probably seen this on a recent trade secrets, because it's been on the show before. This will be the last time.
Installing Fret Position Side Dots
I'm going to put some side dots in it today and ship it tomorrow. The lady that owns this has had it for years. Her dad made it. She doesn't play classical, and like me [on-screen text reads: Traditionally, clasical guitars don't have fret markers] she gets lost knowing where she is [traditionally, classical guitars don't have fret markers]. So I'm going to show you how to drill side dots at the third, fifth, seventh, and ninth frets.
Trick to clamp fretboard into vise without taking the strings off
It's not going to take me long to do this job, and it's going to take a lot longer to take the strings off. I've had them on and off so many times I'm sick of it, so I made a nice little wooden block that's padded, with holes drilled in it that I can sit over the strings, and that'll let me clamp this into my vice. I simply took a block of maple, drilled six holes in it that spaced out to the strings, cut it in half, open sided holes with some felt glued to it. It'll make the job a lot easier. And this was not the first time I've done this, I just took the time to make a nice tool. I've got a drawer full of them here. Notch blocks of all sorts. Some should be thrown out, but that one's going to serve this purpose.
Measuring and prepping the fretboard
Start off by finding the halfway point between the second and third fret. That's an inch and a quarter. [on-screen text reads: Inlay Tracing Scribe] Half of that is five eighths. So I'll mark it there. Make a little poke with my scribe. And to be honest, I'll just go down by eye, third, fourth, five. And make a mark at the halfway point. Then move on to the seventh and ninth. I like to start each hole with a hand drill and then use a power drill to finish them up. The depth-stop on the bit [on-screen text reads: Depth-Stop Drill Bit] keeps me from drilling too far into the fretboard. I only need to drill a little bit.
I don't need to do this today, but a lot of times you'll have to drill side dot holes up over the fingerboard on the body, and you can't get in there with the drill. In that case, I take the drill bit and super glue it into a brass hobby tube. Then I can grab it with the drill chuck out here and drill a hole.
Preparing and installing the side dots in the fretboard
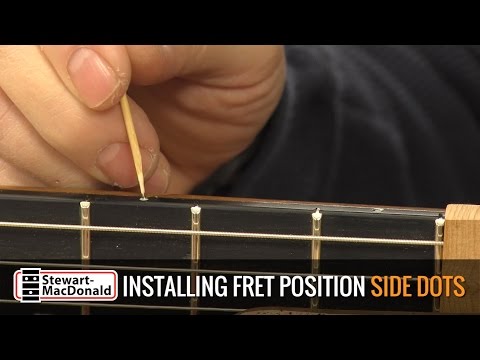
That's a strip of side dot material. White, 16th inch diameter. And most often I would poke it down into the hole with some glue, cut it with nippers or fret pullers, then file it smooth [1/16" Side Dot Material] . I don't want to do it today because my work's all done on the edge of this fret board. So I'm going to take these onto the bench and cut them off a different way so they have a smooth face already.
I've drilled a little 16th inch hole in a block of hard maple, sideways through it like that so I could slide the dot material in through it, and flush it off with a chisel. That leaves it smooth and flat. And then I just saw a length with a little saw. To install these dots, use a toothpick to add a dab of Titebond Wood Glue to each hole, and then use a pair of tweezers to push the dots into the holes. Just a little damp paper towel [on-screen text reads: StewMac Preservation Polish] for cleanup, and my favorite polish, and we've got nice side dots and I didn't have to take off the strings.


