Using a flash coat for guitar finish touchups
Issue 246 July 02, 2015
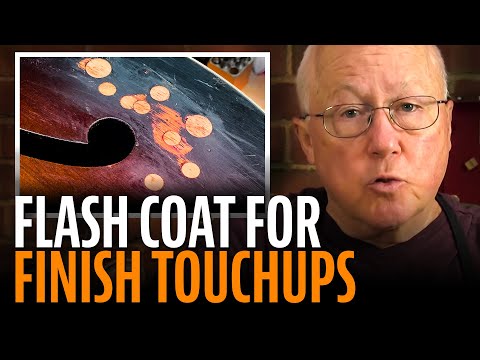
Dan Erlewine learned this trick at Gibson’s factory back in the 60s: Three jars, three mixes of lacquer and thinner always ready for “flash coat” touch-up spraying. This finish repair hides a batch of punctures in a Gibson archtop.
About the guitar in this video: This 1949 Gibson L-48 had a lot of holes in it, probably left over from someone’s attempt to electrify it.
- The 4:1 flash coat mix
- Repairing holes with round mahogany patches
- Using amber super glue as a colored base coat
- No spray guns used: Prevals did a great job!
Video Transcription
[on-screen text reads: Stewart-MacDonald Trade Secrets! "Flash Coat" Touch Up Spraying]
Dan Erlewine: Good morning. It's a good day for spraying. It's very dry out today in Ohio, and that's what I call a good spray day, and we're going to do some touch up work after I show you what I'm going to use, and it's lacquer. This jar is lacquer thinner. It's always sitting around the shop ready to go. This will be clear lacquer right out of the can straight, and this is called a flash coat. It's going to have four parts of thinner, one part lacquer, and then a small amount of retarder thinner that slows the dry time down and gives it a smooth coat.
Preparing the flash coat
What I'm showing you here is called a flash coat. That's something that I learned at the Gibson factory back in the '60s, where I visited often. A flash coat is four parts thinner and one part lacquer, so that's not much of a build. Gibson used it after their final sanding of their final spray coat to smooth out the finish and make it shine and glossy before the buffer. Here, I'm using it in repair works, so for me, the flash coat is to soften the finish so I can go back on it with new lacquer and it will melt in, and then I'll go back over that with another flash coat to melt it in on the edges. What I do is spray flash coat, lacquer, flash coat, let it sit four hours, flash coat, lacquer, flash coat, let it sit four hours. And I will sand in between when I think I need to, with nothing less than 800 grit, just to knock off the dust.
To keep things clean, I like to just use a Dixie cup to load my lacquer, then I don't get to mess up the top every time I try to pour it out. Now, I'm going to make a flash coat with four parts thinner, one part lacquer, and it doesn't have to be exact. That just adds body to it. Otherwise, you'd be spraying straight thinner. And because we have a dry day today, but rain's coming, it can get humid in a hurry. I'll use a little bit of retarder thinner [on-screen text reads: Behlen Lacquer Retarder]. That'll slow down the drying time and give it a really nice smooth coat.
I'll be using my magic potions on this 1949 Gibson L48 guitar. It's a nice old guitar, but someone botched a plugin job on the top. They had electronic pickups in this at one point and knobs and stuff. There were a lot of holes left over, and the fellow that fixed it had trouble, and I'm bailing him out. This is how the guitar looked when my friend sent it back after he tried to fix it. He put plugs in that I sent to him in the mail, but got them in sideways, and the color that he was using was way too strong. He used more than he should.
Remounting the old holes and airbrushing
I made new plugs out of mahogany, and they're slightly larger because I had to remount the old holes and plug them with new ones. I used Amber's Super Glue as a sealer, because it gave me something to spray over, and it also sort of yellowed the wood at the same time. Then, I made a stencil punching out holes that would fit right over my plugs so I'd be able to airbrush color on them, but not spray dark on the surrounding area, which would then look too dark. Then, I airbrushed the area with a colored shader that I made of lacquer, medium brown ColorTone Stain, black ColorTone, Stain, and a little bit of black ColorTone Lacquer soluble pigment to opaque it a little bit. After a few coats, I take that mixture, which is a blackish brown, and I added a little bit of red to it [on-screen text reads: ColorTone Liquid Stain]. It falls out on its own accord. That's a lot right there. That's to blend in with the little bit of red that's in this guitar.
Dust sanding
I've got a good buildup of clear here, but I'm not done. All I'm doing now is knocking down the dust. I don't want to get into color, and any little lint that got on there and little dust specks. This isn't a full level sanding, just a dust sanding. The little scratches that you may see will be gone into the next coat, which will take place in my spray booth right over here.
Spray coat
When I say spray booth, it's because this is what I'm using these days. I only do touch ups. I have friends with real booths, and if I want to use that, I can. I'm not big on spraying anymore, because I've done my share of it. I'm going to set the guitar here on the stand on my belt sander, and this is a slow moving exhaust fan. 18 inches with a totally enclosed motor, and if I open the window on the other side of the shop on a nice day like this, it's plenty of draw. And I spray into the furnace filter right here [Dan places a furnace filter against the fan using a magnet]. And I'll just be shooting out like this.
I'll set the guitar like this for some of the spraying, maybe. That's if I want shoot off the edge out the fan. But I always leave it sitting level like this after I spray so that it flows out smoothly and don't get runs. What I've used lately are these Gravity Feed Spray Guns that I love. These are touch up guns and they're new to me. All my life I've used siphon feed cans that are hard to clean and messy. These are awesome. You can put your stuff in it. When you're done, you can open it up, pour it back into the jar and put thinner in it. You could get by with one gun. I'm using three.
But for today's shoot, I'm going to use prevals. You may not have a compressor or spray a gun [on-screen text reads: Prevail Spray Unit], and this does a great job. I'm not kidding. I've used these since the 1960s. For a small job, it's the way to go. Just like the spray guns, these jars are loaded with lacquer, flash coat four to one, and some thinner to clean the tips. What I'll do is start out with four to one and spray that area to soften it; quickly follow with clear lacquer, not too much; and go right back on it with four to one around the edges to help melt it in.
There you have it. By alternating the flash coats in the lacquer coat, I've gotten a great touch up here with no runs or sags that blended in nicely. I'll let it hang for a week or so, and then buff it out, and it's going to look great.


