How to patch a hole in your acoustic guitar
Issue 343 February 06, 2020
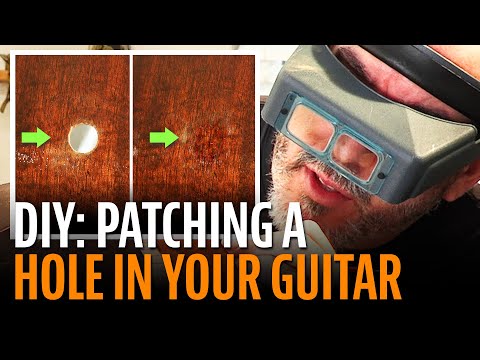
Special guest Ian Davlin from Lark Street Music in Teaneck, NJ, shows us how to patch a hole in an acoustic guitar body. Ian uses an epoxy putty that he mixes with pigments and dyes, then paints on top of it to make a beautiful disguise. Ian shares some great pro tips for sanding as well.
- Coloring epoxy for a fast and easy patch in a guitar side
- Compare this epoxy substitute to a carefully fitted wood patch
- Mixing ColorTone Stain to create a color match
- Ian’s clear sanding block idea is brilliant!
Video Transcription
Dan Erlewine: A hole or a puncture in an acoustic guitar can be repaired. So it's pretty hard to see if the right person does it and knows how. The repair you're looking at is done by Ian Davlin who repairs at Lark Street Music in Teaneck, New Jersey. We became friends years ago, and this weekend, Ian came out to Athens to my shop, and we had a repair seminar with 20 people here where Ian showed us how to patch what looks like an impossible hole in a guitar using putty that you can mix yourself. Ian uses an epoxy putty that he mixes with ColorTone finishing pigments and dyes and then paints on top of it, making for a beautiful disguise. Today, he's going to show us what we taught this weekend. And I marked up this little hole in a guitar for him to show you on.
Ian Davlin: Thanks, Dan. So this is a repair that comes up quite a bit in our shop. Guitar sides are pretty thin. It doesn't take much to make a puncture banging it on the side of a table. A lot of times on super high-end guitars, we're going to do a wood patch and do it like pro level. On this one, we're going to go ahead and do something that's fast and easy but still looks good. So let's get started.
Dan Erlewine: I'm ready.
Prepping and staining the epoxy putty
Ian Davlin: We're going to use epoxy putty for this repair. This is epoxy putty. This is the hardener in here. And then on the outside as a resin. Slice yourself off a little chunk and then start kneading it with a little bit of dye [on-screen text reads: ColorTone Liquid Stains - stewmac.com] . So this is a little bit of vintage amber. I'm going for not the lightest color but the middlest color on here. So the lightest color would be something in the yellow area. The darkest color would be like these chocolate brown streaks where the paste fill is really taken up the grain lines. But what I'm going for is more of the smudging of the paste fill. I found that two of the vintage amber, one of the medium brown, one little dropper was kind of getting into the color that I wanted to see.
Dan Erlewine: Those stains are strong.
Mixing the epoxy putty
Ian Davlin: They are very strong. It's pretty important to mix the epoxy putty thoroughly too. You don't want any of the hardener to not be mixed in and have little white flecks in your end result. This is where you take your gloves off, so you don't track dye everywhere. The last thing you want to do is track that dye all over the guitar. We got to let that set up, and we'll come back to it when it's hard, and we'll sand it flush and start painting grain lines.
Sanding the patched hole
All right. We're back after this is cured enough to start working with it. I like to use plexiglass with sticky sandpaper on it. You can see what you're doing. You're less likely to sand wildly outside of the lines because you can see how you're sanding.
Dan Erlewine: That's a great tip that I picked up from you this weekend. The clearer block.
Ian Davlin: Thank you, Dan. So, Dan has some ancient epoxy putty. And so the hardener didn't smushed into the resin quite as well as we would've liked. So we've got some splotchiness here. We'll make that work though. We can paint that out. Blue tape is going on. I want to still be able to see what I'm doing, but now I've got a depth stop. The blue tape is actually acting to prevent me from sanding too far into the surrounding territory.
Dan Erlewine: Now you switched to 220.
Ian Davlin: I have switched to 220. I'm getting really close to the finish. It's getting almost level, and I don't want to put anything, any sanding marks I'll regret later. We're just starting to get to bare wood right here. I've actually abraded around the area that we're going to touch up. So I need to bring this sheen back up. So I have an idea of what we're doing right next to the area of touch up. I'm using the Zinsser Bulls Eye Shellac out of the can [on-screen text reads: Zinsser Clear Aerosol Shellac]. I don't mix my own shellac anymore because I like this so much for touch up. So just wonderful stuff. And I'm just going to spray a little bit on this Q-tip and wipe it over the project. That's going to give me a good idea of what that actual color looks like. All right. So I'm going to start building up some color. It's pretty important to not try to get to the color all in one brush stroke.
Painting and finishing the patched area
When I'm painting this, I'm going to tell a story of overlapping layers, little colors, overlapping, confusing the eyes, trying to distract from the symmetry of that circle. My first move is going to be to take some vintage Amber and start lining through this with just a very light amount of vintage amber. Look at what's happening here. So in here we have this brown streak. Maybe I'm going to shoot for continuing that over here. And maybe it comes out the side a little bit too.
A couple really aggressive drops of the ColorTone tobacco brown. I'm going to draw this out and I'm going to use the water-based brown pigment. Even though it says water-based, it actually works very well in shellac. Mix the two together, almost like an artist palette on the very edge. All of this is about layering. If you go back over something and it isn't ready to be worked yet, the solvents will actually flow your nice little lines out into this kind of mushy, murky looking stuff. Only work the areas that look dried. We've got a pretty good line on these mid-level colors here, but I think a lot could be done by bringing these darker colors in. It's going to be done with a little bit of black pigment and get a little bit of the black and the brown pigment going together here. Once you start going darker on this too, you definitely want to settle up how much you're putting on. Almost every touch up looks better, lighter than darker.
Dan Erlewine: Are you stippling that now?
Ian Davlin: Yeah, we're stippling. We're getting that smudgy look. See this kind of cross grain detail? What happens if this comes across here and is reinforced? This little smudge, what happens if this gets drawn out, maybe it's a little bit bigger. We're going to do something really dark for grain lines. We get in a super big concentration of dye, a super big concentration of pigment to work together. This is going to be key to making the grain lines fairly convincing. So I'm only going with just a little bit of shellac in here. Like a really, really heavy concentration of the tobacco brown. The brown and the black on the edge coming into that. Okay. So this is where I'm going to stop with the color portion of it. I got some nice grain lines in there. The next step is actually going to be to wait overnight for all of the solvents to evaporate from the shellac, everything to kind of decide what it's going to do. And then I'm going to hit it with a clear coat. Well, I think I'm done. What do you think, Dan?
Dan Erlewine: I think it's really good. I'm surprised you called this the inexpensive quickie because that's awesome. I'm really impressed and everybody from this weekend was too. From everybody here at StewMac, we'd like to thank you for staying around this extra day to show this to everybody.
Ian Davlin: Absolutely, Dan. I had fun.
![]()


