TJ Thompson Top Crack Repair Video
V-4610
Dan Erlewine demonstrates the TJ Thompson Crack Repair Tool.
Video Transcription
[on-screen text reads: Stewart-MacDonald - Thompson Top Crack Corrector]
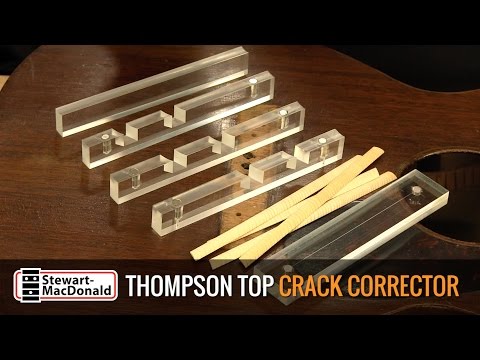
Dan Erlewine: Here is the TJ Thompson Top Crack Corrector. It's a new method for repairing cracks in guitar tops that comes to us from TJ Thompson, one of the world's greatest repairmen, and a Martin specialist. This is a singalo 0-17 Martin from 1941, and it has a perfect crack to repair right here. It starts here and it runs all the way up to the bridge. The perfect guitar for these tools.
I love these patching cleats that are made on a CNC. Round on the back, flat on the bottom. They bend like feathers, and the angled grain gives just the support you need. They're loaded onto the cartridge here with a little double stick tape. You put some glue on that and that goes on the inside, and this is on the outside. The magnets are strong enough to hold themselves together right through the guitar top.
Position and set the outside caul
I made this prop guitar for a demonstration and I scratched a crack in it, and I'm darkening it up so you can really see it. A crooked crack. There's your crack. Don't rub dirt into it, clean it whatever way you would.
And then you take the top caul with the scribe side down and lay it over the crack. Then select the cartridge that fits over the braces. You may have to turn them around. Pick one that gets you where you want to be because you won't be able to see. And you go in there and find when they mate. There, that's a good setup right there. And what you do is put a little piece of Low Tack Protective Tape on the finish if it's old like this one and make a mark at each end. That's on your scribe line. On the outside one I'm going to tape those in place with a little heavier tape, some of this brown tape. And I'm taping onto the low tack tape so I don't pull off finish. That'll keep the caul in position then I can remove the caul from the inside and load the cartridge.
Prep the interior caul
To load the cartridge you put the curved side of the cartridge up and the curved face of the patch down so they nest and you cut the wood to fit around the braces. Then you put some double stick tape up on the cartridge to hold those pieces in place. You don't need a lot. And that's ready for glue and to go inside. Heat the cartridge in the cleat with a 100 watt light bulb until you get in the 80 to 90 degree range for a little extra heat if you're using a hot glue.
Glue in the inside caul and clamp
Work glue into the crack. Make sure your fingers clean, wear a glove. Get all the excess and squeeze out that you possibly can.
Set the outside caul in place right over your crack. Put glue on the patch, keep it clean. Here's the tricky part because you won't be able to see what you're doing in this case. I would run up against the end block until I felt it touched, because I know I'm in the right approximate area and it just takes care of itself. Now I'm coming in with two Soundhole Clamps. One's going to reach way back there. Nice pressure. I think I can squeeze a second one in here. And I honestly have never patched a crack this nicely in my life.
Extra blank cauls included
Now, these cartridges don't fit every guitar in the world so you may end up having to notch one of your own and that's why we've included the extra cartridge and two extra magnets. A couple of saw cuts on each side of the brace and you can knock it out with a chisel. Very workable. And I've used the blank cauls a whole bunch. This one here, I cut a notch to get on one brace. I'm not sure what it was for, but I saved this for later. This one I notched on the band saw to bend on the inside of an archtop mandolin. And I've got a lot more I could show you. This is a great outfit and thanks to TJ Thompson we have it.

