Using the Binding Router Bit and Bearings
Tips for routing binding ledges using the Binding Router Bit and Bearings, including how to choose the correct bearing, hand routing and using router tables.
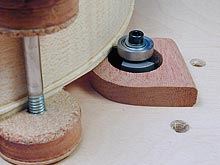
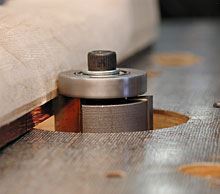
Choose which bearing to use
![]()
Our bearings are sized for exact cutting depth. Remember to allow for swelling of wood fibers from gluing, as well as for the thickness of the glue itself. Glued plastic binding will swell considerably as it absorbs the glue solvents. Wood bindings glued with wood glues that contain water will swell also. Without an extra .010", swollen bindings will overhang the ledge, requiring extra scraping and sanding.
Find the right size bearing for your binding: measure the bearing diameter with a dial caliper and use this chart to find the size ledge your bearing will cut.
Hand-held routing
![]()
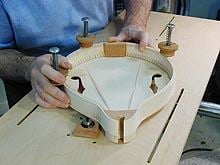
The instrument must be held securely. Guitars, mandolins, banjos, and others can be tricky to clamp. One way to secure the instrument is by screwing several close fitting wood blocks onto your work surface around the body. Thin strips of veneer or heavy cardboard can be lightly wedged between the blocks and the body to hold it fast.
 Wood tearout is always possible when routing, but especially with long-grain quartersawn tonewoods. Therefore, start with four "climb cuts," so-called because the router is climbing, or being pulled along as the bit grabs the wood.
Viewed from overhead, the cutter is rotating clockwise and moving into wood, which is on the right-hand side of the bit. This will minimize the chance of wood tearout.
Begin at the centers of the top and lower bouts on both the treble and bass sides, with the router base moving in the direction of the rotating cutter (clockwise). Rout up to the areas indicated by the arrows. When all four cuts have been made, you can move the router in the opposite direc- tion (counterclockwise), cutting into the wood rather than climbing. Make one continuous pass around the guitar. When you reach the areas that were already climb cut, the router will pass without tearout.
After routing, use a file to smooth out any irregularities in the routed channels if necessary.

Router tables
Years ago most of us used hand-held routers for all our work, but today more shops than ever have router tables, from heavy-duty industrial versions, to the small benchtop tables sold by Sears and other suppliers. Much of your binding routing can be done most effectively on a router table.
The router mounts from below with the cutter projecting up through a hole in the table. The workpiece is laid face down on the table and moved into the rotating cutter. The same rules for tearout apply to router tables, but since the router is fixed, and you are holding the workpiece firmly, you have great control over how you feed the piece into the cutter.
For archtop instruments, such as mandolins and archtop guitars, the router table is the perfect tool for accurate routing in a small shop. A small wood ring of appropriate height is double-stick taped around the cutter on the table to raise the instrument to the right height. Keep it square to the cutter. Small smooth-bottomed spool clamps on opposite sides keep the instrument on the proper plane for routing. Rout as far as you can, move the spool clamps, and then continue until finished.
 |
 |
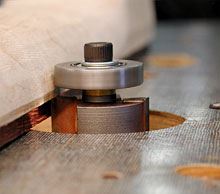
Extension bushing
A small extension bushing is provided to set the bearing 3/32" (2.38mm) away from the bit. When routing multiple passes with relatively tall binding, it's a good idea to place the bushing between the bearing and the cutter to avoid the possibility of the bearing dropping into the previous cut.

Another good time to use the bushing is when glue squeeze-out has dripped down the sides and hardened. Use the bushing here to avoid rolling over the dried glue.
Leave the bushing off when routing a neck with the fretboard attached. The rounded shape of the neck will cause the binding depth to vary if the bearing is set too high.
 |
 |


