Precision Router Base and Edge Guide
How to assemble and use the Precision Router Base and Edge Guide.
The Precision Router Base has a tool mounting bar with 3/4-12 thread to fit these rotary tools:
- Dremel, Professional, MultiPro, and models made since 1986
- Black & Decker Wizard & RTX
- Our Foredom Custom Handpiece
Before attaching the Router Base, unscrew the threaded plastic collar from the nose of the tool, and install the desired cutter bit in the collet. Screw the Router Base onto the nose of the tool until snug. Our optional #5262 Mini Air Pump hose can be attached to the Router Base for blowing dust while routing.
To adjust cutting depth with the Router Base:
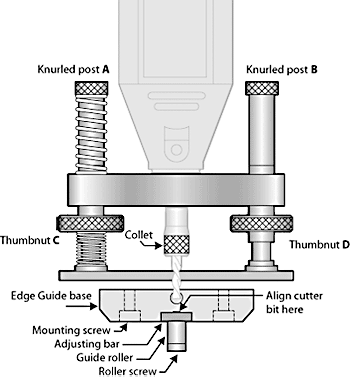
1. Loosen knurled posts A and B (see illustration), and the large thumbnut D.
2. Adjust the cutter bit to the approximate depth in the tool's collet (be sure to leave sufficient bit shank in the collet). Tighten the collet. Use the large thumbnut C for fine adjustment of the cutting depth. One complete turn of the thumbnut equals .035" (.889mm).
3. Tighten knurled post A to lock the cutting depth.
4. Tighten thumbnut D until it touches the bottom of the tool holder.
5. Tighten knurled post B.
The screwholes in the baseplate allow attachment to other jigs and fixtures.
 To use the Edge Guide:
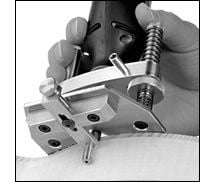
1. Attach the base of the Edge Guide to the aluminum plate on the Router Base, using the screws provided. Don't tighten the screws yet.
2. Hold the rotary tool, Router Base and Edge Guide as shown in the illustration at far right. Align the cutter bit with the tip of the roller screw that protrudes through the adjusting bar on the Edge Guide. Tighten the screws when the bit is correctly aligned.
3. Loosen the adjusting bar locking screw, and position the guide roller with the knurled thumbscrew for the desired depth of cut. Tighten the locking screw.
4. For a constant depth of cut while routing, be sure to keep the tool perpendicular to the point of contact of the router bit.

