Peghead shaping
How to copy or design your own headstock shape with a blank peghead guitar neck.
1. Trace the shape of the peghead, including the pegholes, onto a piece of paper or thin cardboard. Draw your design on the paper (this way, you can erase all you want, without messing up the real peghead). 2. Think about tuners! As you lay out holes for the string post holes, make sure there's room for the tuner baseplates, and enough room to turn the knobs comfortably. 3. Carefully cut out your design and use it as a template, tracing it onto the peghead in pencil. Don't use ink, because it can leave permanent marks — even through the finish! 4.Carefully trace your design onto the face of the peghead. Use a pencil, because
ink may stain the wood, even through the finish! 5. Use a bandsaw,
coping saw, or jigsaw to cut out your peghead design. A bandsaw or jigsaw
is the best way to go. This will ensure that the edges are square to the
back of the peghead and that the transitions will be smooth. When you are
sawing, never cut on the line—always cut to just outside the line, so that
you can sand to the line. 6. After you have roughed out the shape, it's time to final shape
the peghead. Use a
drum sander,
files, or
rasps.
7. Once the peghead is shaped to your satisfaction, sand the area with
150-grit sandpaper, followed by 220 and 320-grit. The neck is now ready for finish touch-up, or more finish. Wear eye protection and follow all safety guidelines when working with tools.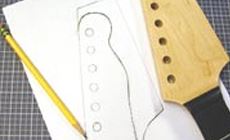
Work Smart!


