Hiding an "evil smile" peghead break with the Razor Blade Trick
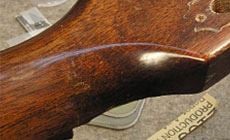
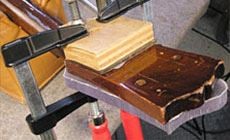
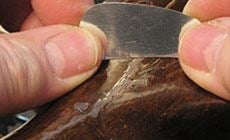
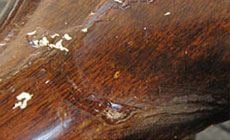
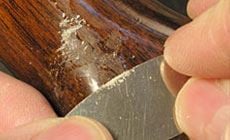
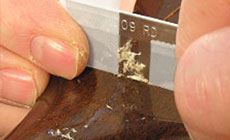
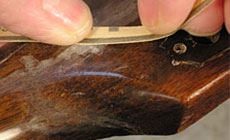
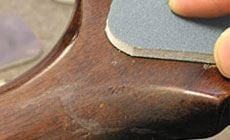
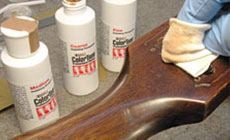
A peghead crack is often shaped like a smile. After it’s fixed, there’s still a finish repair to do: making that smile disappear. I saved time by using amber super glue and the Razor Blade Tape Trick. You’ve probably seen breaks like this: I think of them as smile-shaped. That nasty smile is a familiar sight in any busy repair shop. Today I'm working on a typical example: a 1957 Gibson that probably took a fall when somebody left it leaning against a wall or amp. The neck has cracked at the delicate point where it meets the peghead. In this case, the “smile” runs from the edge of the neck to the center, where it meets a split running lengthwise. Gluing these cracks is only the first step on a repair like this; after gluing, there’s still the chipped finish to fix. That’s what I want to show you, but first let’s get the gluing done… I warmed the peghead with a desk lamp, then worked hot hide glue into the cracks. I applied clamps, and they squeezed out excess glue; after cleaning the squeeze-out several times, I left the repair to dry for two days. It glued up nicely. All along the cracks, bits of finish were missing. To repair these chips, I drop-filled them with super glue applied with a drop-fill toothpick. Often I need to mix a custom color into the glue for this, but I skipped that step this time: our amber super glue matched the color of the old finish well. The glue that filled the finish chips supplied the color at the same time. I created a slight mound of glue by giving the cracks several light applications of amber glue over the next few days. In this photo, they're about halfway filled. When I'm done, the glue will be mounded a bit higher than the surrounding finish; I'll scrape the hardened glue down to the level of the surface. Whether you use lacquer or super glue, scraping is the safest way to begin leveling. Super glue is harder than lacquer. If I used sandpaper to level, I could have easily sanded into the surrounding lacquer. So I'm going to start out with a scraper instead. I started scraping with an oval mini scraper. The rounded shape can balance on a high fill and work it down fast. Be careful not to tip and scratch the finish. It takes practice, but the oval is less likely to scratch the surrounding area than a straight blade. This is also a good shape for scraping the curves on the back of the peghead. Unlike the razor blade, both edges of the scraper have a burr; you can cut with either edge. Here I've gotten a good start on the flat area, but I still have a long way to go. The curved area is barely started. For the curves, the oval mini-scraper works well. I'm holding it at an angle and using gentle push and pull strokes. Turn a single-edge razor blade into a micro-scraper by drawing the edge along a sharp steel or cast iron edge (a nut & saddle vise is what I use). This turns the super-sharp edge to one side, creating the "burr" — the microscopically small edge used for scraping. Turn the burr toward the imprinted side of the blade, so you'll know which side has the burr — that's the side you'll always use for your final scraping before sanding. Now wrap cellophane tape onto each side of the blade, leaving enough center exposed to span the fills you're scraping. The tape is .002" thick, and it acts as a depth stop as you scrape. When you've scraped the drop fill down until the tape touches on each side, the remaining fill is only .002" higher than the surrounding finish. Most of the drop fill is scraped away, and I've switched to the razor blade. You can pull it or push it, but always have the burred edge doing the work — the opposite side won't scrape. You can use a scraper at any angle you like — even laid flat and gently pushed. Here, I'm pushing the blade away from me, held nearly vertical. Don't hold the blade vertically for scraping drop fills until the very last, when the fill is almost gone. This is because it's easy for a vertical blade to snag the edge of the fill and chip it. When the tape-wrapped razor blade no longer cuts, you're down to .002". Time to switch to strip-sanding with Fre-Cut sandpaper cut into strips 5/16" wide. Pull the strips across the drop fill while lightly pressing down with your thumb, finger, or a small foam rubber block. Each grit gets only a couple of swipes of 320, 400, 600, and 800-grits. When you get to the 600 and 800-grits, feather your sanding out and away from the fill and very lightly onto the finish. For the final step, switch to Micro-Mesh pads. As you practice with these, you'll get to know what works for you in various situations. I used them dry starting with 3200, then switched to 4000, then to 8000. After the Micro-Mesh pads, I moved to polishing compound. The little 4 oz. bottles in our finishing kit are all you need for small jobs and touchup work. I started with coarse, and when I went to medium it looked so good that I stopped there rather than going on to the fine. I wear nitrile gloves when rubbing out with any kind of compounds or chemicals. That's a lot of leveling/polishing steps, but they probably seem longer to read about than to actually do. The end product looked pretty darn good, even if I do say so myself!Wipe off that evil smile!

Broken pegheads are pretty common


Gluing the cracks
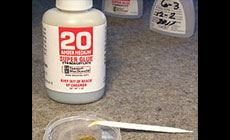
Create a slight mound of glue
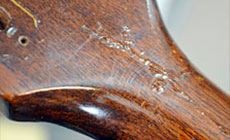


Ready to scrape
Razor blade scraper
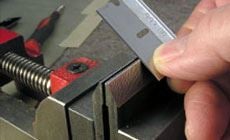
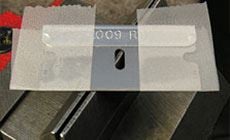
The razor blade tape trick
Now for strip-sanding
Next, sanding pads
And finally, polishing compound
Whew!