Truss Rod Rescue Kit Instructions
When the truss rod nut no longer adjusts due to damaged threads, or because it is already as tight as it can go, this tool fixes the problem.
I-5680
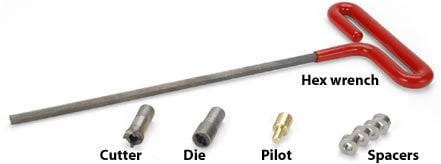
| Cutter Removes wood around the truss rod, exposing the rod and making room for the thread-cutting die. |
Thread-cutting
die A specially-designed 10-32 die that cleans up existing threads and cuts new thread on the truss rod. |
Pilot For Fender guitars: guides the cutter into a 3/8" truss rod access hole. |
Spacers Provide a smooth bearing surface for the truss rod nut, and cover the last few partial threads left by the die. |
Our Truss Rod Rescue Kit breathes new life into valuable necks that would otherwise be scrapped. When the truss rod nut no longer adjusts due to damaged threads, or because it is already as tight as it can go, this tool fixes the problem.
Use the Rescue Kit to clean up threads, cut new threads, and remove wood to make room for the truss rod to work. It even rescues truss rods when the adjusting nut has broken off!
Instructions
Use the Truss Rod Rescue Kit to repair standard truss rods. The Rescue Kit fits the standard truss rods commonly used by Gibson, Fender, and the majority of guitars: a single steel rod 3/16" in diameter with a 10-32 thread (also common on mandolins and other instruments). One end of the rod is anchored inside the neck, and the other end is threaded to accept an adjusting nut. Tightening the adjusting nut pulls the rod tight, which pulls the neck. The threaded end is where a truss rod is most likely to fail: threads become damaged, and sometimes rods break at this point. This is where the Truss Rod Rescue Kit helps by cutting wood to expose more of the rod, and cutting new threads into the exposed rod. Sometimes the adjusting nut is located in the peghead, and sometimes in the heel of the neck. The Truss Rod Kit works in either situation.
The Truss Rod Rescue kit is not for double-action truss rods. These designs, including our own Hot Rod truss rods, combine two shafts to achieve their "push-pull" effect. They are less likely to become damaged in the way that standard truss rods do.
First, try cleaning the threads
Turn the truss rod's adjusting nut counterclockwise to remove it from the threaded rod. Sometimes, all that's needed is a cleanup of the truss rod threads. Use the thread-cutting die for this, turning it carefully onto the existing threads. By threading the die on and off once, you'll know the rod is cleaned and ready for its adjusting nut.
If you feel resistance when turning the die, stop. This resistance means the tool has met with marred or dirty threads, or is starting to cut new threads in the metal rod. This requires a slow and careful approach, as detailed in step 3, below.
In some cases the nut will have become frozen to the rod, or may even have broken off, taking the end of the truss rod with it. To repair a truss rod in this condition requires removing wood around the rod, and cutting new threads as shown in steps 1 through 5.
Good, working truss rod. This adjusting nut is accessible, turns without too much force, and is flush against a metal washer that serves as a bearing surface. |
 |
||
Broken truss rod. Here, the adjusting nut has frozen to the truss rod and then broken off — taking part of the rod away with it. The remaining truss rod doesn't have enough thread exposed for an adjusting nut. |
 |
||
Truss rod repair, step-by-step |
|||
Step 1 Use the cutter to remove wood until you have 5/8" of the truss rod exposed. Use only moderate pressure, and let the tool do the cutting. Stop frequently to remove wood chips from the cavity. |
 |
||
Step 2 With the wood removed you now have access to more of the truss rod, but there may not be enough thread for the adjusting nut. |
 |
||
Step 3 Switch to the die, using it carefully so you can feel it catch onto the threads. Turn the die slowly, and stop when it hits resistance. Note the position of the wrench at this point, then continue 1/4 turn — you've now started cutting threads. After 1/4 turn, back the die out and clean its threads. Also clean any shavings from the truss rod cavity. Continue thread-cutting 1/4 turn at a time, stopping to clean between each cut until you reach the bottom of the cavity. Cutting too quickly allows shavings to build up and places stress on the truss rod. A bit of lubricant in the die, such as petroleum jelly, Guitar Grease, paraffin, or beeswax will ease the job and produce cleaner threads. We don't recommend using oil, or any other thin lubricant that might leech into the wood. |
 |
||
Step 4 Now there is enough thread for the adjusting nut, but the die leaves a little bit of unthreaded rod at the deepest point in the cavity. |
 |
||
Step 5 Use a spacer (provided) to cover that last bit of unthreaded rod and to provide a metal bearing surface. A thin washer can also be added over the spacer if you wish. |
 |
||
Use the pilot for Fender truss rods A Fender neck's truss rod cavity is smaller than the cutter and its rod is recessed. In this case use the pilot, which is sized to match the Fender cavity. The pilot keeps the cutter centered until the cut is well started; after that you can remove the pilot and continue cutting normally. |
 |
||