How to Adjust the Action on an Electric Guitar
Getting your action just right can transform how your guitar feels and plays. StewMac Tech Gene Imbody breaks down how to find the ideal action height for your playing style, how to check it quickly without fancy tools, and how to make adjustments no matter what kind of bridge or nut height your guitar has. If you’re chasing better tone, comfort, and control, this is a must-watch!
Video Transcription
Gene Imbody:
When we talk about guitar action, we're talking about that critical space between the top of the fret and the bottom of the string. As a player, one of the most important decisions you need to make is how high or how low to set your action. If it's too low, your notes are going to buzz and your bends are going to choke out and die. If it's too high, it's difficult to play and can be painful on your fingers. Plus the extra stretch of the string to touch the fret can throw off your intonation- not good.
When you learn how to fine tune your own action, you unlock the door to a whole new level of Guitar Mastery. You can adjust it to your own unique playing style and it's something anyone can do at home. So let's get started. I've set up thousands of guitars and what I find is that when most people come into my shop, they ask for the lowest action possible, no fret buzz. Low action is nice for a lot of players. It takes less effort to fret your notes, bends are a lot easier, and you can glide up and down the neck a whole lot faster.
But if you have an aggressive pick attack, you may need higher action. The harder you strike a note, the higher it needs to be off of the top of the fret in order to ring clearly and avoid buzzing.
Neck Straightness
So what is low action or high action and how do you measure it? Well, that starts with your neck. You want to make sure your guitar neck is fairly straight before we start measuring things. The straightness of your neck is controlled by the truss rod. That adjusts either at the headstock or at the heel. Your neck could have a back bow. That's a bad thing. It can result in a pretty unplayable guitar.
You may have a lot of buzz in the first three to five frets where you're hitting the fret ahead of where you're fretting, or it could have an up bow, which is also called relief.
Relief is the curve in the neck that results from the pull of the strings. A little bit of relief can be a good thing. It's going to give your strings a little extra room to vibrate freely without buzz. Too much relief can make the guitar feel stiff and uneven going up the neck. It can make your action feel higher in the center of the neck than on either end, so you need to find the right amount. I use a straight edge to check the relief in my neck, but if you don't have a straight edge, you can use the strings themselves. Put a capo behind the first fret and hold the string down At the 14th fret. You'll get a reasonable reading of the straightness of your neck by looking at the gap over your seventh fret. If the gap is too large like on this neck- I can fit my car key through this gap. You need to tighten your truss rod nut to straighten your neck.
On the other hand, if you don't have a gap or the string is touching the fret, you need to loosen the nut just a little bit to give yourself a slight gap. This is a good amount of gap to look for. Somewhere in the range of a sticky note to a business card is a good range to be in. Make small adjustments to your truss rod. No more than about a quarter of a turn at a time until you get the gap you're looking for. And be sure the guitar is in tune and you're checking in the playing position. Tension and gravity matter.
Just remember, left to loosen the nut and give yourself some relief, right to tighten the nut and straighten the neck. Okay, you've got your guitar neck straightened out with just the slightest gap around the seventh fret.
We need to think about one last thing before we measure our action, the nut.
Action at the Bridge
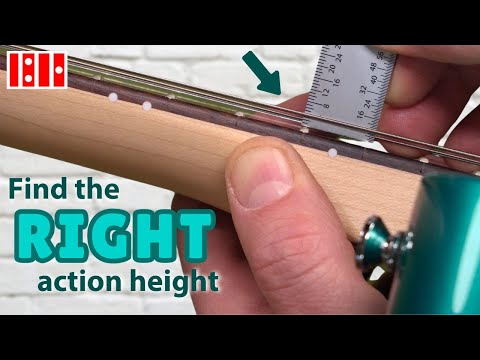
Your guitar nut is where it all begins. The depth of these slots sets the action height at the other end of your neck, the height of the strings over your first fret. That's a critical detail for the overall playability of your guitar. We'll deal with the nut in a minute, but let's take it out of the equation for now by putting a capo back at the first fret. Holding the strings down at the first fret essentially sets our nut height to zero, and that's going to give us a more accurate reading when we go to measure the height at the other end of the neck. So now we're ready to measure our action, which we're going to do back at our 14th fret. I highly recommend a measuring tool like our String Action Gauge.
It makes this job precise and very easy, or any quality rule that measures down to at least the 32nd or one millimeter for the metric fix. Make sure you aren't using a ruler. A ruler has a space before the measurement starts, and that's going to throw you off. The edge of the tool needs to be the start of the measurements, like our String Action Gauge or our Six Inch Rule, or you could even use a guitar pick. A typical heavy guitar pick is going to measure about a 32nd of an inch thick or 1.5 millimeters. You can stack these to get a decent idea of your action height.
So let's talk about some good measurements to aim for when you're checking your action for the first time. We'll start with our low E. In general, a good low action for your low E string is about 3/32nds of an inch or 2.5 millimeters.
Now let's look at our high E trouble strings can be a little bit lower than your base strings, so a good low action for your high E string is about a 16th of an inch or 1.5 millimeters. But don't get too obsessed with nailing these numbers. These are just a reference point to start with. Ultimately, we're going to tweak these up or down to suit our tastes. So we measured our two outside E strings, but we still need to set the four remaining strings in the center. The best way to do that is with an Understring Radius Gauge.
In case you didn't know, your fretboard is curved, not flat, and your strings need to follow that radius in order to retain the right height across all six strings. It's a good idea to match the radius of the strings to the radius of the board.
This fingerboard has a 12 inch radius, and that's pretty common, but you're going to need to measure because you could have anything from 7 and 1/4 all the way to 20. So using an Understring Radius Gauge, we can set the bottom of our remaining four strings to the arch matching the fretboard based off of the two outside E strings we already set.
You'll notice on this Telecaster, it was really easy for me to adjust these saddles with a 1.5 millimeter Allen Wrench, but you might be working with a different style bridge like a Gibson style Tune-O-Matic or a wraparound bridge. Those adjust on each side with a thumb wheel or a post, and the radius is preset by the height of the saddles across the bridge.
Or you might have a tremelo. Setting up a tremolo involves balancing the tension of the strings with the claw on the back of the guitar, screwing the claw in, increases the tension and pulls the trem back. Letting the claw out reduces the tension and allows it to move forward with the pull of the strings, make small adjustments to the claw and retune the guitar and repeat that until the bridge is sitting level to the top of the guitar.
We'll be releasing a video dedicated entirely to setting up a trem since it's a little more involved, but those are the basics.
Action at the Nut
Okay, we have the action set at our bridge. Now it's time to turn our attention to the other anchor point, our nut. This is all about feel. So if your basic notes and chords in the first couple of frets are playing good, they don't feel too stiff and they're not sharp and out of tune, you're probably okay. But if you're not sure, here's what to do with your capo at the first fret, check out the gap over the second fret. This is basically what we want to see when we remove the capo and check the gap over the first fret with just a little extra height so we can strum open notes harder without getting buzz. This guitar is looking great, but let me show you what to do if your action's too high.
Check out this guitar. The gap over the first fret is way too high. I'm going to use nut files that match my string gauge to lower these slots. File these slots one at a time carefully and check after every few file strokes to gauge your progress. Just go slow and make small adjustments and recheck often.
You don't want to go too low on these slots or you may have to change the nut out, and that's a job you don't want to have to do. This action is looking perfect and we're good to go.
Intonate & Play
Once you have the guitar set to these basic measurements, use a good quality electronic tuner to check your intonation, you want to match your open note to the fretted note at the 12th fret. If the fretted note is sharp in comparison to the open note, you're going to need to move the saddle back. If it's flat, you're going to need to move the saddle forward. Make small adjustments, retune, and check again until all six notes match the open note.
Now it's time to play the guitar, and it's important to do just that. Play the guitar as you normally would. Any string will buzz at any height if you strike it hard enough. So test each string out with the normal intensity that you would use when you play. We want a guitar that feels great and plays cleanly without any buzz. If you're still getting buzz, try raising your E string slightly and reset your radius and try it again.
Or if that buzz is mainly in the first three to five fret range, try loosening your truss rod nut a little bit to give yourself a little more relief. If it plays cleanly but feels a little stiff, lower your outside strings just a little bit and reset your radius and try it again. If the stiff feel is mostly isolated to the center strings, try a slightly flatter radius. That's going to give you a lower feel across all six strings. And it's something that I and a lot of players I do work for like.
The great thing about an electric guitar is you can make changes quickly and easily to fine tune the action to suit your tastes. So don't be afraid to experiment. Use the measurements here to give yourself a home base, and then have fun tweaking the guitar to suit your own taste and make it truly your own. See you at the bench next time.


