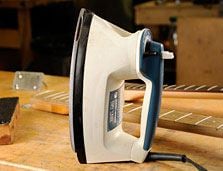
Why use a household iron on a fretboard?
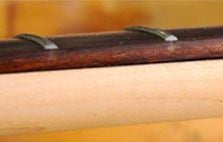
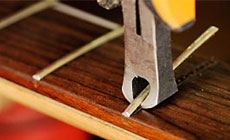
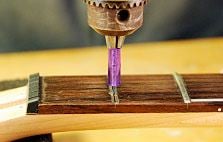
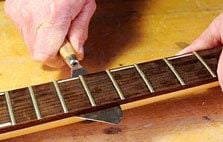
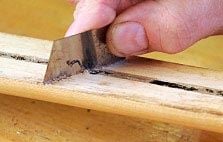
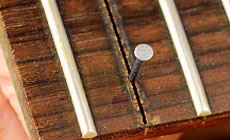
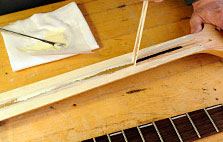
Meet Dave Frush, a member of our StewMac warehouse crew. Dave’s one of StewMac’s resident rock and rollers, and after work you’ll find him recording or playing the local clubs with his band, Zapaño. Dave asked me what to do about this separation between the rosewood fretboard and maple neck of his guitar (below). He wondered if he should just run some thin super glue into the seam and clamp it tight. It’s great for lots of jobs, but super glue isn't the right choice for this. I wouldn’t want to chance having thin glue run into the truss rod channel, causing the rod to seize up. I thought about working some Titebond into the gap, but then I wouldn’t know what caused this issue to begin with. No sense filling this gap with hardened glue when I’d rather the gap wasn’t there at all. And I sure wouldn't want to see the fretboard separating later on either side of the repair. I decided to remove the board, clean up the surfaces, and re-glue it. The first step was to pull two frets: the 1st and the 22nd. I used care not to twist or mangle these frets, so I can reinstall them later. Watch out: it's easy to drill clear through the neck! So I'm using a depth-stop drill bit. This trusty old iron that my wife discarded is my favorite tool for removing fretboards. I turn the iron up to its maximum temperature, and the frets help transfer heat deep into the board. I heated the entire fretboard by moving the iron over its length for about 10 minutes... ...then I used a bridge removal knife to work the board off, starting where it was separated.When I got the board off, I found the issue: the factory simply hadn't used enough glue to cover the board. The next step was to clean off any humps of glue left over from the factory. I softened the glue with hot water on a brush, then used a scraper to remove it. I let the cleaned-up board dry for a few hours. I used wire nails for indexing pins, pushing them through the holes I’d drilled in two fret slots. I taped off the truss rod slot before brushing on the glue, to keep the glue out of there. I spread a good layer of Titebond to ensure good glue squeeze-out, and removed the tape.
The index pins and holes made it easy to position the fretboard exactly where it had been before I started. I clamped the board tight with rubber bands and removed all the glue squeeze-out I could before the glue dried. I'm not going to be able to get it all, but it helps! I let it dry overnight. The next day I removed the rubber bands and indexing pins and used a damp rag to clean up any remaining squeeze-out. I reinstalled the two frets I pulled, and put this rock and roll machine back together. Dave’s guitar is repaired and playing great. The job wasn't too difficult; actually, it was fun to do. Here you go, Dave—
commence rocking!Why I’m ironing, and why super glue is the wrong choice for fixing this fretboard.


Time to glue!
Back in business!

