Why hide glue is best for this cracked neck
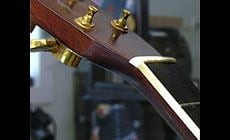
Hide glue is the best way to fix this nasty peghead break, and here’s why. This tricky crack on a 1972 Martin D-35 led me to a technique that I could hardly wait to show in Trade Secrets!
Starting at the nut slot, the crack ran at an angle down to the 2nd fret. It was a mirror image on both the bass and the treble sides, so it opened like a hinge across the width of the neck. It was clean inside and the break ran with the grain, so it was ready to accept glue quite well. I could have used a number of glues for this repair, but I chose hot hide glue for these reasons: Hide glue has a fairly low viscosity so it can penetrate deep into a crack. Hide gluecleans up easily with water, even after it’s dry. I trust hide glue’s strength (similar to epoxy). Epoxy would be hard to clean up in this situation, and most epoxies aren’t thin enough to penetrate deep into the recesses of this crack. Titebond is strong and cleans up easily, but it’s rather thick and wouldn’t penetrate as deeply as hot hide glue. Superglue works too fast for this job. Also, it will mar a lacquer finish, requiring a finish repair that isn’t needed with hide glue.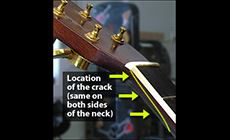
The right glue for this job
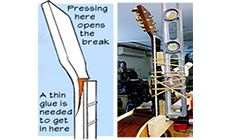
I thought this crack was just a scratch in the finish until I clamped it up
The glues I didn’t choose for this job:
Here’s the gluing technique I want to show you
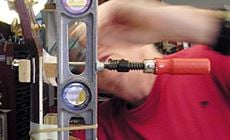
I clamped a board into my repair vise, running parallel to the floor. With the butt end of the guitar resting on a padded chair, I clamped the guitar to the board so it’s held upright (so the force of gravity will pull glue down deep into the break).
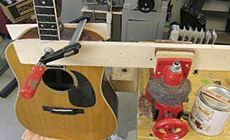
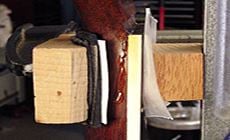
I clamped a rigid beam to the fretboard using rubber binding bands. Wood spacers between the beam and the neck create a gap that lets me insert a “spreader” between the beam and the peghead.
The spreader is a half-dowel that slides against a piece of paper-covered plywood (the paper helps it slide smoothly). Pulling the dowel downward forces the peghead back, and makes the break open up for gluing.

Ten minute's worth of carefully-watched heating with a desk lamp gently warmed the neck. The warmth extends the glue's working time before it gels, encouraging the glue to seep deep into the crevice.

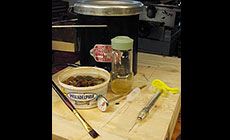
Here's my glue pot and tools:
The small jar holds the fresh-mixed hide glue. (Keep the lid on so it the glue doesn’t evaporate and become too thick.)
The glue pipette has its thin tip snipped off, and it’s filled with thinned hide glue (50/50 with water). I also have a 5cc glue syringe with unthinned glue. The small brush is for applying glue or hot water. The cream cheese carton is filled with gravel; it sits at the bottom of my glue pot to lift the small jar’s lid up out of the heated water.
Ready, Set, GO!
I worked fast in gluing this crack, to take advantage of the warmed neck and the warm, thin hide glue. First I squirted in a little of the thinned glue from the pipette; this wet the wood, and got some glue way down in deep. I followed with the syringe of unthinned glue.
Next, I loosened the pressure to close the crack and see if the glue had penetrated. It did; it was flowing out of the crack.
Still working fast, I clamped it shut using shaped cauls that matched the curves of the neck and the fingerboard.
Continuing to move fast (too fast for my camera's shutter speed!), I cleaned off the squeeze-out from both sides. This is when hide glue’s water cleanup is so handy.
I let the glue harden overnight, then un-clamped it and let the glue dry for a few days — that way, any swelling from the water will have dried and shrunk back to normal.
Three days later, the crack was, again, almost invisible!