Regluing the bass bar inside a standup bass
Man, this takes up shop space! Wrestling with a standup bass
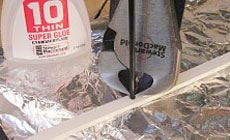
Doing an interior repair without taking the top off this big ol’ doghouse.
This is a 1955 Kay M-1 bass, a 3/4-size workhorse used in school orchestras pretty much everywhere. My brother Tom left this in my shop after a jam two years ago, and I’ve been tripping over it ever since! He’s decided to sell it, and I’ve agreed to give it a repair to help that happen.

Problem: a loose bass bar
The bass bar is a long brace running vertically down the carved top, transmitting string energy from the bridge. It’s shaped to match the top’s curvature; you don’t want gaps between it and the top. That’s the problem I’m going to fix.
I really don’t want to take the top off.
That would give me direct access to the bass bar, and I want to do my brother a favor, but this week I don’t have time or shop space for such a big repair. There must be an easier way...
Peeping inside.
Looking through the f-hole, I can see where someone tried to glue the loose bass bar. The picture below is looking through the f-hole into a mirror, reflecting the bass bar on the underside of the top. Sloppy glue marks the unsuccessful previous repair.
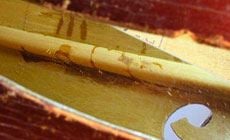
There’s an unwanted gap between the bass bar and the top, with old hide glue drizzled on it. The bass bar wasn't clamped to the top, so the glue hardened in the gap and kept it from closing. My plan is to steam that glue to reactivate it, add more fresh glue, and clamp the brace while the glue hardens. All of this done by reaching through the f-hole.
Shop-modified custom tools.
I’ll need to make some custom bass-working tools. I cut and drilled two sections of our 3-piece inspection mirrors, and chopped off a bridge removal knife. These sacrificed tools cost less than $25, which my brother will gladly pay in order to make his bass saleable.
On a regular customer’s bill, I’d list this under “Misc. Parts & Materials.” I tell customers they can take the tools they’ve paid for, but they never do. Two of the long-reach knives I'll use here are leftovers from previous jobs like this.
Modified mirrors:
- Two sections taped together as one large folding mirror.
- One section super-glued and screwed to the angled end of a dowel.
- Two sections taped together, with one edge trimmed to a shape that fits up against the curves inside the bass.
- Telescoping inspection mirror (small for a bass, but handy).
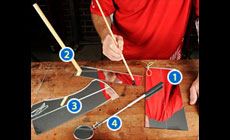
The wooden dowel in my hand has a rubber cap for pushing the mirrors around inside, and the folding mirrors are drilled for strings to pull them back out.
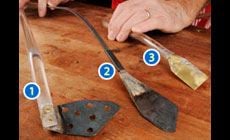
Long-reach knives:
- 1/2" diameter acrylic rod is slit on the end and drilled to hold a blade from a bridge removal knife. Acrylic rod bends to shape easily when warmed with a heat gun. The holes drilled in the blade help it carry water or glue into an open joint. Caution: When drilling something like this, steel and acrylic especially, clamp it to the table. Don’t hand-hold it!
- This flat, bendable, bar of 1/16" x 5/16" soft steel has a fingerboard removal knife blade attached with heat-shrink tubing.
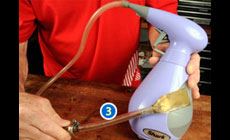
- My steamer blade is shaped from .005"-thick brass sheet, soldered into a thin hollow blade, then soldered to 1/4" copper tube. Hose-clamped to flexible plastic tubing, it carries steam from a Shark brand bathroom tile cleaner that delivers steam at the pull of a trigger.
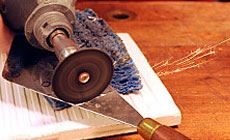
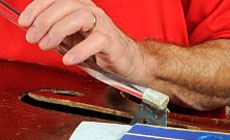
To make knife #2 above, I used a Dremel tool with an abrasive wheel to cut a bridge/fingerboard removal knife to the size I needed. The blade is resting on a wet sponge to keep it cool while I cut.
Keep it neat.
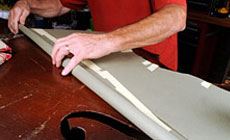
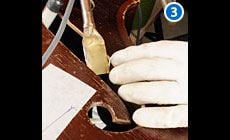
I cut paper to the shape of the bass and rolled it on a broom-stick. I can slide this through the f-hole then unroll it to keep glue and steam off the back of the bass while I’m working. This’ll protect the old paper Kay label on the back, too.
OK, let's get started...
- I warmed the top in the area of the loose brace with a desk lamp until a surface thermometer registered about 109° F. This extra heat extends the working time when you’re using fresh hot hide glue.
- The knives were heated in a water-filled electric glue pot, along with a jar of hot hide glue.
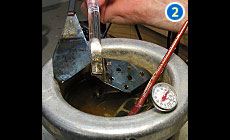
- Watching in the mirrors, I inserted my steamer blade into the open joint and pulled the trigger. The steam spread into the loose joint and I could feel the hide glue melting.
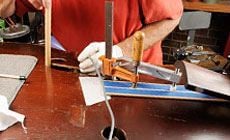
I followed with my knives: the steel bar knife through the treble f-hole, and the perforated blade loaded with fresh glue through the bass f-hole. With these I spread the hot glue in the joint.

I quickly clamped the brace, with a caul on the outside to protect the top. I used tape to mark the locations for my clamps beforehand — this preparation helped me work fast with the hot glue.
I left it to dry overnight, crossing my fingers that the brace would hold. When I checked in the morning, it was solid!
String bass setup
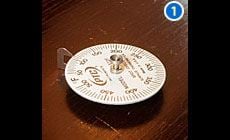
A 3/4-size bass scale length is 1060mm, or 41.838" (approximately 42"). Footprints on the top showed this bridge had been located in a number of places. I chose the location that centered the strings over the fingerboard with 42" from the nut to the top of the bridge.
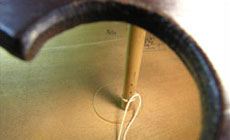
With only enough string tension to hold the bridge with slight pressure, I installed the sound post. This is the dowel that runs between the top and back on violins, cellos and basses, located near the bridge on the treble side. I could see several places where the sound post had been installed before, and chose a spot slightly behind the treble side bridge foot. How far is “slightly behind”? I took this advice from the internet: “a distance back equal to the thickness of the top.”

I don’t have a sound post setter for a bass, but even so this was easier to install than a violin sound post because of the size of the f-hole. There’s a string tied to the post, which helped me pull it into position.
I put a little more tension on the strings, then I could knock the sound post into better position with a fretting hammer. My friend Dave Messina teaches classical bass at Ohio University, and he stopped by to check my setup. He gave me the A-OK, and I called my brother: time to get this big ol’ thing outta here!


