Guitar Neck Removal
The Neck Removal Jig applies gradual, controlled pressure for safely steaming the neck out of a dovetail joint.
I-4737
The Neck Removal Jig applies gradual, controlled pressure for safely steaming the neck out of a dovetail joint.
We would like to thank Bryan Galloup of Galloup Guitars for the idea that led
to the development of this tool.
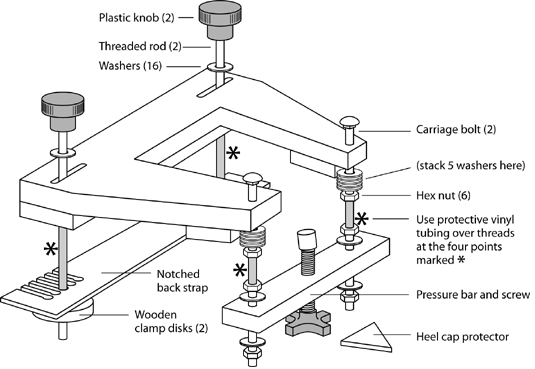
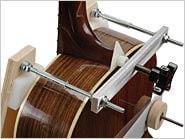
Assemble the jig as shown in the diagram. The vinyl tubing fits over the threaded
rods and carriage bolts so that those metal parts won't scratch the guitar's finish.
Each carriage bolt is held tightly in the plywood base using five washers and
a hex nut. The other hex nuts allow adjustment of the bar that holds the pressure
screw.
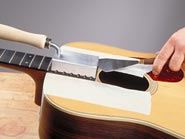
| Instructions Removing a neck from a dovetail joint is tricky, and requires steam to loosen the glue—don't try to push a neck out by force alone! Steam from a pressure cooker, espresso maker, or other boiler is injected deep into the neck joint through the extra long needle of our Neck Joint Steamer #4059. For detailed instructions, we recommend Dan Erlewine's "Neck Resets" DVD #5621. Loosen the fingerboard tongue Before attaching the jig, you'll need to loosen the fretboard extension over the body (the "tongue") by heating it with our Bridge Heater & Fingerboard Iron #4607. Use a hotplate to heat the iron to 250°F. When the glue under the fingerboard softens, you can work the tongue free from the top using our Bridge/Fingerboard Removal Knife #4464. Use extreme care, you may want to protect the guitar top by covering the working area with cardboard wrapped in metal foil. This will help protect the top from heat damage. |
  |
|
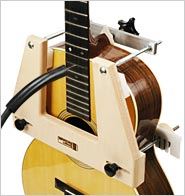
| Attach
the jig Carefully fit the guitar neck through the opening in the jig, as illustrated. Adjust the threaded rods to fit the waist of the guitar. If the guitar has a curved back, the clamping disks will try to slip off under tension; use the notched back strap to keep these disks in position. Align the tip of the pressure screw to meet the neck heel as you tighten the jig. The pressure bar adjusts for guitars of various depths. Place the triangular heel cap protector between the pressure screw and the heel cap to distribute the pressure. |
  |
|
| Protect
the top Keep the guitar top covered and protected around the fingerboard extension. (Foil isn't necessary at this point, but keep a mask of sturdy paper taped in place to protect the finish.) Adhesive masking paper is a handy way to protect your guitar top. Don't let water get between the jig and the guitar; use masking paper to direct it out and away from the jig. |
||
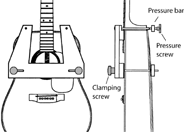
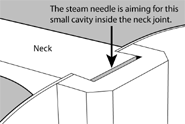
| Steam
the neck joint The target for the steam needle is a small gap that exists between the end of the neck tenon and the wall of the neck block (illustrated). This cavity typically falls below a fret—the first fret in from the edge of the body. On many guitars the neck meets the body at the 14th fret, and this gap is below the 15th fret. On the example guitar in our photo, the neck meets the body at the 12th fret, so the gap is below the 13th fret. Remove the fret and drill a 1/16"-5/64" hole through the center of the fret slot and into the dovetail cavity (you should feel the drill bit hitting the gap once you're through the fingerboard). Insert the needle of the Neck Joint Steamer into the cavity and begin steaming. After the steam softens the glue in the neck joint, wiggle the neck and turn the pressure screw to push the neck out of the joint. Continue injecting steam throughout the removal. When the neck comes out, immediately turn off the steam and remove the jig and masking paper from the guitar body. Dry any remaining moisture promptly. |
 |


