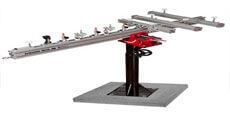
Erlewine ShopStand Instructions
Installation and anchoring instructions for the Erlewine ShopStand.
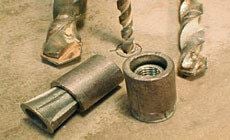
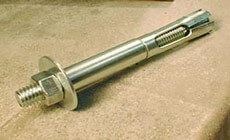
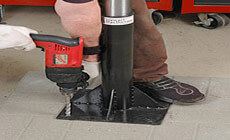
Use lag bolts (not included) to mount the base on a wooden floor. The bolts should fasten into a floor joist if possible. On a single-layer plywood floor (lacking an upper layer of flooring), consider adding a second or third layer of plywood (18-24" square) for stability. To mount on a concrete floor, follow the steps described below. A hammer-drill and several carbide-tipped masonry bits are needed to install anchors in a cement floor. Two types of cement anchors are described below. Drilling concrete can create flying chips of stone. WEAR SAFETY GOGGLES and gloves. "Tampin" brand anchors expand in the hole and are threaded to accept a machine bolt. The 5/8" Tampin anchors fit 5/16"-18 bolts, and require 5/8"-diameter holes drilled a minimum of 1" deep for the anchors to remain below the surface of the cement. Start each hole with a 1/4" pilot bit, then enlarge the hole with a 1/2" bit, and then use a 5/8" bit for the final size. Starting with a small bit helps keep the hole on center, and gradually enlarging the hole keeps it round and clean. For more precision, start with a 1/8" bit and drill in 1/8" increments. Sleeve anchors expose a threaded bolt above the floor surface as the hex nut tightens the expanding sleeve below the floor. The advantage is that fewer drill bits are needed to install a heavy-duty bolt. A 3/8"-16 bolt needs a 1/2"-diameter hole in the floor. 1 Position the ShopStand, mark one baseplate mounting hole, set the ShopStand aside, drill the hole and install an anchor. 2 Reposition the ShopStand and fasten it down. Though smaller than the 1/2" holes in the ShopStand base, 5/16"-18 bolts hold well and allow for alignment if the anchors don't line up perfectly. Use larger mounts if you're confident of your drilling accuracy! 3 Stand on the base to weight it down as you drill the second hole diagonally opposite the first one. Start the 1/2" hole by using the baseplate as a drill guide for centering, and then switch to the smaller 1/4" bit for the full-depth pilot hole. WARNING: Drilling into cement is hard work! Wear gloves, keep the bit perfectly square through the steel plate, and brace yourself against the column in case the bit binds and wrenches in your hands. 4 Swing the ShopStand aside. Install the second anchor, bolt the stand in place with two fasteners, and follow the procedure above for centering and piloting the remaining holes. 5 Remove the ShopStand, enlarge the holes as above, install the remaining anchors, and fasten the stand to the floor. A 2" thick x 24" square poured-concrete "patio block" makes an excellent base that moves wherever you want it! Mount the ShopStand to the patio block using the same instructions for installing on a cement floor. These items are included with your ShopStand:

Installation

Installing on a cement floor
Safety Warning!
Install ONE anchor first!
Movable ShopStand tip: