Replacing a shrunken pickguard
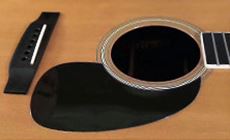
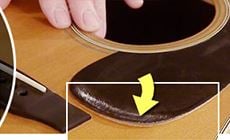
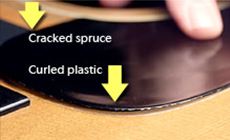
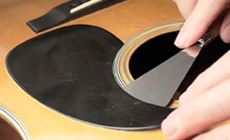
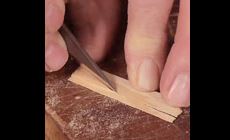
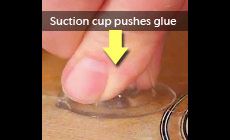
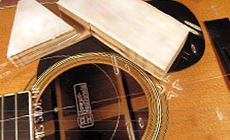
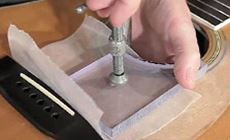
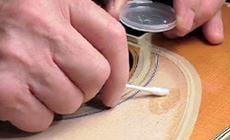
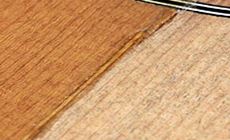
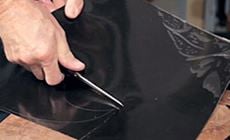
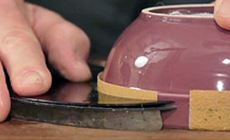
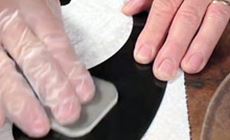
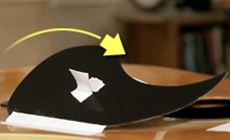
Over 38 years, the plastic pickguard on this ’73 Martin D-35 has shrunk and peeled up at the edges. Prior to 1985, Martin glued guards directly to the bare wood, then applied the finish. Vintage Gibsons and Guilds were built this way too. When the guard shrinks it curls up like a potato chip, pulling the wood with it. That’s caused a crack in the spruce at the edge of this guard. Sometimes you can simply reglue these pickguards by working glue under the loose edges and clamping them flat. Often, however, the best fix is to remove the guard, glue any splits, then make and install a new pickguard. That’s what I decided to do here. Paying careful attention, I warmed the pickguard with an 80-watt bulb. Then I gently worked under and around it with a fingerboard removal knife, peeling the guard as I lifted it with the knife. With the pickguard off, I could see that the crack had been glued before. Even so, the shrinking guard still pulled the repaired crack back open. I heated the tip of my knife blade with an alcohol lamp and dug out the glue. After cleaning the glue from the crack it was wide enough to be filled with a sliver of spruce. I glued the crack with hot hide glue. I pumped the glue deep into the crack by using a plastic suction cup that used to hold a thermometer on our kitchen window. After applying the glue, I quickly slid my sliver of spruce into the crack and snapped the excess off. In a moment, this piece will be pressed flush with the top by one of my two gluing cauls. Here’s a caul I made for fitting inside the body on glue-up jobs like this. It’s a single piece of 3/4" plywood, surfaced with non-stick Delrin plastic. The notch in the caul straddles a brace, protecting it from the clamps while pressure is applied to flatten the top. For making this and many other cauls, I used our clear acrylic dreadnought bracing template as a guide, which is seen here under the caul. My exterior caul is 1/2" thick clear acrylic. I clamped this in place for about 40 seconds and watched through the caul as glue squeezed out. I unclamped, cleaned up the squeeze-out, then final-clamped with waxed paper under the caul. I left this to dry overnight. The next morning the top was flat and the spruce filler strip was flush. Two coats of #20 medium-viscosity super glue with a half hour drying in between. This provides a clean, sealed surface to put the new pickguard on, and will make it easier to remove in the future if necessary. Although the crack and its spruce fill won’t show (the plan is to overlap it with the new pickguard), I sealed the crack and spruce fill with two coats of dark garnet shellac. I allowed an hour in between coats and then five hours to dry completely before applying the pickguard. After lightly penciling the old guard’s shape onto a piece of black pickguard material I roughly shaped it with scissors, staying well outside the penciled line. Using small scraps from the adhesive sheet I'll use for attaching the completed guard, I stuck my roughed-out blank onto a piece of thick acrylic. The acrylic is shaped so the pickguard blank hangs over the edges to let me shape it with a 6” fret leveler laying on its side. I file right up to my traced pencil line. This info is from one of many quick lessons that I've just videotaped for a new DVD coming out soon. It shows this whole process in just about five minutes. I shaped the soundhole curve using 80, then 120 grit Stikit sandpaper stuck on a porcelain bowl that just happened to be the exact 4-15/16" diameter that was needed. The new guard looked too shiny for a guitar of this age, so I de-glossed it with a Micro-Mesh finishing pad (12,000 grit). This softened the sheen of the plastic, making it fit the older guitar better. (With a little buffing, it could easily be brought back to a high shine.) After applying the pickguard adhesive sheet to the underside of the new pickguard, I set it in place and gave it a masking tape hinge. Then I peeled away the remaining backing and swung the guard down into position. Or maybe "just like old” makes more sense. Anyhow, this D-35 has a pickguard again! The adhesive sheet under this new guard has more “give” than the old glued-to-spruce guard. This'll allow the wood a little room to move, so this guard should have longer life than the original.Fixing a familiar problem: the shrinking pickguard.
Removing the guard:
Repairing the crack:


Next I put a finish on the bare wood:
OK, let’s make the pickguard!

Rather show you than tell you.

Belt sander? No, bowl sander!
Just like new!