Fixing a badly worn neck: super glue as both fill and finish
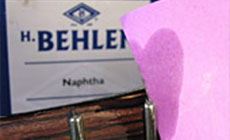
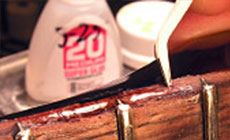
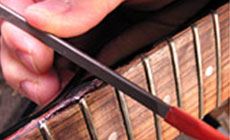
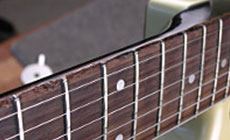
— a go-to guitarist for soul, gospel, jazz and funk artists like Al Jarreau, David Sanborn, Brian Culbertson, Stephanie Mills, and Will Downing. Wayne’s '85 Strat didn’t come with a scalloped fretboard, but it’s got one now — because he’s worn divots between every fret from the 7th to the15th frets along the edge of the fretboard. The fret ends stick out like nails (ouch!). Wayne says no. He’s not ready to put his main squeeze out to pasture. He asked me to smooth things over so this neck will keep on keepin' on. The divots were so deep that it would be a mistake to file the fret ends flush to the wood. That would remove a lot of fret, causing the treble E-string to fall off the edge when Wayne got in a groove. I opted to fill the divots with layers of super glue — building it up to match the fret ends that were trashing Wayne’s fretting hand. Super glue bonds nicely with polyester and polyurethane, like the finish on this guitar. Using super glue as both a filler and a finish turned a tricky repair job into a fun afternoon’s work... I cleaned the fretboard edge with naphtha, running a naphtha-dipped paper under the edges of the frets to soften any built-up dirt so I could scrape it out. I did a trial run on the 14th fret. If this super glue idea worked well there, I’d have a green light for filling the rest of the divots. After the naphtha dried, I used an X-Acto knife to poke holes in the clean wood, making a texture for the super glue to grab onto. Can you see the tiny chip of missing black finish? In several places the neck’s black color had chipped away. For the chips in the black finish, black super glue laid in with a drop-fill toothpick filled the bill perfectly. That's green masking tape in the lower left corner of this shot. I used water-thin #10 super glue for the first two coats of clear, applying them with a whip tip. Thin super glue dries very fast — I waited just 15 minutes between coats. Four wet coats of #20 medium thickness glue raised the level of the patch. I used a drop-fill toothpick, spreading the wet glue from the center toward the outer edge of the area. I gave each coat 30 minutes to dry, then touched the nearly-dry glue with accelerator to hasten the hardening Drying time depends on humidity, temperature, the glue’s freshness, and the alkaline property of the wood; you can only find what works for you by experimenting. If you end up with a sticky surface, let it dry for a day — don’t worry it’ll dry. (Best idea: practice on scrap.) I was able to level the hardened super glue into the surrounding finish with fret files. This is the medium size file, and it’s removing excess glue quickly; I followed with the small size to get closer to the finish before switching to sandpapers and polishing compound. I’m always nervous about filing or sanding through the finish — especially with imported guitars finished in urethanes and polyesters — because they have a technique for putting the color on super close to the outer surface. You can sand through the color in a second. This MIJ Strat (Made In Japan) fits this description, and I’m taking it slow and watching each file stroke. When you’re filing on finishes and glue, a file’s teeth load up fast, so clean the file often while you work. Do you keep a file brush handy? (Do you know where yours is right now? I suspect a lot of folks forget to use this tool often enough.) When the bristles wear short I grab them gently with fret nippers and pull the bristles out 1/8" or so — then nip the bristles so the exposed edge is sharp, clean, and fresh. For the final leveling, I strip-sanded what little super glue remained above the surface. Starting with 400-grit Gold Fre-Cut and ending on 2000-grit Micro Finishing Paper, I pulled strips of sandpaper across the repair under slight pressure applied with my thumb. (In this photo, you should see my other hand pulling the paper, but it was busy pressing the camera shutter!) A few seconds of pulling each grit, and the finish was level. Now all I needed to do was buff the repair to a gloss. Of course I had to go back through each step again — but that’s better than having to undo a whole string of super glued divots that didn’t work, and why we test repair techniques and practice on scrap. A hand buffing with medium and fine ColorTone polishing compound left the smaller fills looking quite good, and even the worst-case divots looked pretty decent... Not as great as a new neck would look, but this was a fast, affordable solution — and all the fret ends felt great. With his favorite Strat back, Wayne’s a happy fretter!Wayne Bruce digs DEEP when he bends strings, and his Strat neck has taken a beating

Wayne Bruce is an in-demand studio player in the Washington DC area
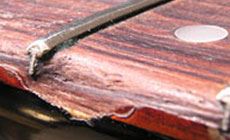
Time for a new neck, maybe?
I decided to fill, not file

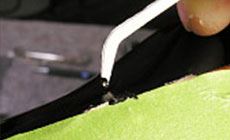
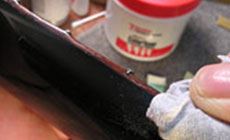
Black touchup:
Sealer coats:
Build coats:
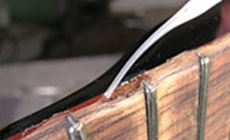
Now it’s time to file:
Don’t forget to brush your teeth!
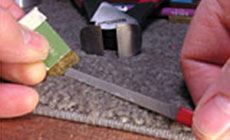
Hot Tip: sharpen the brush
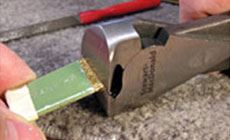
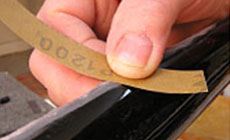
Strip sanding:
Trade Secrets archive:


