Moneytalk: Quickly installing an acoustic pickup
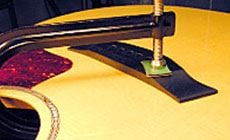
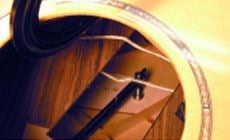
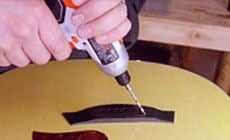
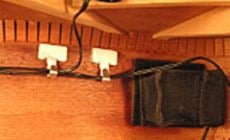
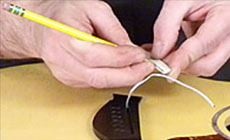
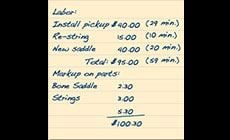
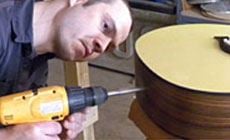
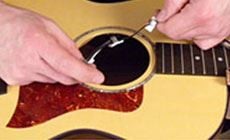
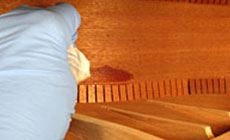
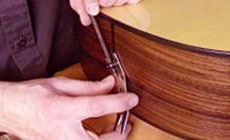
A lot of Trade Secrets readers are in the business of guitar repair, so let’s talk money. My friend Gene Imbody is in this field because he loves it, but he also knows it has to pay the bills... While visiting Gene Imbody’s shop, United Lutherie, I watched him install a Baggs Element pickup in a Taylor acoustic. I was there to “moneytalk” with Gene, about which jobs are the the most profitable for him. He said this pickup installation was a good one. While Gene worked, I clocked him to see how long the job took. (When you deliver good work fast, everybody’s happy.) I’m impressed by Gene’s speed! He talked as he did this installation (in 29 minutes!), and I took notes. Here’s Gene: I installed hundreds of pickups when I worked at Woodsongs, [Woodsongs Lutherie, Boulder, CO] so pickup installs are good moneymakers for me. And the Element needs no soldering, so it goes in fast. First, enlarge the endpin hole with an endpin reamer, not a drill bit. The reamer’s a safer way to go, because it doesn’t hog into the wood the way drill bits do. The wire-mounting clips, volume control, and battery bag are adhesive-backed so they go in fast, too. To avoid getting the wires tangled, put an inspection mirror inside so you can see what you're doing. The mirror will also help later, when you drill a hole through the bottom of the bridge saddle. When you put the endpin jack in, everything else follows with it — it’s all wired together. You’ll probably need to take the jack in and out a couple of times until everything’s in position. When a little more than 1/4" of jack thread is sticking out, put on the washer and hex-nut and tighten them. I put my inlay tracing scribe through the jack to keep it from turning while tightening the nut with a multi spanner. Gene’s shopmate, Erick Coleman demonstrates the ESP Multi Spanner in this short video filmed at their United Lutherie shop. Check it out! It’s necessary to drill a hole for the pickup wire through the bottom of the bridge saddle. There’s a predrilled hole located in this Taylor bridge, but it doesn’t go through the guitar top, so I have to drill anyway. I want to know where the hole will come through on the inside, so I don’t drill into a brace by mistake. Put a soundhole clamp where you plan to drill, and look in the mirror to see the matching jaw of the clamp. That’ll show you where the drill will come through. The Baggs Element needs a hole drilled at a shallow angle, instead of straight down through the top. It's hard to start a hole at a shallow angle like this, so start at a steeper angle. As soon as the bit enters the wood, lower the drill to the correct angle as shown here. With this pickup, the end of the braided cable is the actual transducer. Carefully slide it up through the hole you drilled, and it’s in! Before threading the components into the body, put the wire-holding clips on the wires loosely so that you can move them into position inside. Fasten the wires right below the kerfed lining on the bass side, and put the battery bag wherever the customer wants it. Mark the thickness of the transducer on the bottom of the saddle and remove that amount using the belt sander. I’m going to use this original saddle as a test, then match it with a replacement saddle. Done! I installed the pickup with its volume control, jack and battery bag. And I made a new saddle of vintage bone (that's the material I recommend). And I billed for a re-string charge, too. I’ve always found it helpful when I can learn how other shops bill for their work, so I'll share my billing notes below. (The customer brought his own pickup to install, so that didn’t figure in.) Thanks Gene, I enjoyed watching your speed, and learned a lot!Quickly installing an acoustic pickup

Here’s how I install one:

Online video demo:
Here’s a tip: