Humbucker Pickup Kit
Assembly instructions for the humbucker pickup kit.
Gibson's Seth Lover invented the "humbucker" in the mid-fifties to solve the inherent problem of single-coil pickups — 60-cycle hum. In 1955 Gibson filed for a patent for his humbucking invention and the Gibson "PAF" (Patent Applied For) Humbucker was born! The PAF has acquired holy grail status among guitarists of all types, and has inspired many to replicate or add their own spin to this pickup design. The original humbuckers had two black coils (double-black) under the pickup cover, however, in early 1959 Gibson manufactured some pickups with mixed white and black bobbins, known as a "zebra" pickup. This kit has all the parts to wind and build your own PAF inspired humbucker. Gibson wound their humbuckers on machines, which means the traverse and layers of the windings are very consistent. You can experiment with winding very methodically to replicate "machine-wound", or "scatter-wind" your coils. The number of turns will affect the pickup's tone and response. More wraps will give you higher output, and more midrange punch. Fewer wraps will give you a more open sound with greater high-end clarity, but less output. Another way to affect a pickup's tone and response is to experiment with mismatched coils. You can mix different number of turns/DC resistances and styles of winding to produce some very interesting and great sounding pickups. You can also tweak the number of windings for a custom sound. For example, winding a coil 5% under spec can give you a sound that is brighter while overwinding by the same amount can give you a warmer sound with less top end. 1. Carefully inspect the bobbins to make sure there are no rough edges, nicks, or molding lines that may snag the coil wire. Smooth any possible snags with 600-grit sandpaper or a fine emery board. 2. Cut the 4" long white and black 28AWG lead wires into two 2" long pieces (one black and one white per coil). 3. Original PAFs used black lead wires for the starts and finishes, but that can get confusing when hooking up the coils and hookup wires (especially if you plan using the 4-conductor hookup wire). We recommend using black for the starts, and white for the finishes of your humbucker. Strip back 3/16" off of each end of the hookup wires. 4. Wrap the end of your 42AWG coil wire (#1462) around the exposed end of one of the black lead wires. Solder the coil wire to the lead wire — the heat of the solder should melt the poly-coating off of the copper for a good solder joint. Poke approximately 1" of the black wire through the "square in a circle hole" on the bottom of the bobbin — from the inside of the bobbin out through the bottom (the bottom of the bobbin has four round mold marks). Kink the black wire so that it lays against the bottom of the inside of the bobbin. 5. Attach the bobbin to your winder — be sure the pickup coil is well attached to the winding arm and that it runs true. Start the winder to see if there is a wobble or if the flatwork isn't spinning true and straight. 6. Traditionally PAF coils were wound counterclockwise (when viewed from the top of the pickup) with 5,000 turns of wire. Set the "traverse limiter" on your winder so the coil wire stops about .020" from the flatwork on both sides. This helps prevent the windings from deforming and gives a more uniform looking coil. If you have a winder with a counter, set it to zero. Start the first 6-10 wraps turning the winder by hand to seat the black lead wire and insure that the coil wire won't be pulled off of the bobbin when you start the winding. 7. Once you've achieved the desired number of windings, carefully cut the coil wire and solder it to the white lead wire so that it extends from the same end of the coil as the start "black" lead wire. Wrap the coil several times with 1/4" wide Pickup Tape (#5951) to secure the lead wire and protect the coil wire. Repeat the winding procedure for the other coil (same winding direction, same number of turns). 8. Press the "slugs" into the slug bobbin one at a time. They can be pressed in one at a time by pressing them against a bench top until they are flush with the face of the bobbin. Then, thread the six adjustable polepieces into the adjustable coil. 9. Before you assemble the pickup, you must decide if you want to use the braided "push-back" hookup wire, or the 4-conductor hookup wire. The original PAF used a braided, cloth-covered hookup wire — known as "push-back" because the covering can be simply pushed back to reveal the wire, and does not require stripping. For more tonal flexibility you may want to opt for the 4-conductor hookup wire — allowing coil cuts, combining the coils in series or parallel, or wire the coils in-phase or out-of-phase. 10. Feed 3" of the hookup wire up through the hole in the corner of the baseplate (see illustration). If you're using the braided push-back wire, push-back approximately 1/4" of the braid and black cloth insulation to expose the inner conductor. If you're using the 4-conductor wire, remove 3/4" of the black covering exposing the four inner wires and the bare ground wire. Then strip back 3/16" of the covering off of the 4 conductors. 11. Connect the wires using the Humbucker Wiring Chart (below). Cover each solder connection with a piece of the black, flatback tape. If you're using the pushback wire, after you solder and tape the two white lead wires together, tuck them between the two coils. 12. Solder a small portion of the outer braid (push-back wire) or the plain "ground wire" (4-conductor wire) to the baseplate fence. 13. With the hookup wire running flush along the baseplate fence, place the metal spacer and magnet on the baseplate (south polarity facing the metal spacer). Locate the slug coil (north polarity) on top of the magnet and start two of the brass bobbin mounting screws (don't tighten them completely). Next, attach the adjustable coil loosely to the baseplate. Then insert the plastic spacer between the slugs and the baseplate fence. 14. After you've soldered and taped all the connections, carefully tighten the two bobbins down. Neatly tuck the solder wires into the various crevices at the end of the pickup and then wrap flatback tape around the bobbins. 15. Potting a pickup (dipping it in melted wax or other material) is a technique used to help eliminate unwanted microphonics. Some pickups, including vintage P-90s, were not potted from the factory. While it’s not necessary, potting is generally a good idea. Wax is a traditional pickup potting material that works for most pickups, it’s non-toxic, easy to deal with, cheap, and you can undo it if something goes wrong. If the wax is too hot you can warp or melt plastic bobbins. If the wax is way too hot you have a potential fire on your hands! Make sure that the wax never smokes—that’s an indicator that it’s getting too hot. Never try heating your wax on the kitchen stove or in a microwave oven because hot paraffin, and especially paraffin vapors, can ignite. It’s best to wax pot outdoors until you have your methods refined and have eliminated any fire hazards. Stewart-MacDonald’s Hot Glue Pot (#0668) has a thermostat designed to heat hide glue to about 145°. Keep the pot at least 2/3 or 3/4 full. It can operate with less liquid, but the wax may get too hot. After a pickup has been wound, and the output wires are attached and assembled, suspend the pickup in canning paraffin mixed with 20% beeswax, heated to 145-150 degrees Fahrenheit. After ten or fifteen minutes all of the bubbles should have risen out of the pickup, and all of the voids within the pickup should be filled with a coating of wax. Pull the pickup out of the wax and suspend it over the wax pot letting the excess wax drip back into the pot. Then lay the pickup on a paper towel and allow it to cool to touch. Carefully remove any excess with a paper towel before the pickup completely cools to room temperature. 
Number of turns and winding techniques
Overwound, underwound
Assembly instructions

Humbucker Wiring Chart
Wire type
Adjustable coil "start" BLACK
Adjustable coil "finish" WHITE
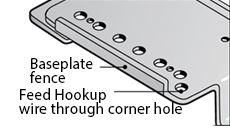
Slug coil "start" BLACK
Slug coil "finish" WHITE
Vintage push-back hookup wire
Solder to outer braid "ground"
Solder to slug coil finish (white)
Solder to inner wire "hot"
Solder to adjustable coil finish (white)
4-conductor hookup wire
Solder to black
Solder to green
Solder to red
Solder to white
Danger:
Application:


