|
 |
 |
 Moneytalk: bad surprises happen Moneytalk: bad surprises happen
An easy, inexpensive repair,
until it blew up in my hands.
Dan Erlewine, March 31, 2011 |
 |
|
 |
 |
|
 |
|
|
|
|
 |
|
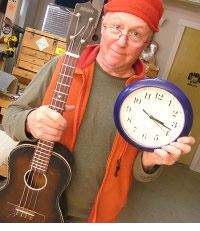
This little baritone uke’s seen better days. It’s an elCheapo “Melody” uke that's been knocking around attics for 40 years. After all those hot summers and parched winters, the dried-up neck and bridge were falling off—literally.
The long retirement’s over for this uke: it’s going to see action as a little girl’s first “guitar.” The owner doesn’t want a restoration, he just wants it glued back together for his granddaughter to play with.
|
|
|
|
|
An inexpensive job for the customer, a bit of easy money for me
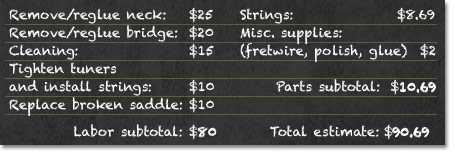
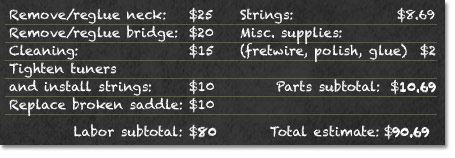
This was going to be a quick, easy, inexpensive job. I figured two hours to fix it... no way could it take longer than three! That’s what I thought, so I gave a firm quote: three hours labor at $30/hour:
|
|
|
|
|
 |
|
|
|
 Medium Fretwire Medium Fretwire |
 In trouble right from the start! In trouble right from the start!
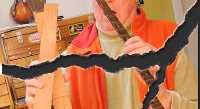
A light hammer-tap should have loosened the neck, easy as pie. But one little *plink!* from the hammer and the whole fretboard popped right off the guitar, landed on my bench and burst into pieces like Humpty Dumpty! Holy moly!
The fretboard was plywood, five layers of glue and cheap veneer, and like Humpty Dumpty, this board’ll never go back together again. This job has now changed from a quick glue-up to a mess-up, and I’ve got to do a fix-up. I can't just tell the guy, “Sorry, I smashed your uke to smithereens!” I've got to fix it, and I’ll have to eat the time and materials to make a replacement fingerboard.
|
|
|
|
 Fretting Hammer Fretting Hammer |
 |
|
Hang on, I’ve got an idea
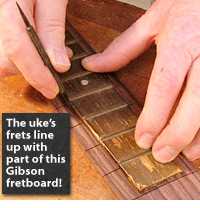
I compared the uke's fretboard to a Gibson style board (24-3/4" scale). When I aligned the end of the uke board with the fourth fret of the Gibson board, all the fret slots lined up like they were made for each other! I had a ready-to-use fretboard, and it was already slotted!
I scribed the shape of the uke board onto the new board, bandsawed it to shape, and sanded the edges smooth.
|
|
|
|
 Slotted Fingerboard for Gibson Guitar Slotted Fingerboard for Gibson Guitar |
|
|
|
|
|
|
|
|
|
|
Join the conversation on our Facebook page. Click "Like" on our page,
and you’ll know when we add new stories, how-to articles and videos!
  |
|
|
|
|
|
|
|
|
|
|
 |
|
|
 Drill Bits, Brad Point Drill Bits, Brad Point |
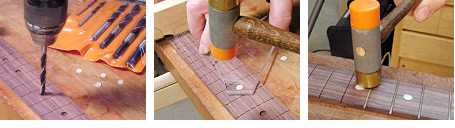
Inlaying the fret markers was a cinch: there were only four of them. I used a 1/4" brad-point bit to create clean holes with flat bottoms. A brad-point’s sharp tip is easy to line on center before drilling.
A drop of Titebond went into each hole, then I tapped in 1/4" pearl dots (middle picture above). A scrap of acrylic sheet served as a leveling caul, so the dots sit flush to the rosewood surface. It didn't take long to hammer the frets in (medium-size #0148 fretwire).
|
|
|
|
 Franklin Titebond Glue Franklin Titebond Glue |
 |
|
Time to glue the fretted board back onto the neck. I masked off the area beyond the dovetail — the “tongue” extension over the body — before brushing on the glue.
I don’t usually cut corners, but this is a quickie job on a very inexpensive instrument (practically a toy), and the exploding fingerboard put me way behind schedule, so I’m playing catch-up ball:
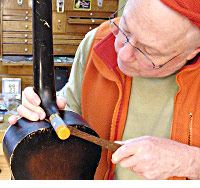
The bridge popped off easily. After scraping off the old glue from the uke top and the bridge, I glued it right back on at the same time I glued on the neck. That’s a first for me: on any other job I'd carefully reglue the bridge as a separate operation.
|
|
|
|
 Bridge/Fingerboard Removal Knife Bridge/Fingerboard Removal Knife |
 |
|
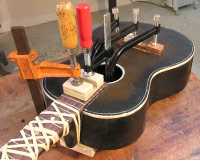
A single rubber binding band wrapped from end to end clamped the fretboard to the neck.
I didn't even wait for the fingerboard/neck assembly to dry before gluing the neck joint back together. Talk about cutting corners!
A little polish, and I'm done.
|
|
|
|
 Rubber Binding Bands Rubber Binding Bands |
 |
|
This quick-and-dirty approach made me a little nervous, but it worked. In fact, when I check the clock, I see that my corner-cutting has made up my lost time. I'm still within my original time estimate.
Since I came in within my quote, I'm not eating my time on this job after all... But there have been many, many times that I have had to absorb my hours when things ran longer than my quote.
This job shows why I don’t like to give “quotes” anymore — just estimates. I've learned to talk to the customer when the job comes in the door, describing the range of time it might take rather than giving a fixed quote. It’s understood that surprises come up in repair work, and we repairers will solve them as efficiently as we can — but as small businesses, we can’t absorb all the risk. Who knows what we might find when we open up an old guitar’s innards!
 |
|
|
|
|


 Medium Fretwire
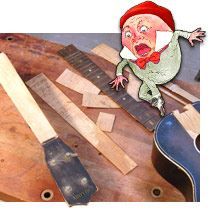
 Fretting Hammer
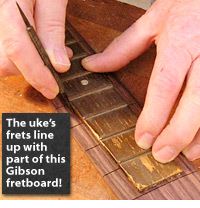
 Slotted Fingerboard for Gibson Guitar

 Drill Bits, Brad Point
 Franklin Titebond Glue
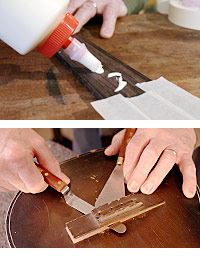
 Bridge/Fingerboard Removal Knife
 Rubber Binding Bands