How to see inside a guitar body if you don't have X-Ray Specs
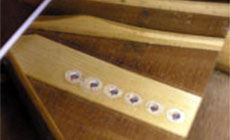
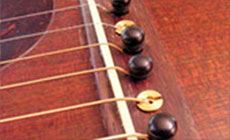
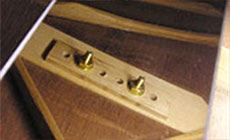
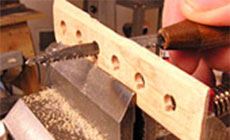
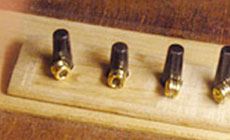
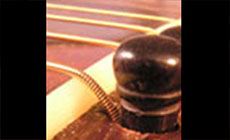
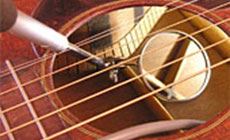
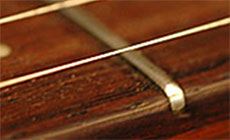
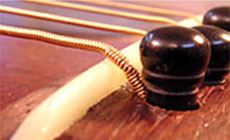
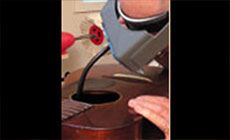
I ordered these X-ray specs from a comic book back in the 1960s, and they really work! I bought ’em way back when they really did have X-ray powers! I think mine are the only working pair left (the ones they sell today are just a joke, in my opinion). Unless they start reissuing the vintage glasses with real powers, you’ll need to find other ways to see inside guitars for repair work. You’ll want lights and mirrors (even with my specs, I still need good lighting). I’m going inside this 1933 Martin 0-17 to repair the bridge. The 0-17 is a small, all-mahogany model that’s one of my favorites. If you find one for sale, snap it up — or call me! This old Martin has bar frets, a kind of fret that you don’t often get a chance to see. They’re not shaped like modern fretwire, they’re just simple strips of metal. (This isn't related to the repair I'm about to do, it’s just a detail of this old guitar I like so much.) Someone lowered the saddle height, and they shaved down the top of the bridge until it’s become too thin. There’s not enough wood between the top of the bridge and the bottom of the bridge plate inside. To add to the problem, the bridge pin holes inside are worn away so the string ends aren’t held down deep enough. You can see the windings on this E string coming right up onto the saddle, causing poor intonation. The arrow at left shows where I added new wood around the bridge pin holes using the BridgeSaver. The red shape is the frame of our flexible lighted inspection mirror. It magnifies and lights up what you’re looking at. It's on a bendable gooseneck and you can aim the mirror by turning a thumbwheel on the handle. It gives a good look at details inside. (It’s not X-ray specs, but it’s close!) Years of wear from string ends used to mean costly major surgery: a bridge plate replacement inside the guitar. This clever new tool puts new wood under every string while leaving the original bridge plate intact! Here are those plugged holes, seen through a section of our 3-piece inspection mirror. We’re looking through the soundhole at the mirror laying on the back braces, letting us see the underside of the top. BridgeSaver plugs have replaced the chewed-out bridge pin holes perfectly, but that doesn’t change the fact that this bridge plate is simply too thin — the string windings still ride up onto the saddle. (By the way, look at those nice delicate top braces on this 1933 Martin.) A new bridge would fix the problem, but my customer wants to keep the original bridge despite its troubles. An easy solution would be a Plate Mate: a brass plate with six bridge pin holes, held in place by the string ball ends. It would add a little thickness while keeping the string ends properly positioned. But this small-bodied Martin’s unusual string spacing (2-3/8") doesn’t align with the Plate Mate. Inspired by the Plate Mate, I made a patch of wood with six bridge pin holes to add thickness inside under the bridge plate. I band-sawed a 4" x 7/8" piece of 1/8" hard maple and sanded it to a thickness of .135". I clamped the piece in place under the bridge with a set of bridge bolts. These brass bolts go through the bridge pin holes to hold a bridge temporarily while you work. Because they have hollow shafts you can even string the guitar up through them. That’s what I did here, to prove that the added wood under the bridge fixed the problem. The lower picture is an inside view of the bridge bolts before I put the strings on. I cut string notches in the maple plate using a bridge pin hole saw, and tapered the edges with a nut & saddle file so it wouldn't look too clunky. I also filed an arch into one side of the plate so it was lightly domed to match the curve of the guitar top. I ended up with a wooden plate that added the necessary thickness under the bridge. On the inside the string ends were right where they’re supposed to be, and on the outside the windings were no longer peeking out. For now, the strings are all that’s holding my wooden plate in. I can glue the plate in permanently, but I’ll wait and let the customer play it for awhile in order to see how this solution works out. Another tool I like is the small inspection mirror on a telescoping shaft that I’ve used for years and years.
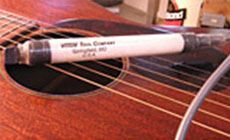
And I’ve found a really useful light used by band instrument repair shops: this is a Votaw #8001 saxophone inspection light, made for finding air leaks. It has a long lightweight cord connecting to a power supply. It’s an expensive light, but nothing beats it. That’s what lights up most of the photos I shoot inside guitars.My secret: here’s how I see inside a guitar to do bridge repairs!
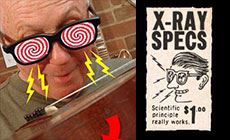
For seeing inside a guitar, nothing beats my vintage X-ray specs.


The trouble with this guitar:


Check it out!
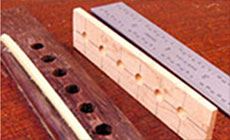
The BridgeSaver