Helpful repair magnet gizmo, and 1970s Earthwood Bass!
Issue 206 December 19, 2013
Ouch! Ouch! Ouch! These Guitar Repair Magnets snapped together with a CLACK!, drawing blood from Dan Erlewine's finger just as he was about to show his gizmo for avoiding pinched fingers and separating stacked magnets! Also, Dan explains a radical bracing change on an original Earthwood acoustic bass guitar.
About the guitar in this video: this is an Earthwood, the original acoustic bass guitar introduced by Ernie Ball and George Fullerton in 1972.
Video Transcription
[on-screen text reads: Stewart-MacDonald - Trade Secrets!]
1970's Earthwood bass
Dan Erlewine: I just pinched myself with the Repair Magnets, right when I'm trying to make a little video about a little tip I'm going to show you about repair maintenance, and the dang things pinched me and it cut me. I'm going to get a Band-Aid and I'll be right back.
Well, here's an instrument that you don't see often. It's an Earthwood bass made in the early 70's by Ernie Ball and George Fullerton. George had left the Fender Company in 1970. At the same time, Ernie was looking at the guitarron, that big, fat six string base used in the Mexican Mariachi bands. Ernie thought "we have an acoustic guitar and an electric guitar and an electric bass. Why don't we have an acoustic bass?" So in '72 he and George got together and made the Earthwood base, and this is an early one. The trouble with this one is that the bridge had warped and curled up on the edges from the movement of the top, and it needed to be removed and replaced. Also, it needed a little re-bracing on the inside. I'll tell you about that in a minute.
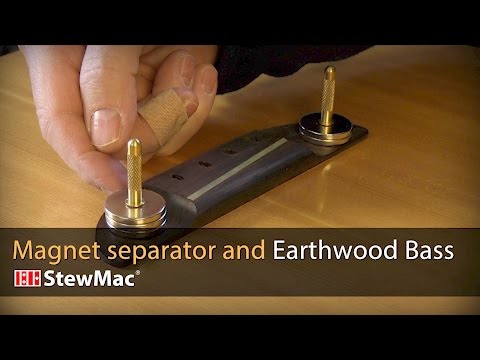
The magnet seperator tool
But first, let me show you how to keep from hurting yourself with magnets like I just did. They can be tough to get apart and they'll clack together if you're not careful, like you just saw. And you can pinch yourself real good if you have dry skin like I do in the winter time, it gets even harder to push these things apart. So I made a little tool, I call it a magnet separator that's got a couple of pins on it to catch the magnet on, and then I can just slide it off. Just a piece of wood with a couple of pins in it. But that's a 1/8 inch pin that's going to hold the little half inch magnets. And this is a 3/16 inch pin to hold the big ones.
Once it's on the pin, you can just slide one magnet off the other. Here's one on the edge of the bench. That works good too. Now if you have a handle on your magnets, it's easier to pull them apart, but not if you stack them up two or three of them for extra power like I'm doing here. Then I'll use my separator to get them apart.
Radical bracing changes
Here's some photos that I took when I worked on this job. To start with, I looked inside in my mirrors [on-screen text reads: 3-Piece Inspection Mirror from StewMac - Get a multi-angle view] and I could see that there were two Barcus Berry Hot Dot pickups... Those are the old transducers, inlayed into the top or into the bridge. To see where they were from the outside, I put a magnet on the inside and one on the outside and slid up against the pickup.
In the photo, you can see that little Q-tip is pointing right where the Hot Dot is. You can see the Hot Dot wires coming out of there, and you can see the bracing. In my opinion, it's way too weak and kind of a strange bracing to begin with. It comes from the outside towards the center, and it meets up against this little plywood bridge plate. On a Martin guitar, for example, or traditional steel strings, you have X braces under there for strength. This was the opposite. It pumped up and down like a trampoline. I can't imagine that the bridge could stay on.
Once the bridge was off, I used repair magnets to locate the braces that were in there, and on the outside I used the straight edge and I lined them out so I had a little picture in my mind that I could see of where these braces were. I also removed the bridge pad because it was glued in with a real dry, crispy glue. I could get my fingernails underneath it, and it actually came out pretty easy. To reinforce the top, I took a piece of 100 thousandths thick, good hard mahogany, and I cut three rabbits into that and glued in cortisone braces. This put braces where they really weren't before and strengthened the top. I glued that up and when it was dry, then I glued the entire thing in at once. This may seem sort of radical, but believe me, I thought about it long and hard before I did it.
Even my longest clamps had trouble reaching that far back and I couldn't get enough in the first place. So I made this one time use cull. Looks like a little airplane, and it's fit onto the bridge plate. It's got some 6-32 threaded rod and some Gibson thumb screws here. This goes back and screws against an acrylic guard on the top to protect the top, and holds the bridge plate up inside. And it rests right over the braces and is going to clamp it in place.
And there we are all clamped up [on-screen text reads: Clamps from StewMac - Clamps and more clamps]. I've got seven clamps in there and it's clamped in a V-pattern. And here's the cull that I'll glue the bridge on with. It's the same cull that I used earlier that fits over the braces in there on that bridge plate that I made. But I've added these culls to the top, again with the thumb screws that'll press it down to the top, and that glues that area and it saves me on trying to get clamps in there as well. When you put on a new bridge, you want to line it up to the center line of the neck. That's what I'm doing with the string, or else you'll glue it on crooked. And the magnets are great for that because it holds it firmly in place, especially when you stack them up like that.
