Fitting an archtop bridge, easily and accurately
Fitting an archtop bridge: getting a perfect fit
Did you ever have to fit a bridge to an archtop guitar or mandolin? Remember how tough it was? Well, it’s not anymore. Don MacRostie has made it easy for all of us. Read on...
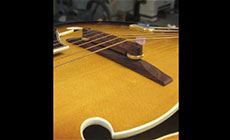
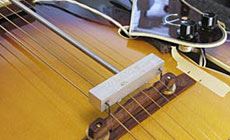
Before: that gap has got to go!
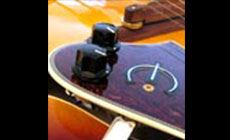
This Epiphone Emperor is the toughest kind of bridge-fitting job, because the entire length of the bridge contacts the top (not just two small feet). This one’s a bad fit: even under string tension, a feeler gauge slides around under this bridge easily.
How to perfectly match the bridge to the archtop?
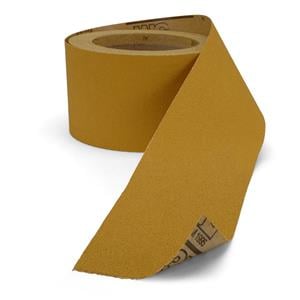
As the maker of Red Diamond Mandolins, this is a problem Don MacRostie is very familiar with. And as StewMac’s chief tool designer, it’s a problem he solved: Don’s bridge fitting jig is ingenious, and it works in a jiffy as you sand the base of the bridge with Stikit sandpaper.
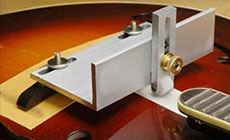
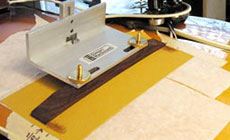
Here’s the bridge fitting jig: a one-wheeled buggy that lets you slide the bridge over sandpaper on the instrument top. The bridge quickly takes on the archtop curve.
Mark the bridge position
I recorded the exact bridge location using a Saddlematic tool. That’ll let me set it back up quickly. I also put position marks on the guitar using low-tack drafting tape, about 1/8" away from the ends of the bridge. When I take the strings off and sand the bridge, these pieces of tape will help me keep it in the right spot.
Mask off the top
To protect the finish, I covered the working area of the top with sign painter’s tape (I used TransferRite brand). This extra-wide tape comes in different tack strengths (stickiness); I use the low-tack version, so it won’t pull off delicate vintage finishes. On top of the mask, I used 120-grit Stikit Gold sandpaper.
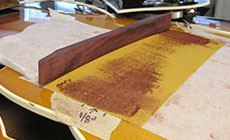
On the underside of the bridge, I scribbled with a white pencil.
This lets me check my progress by turning the bridge over to see where the pencil mark is still unsanded. The picture above shows that wood is coming off the ends first, since the bridge was so high at the center.
Masking tape makes me nervous!
Did you notice that I'm using drafting tape, and sign-painter’s tape, but not masking tape? Regular masking tape isn't my first choice because the adhesive sometimes reacts with lacquer instrument finishes, leaving marks when the tape comes off. Drafting tape and sign-painter’s tapes have less aggressive adhesives. I don’t leave any tape on an instrument longer than I have to. (If you leave masking tape on a new lacquer finish overnight, you may be sorry in the morning.) When I do use masking tape, I reduce its grip by sticking it to my shirt once before putting it on the instrument.
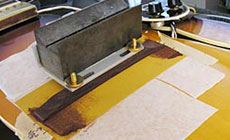
You can see the sandpaper at work. The whole length of this bridge contacts the arched top, so it takes more sanding than most. Here I’m experimenting by adding a steel weight to apply extra pressure as I sand: a machinist’s V-block. It wasn't really needed, but I liked the way it sped up the sanding.
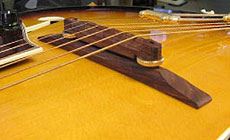
And here I’m done sanding. My white pencil marks are all gone, and the bridge has taken on the exact arch of the top.
After: a perfect fit — no gaps!
That's a really nice fit, if I do say so myself! Thanks to Don MacRostie for creating this tool!
This guitar spent a year closed in a case. Fumes from its new finish and plastic parts tarnished the plating on the hardware (this happens a lot, especially to inexpensive gold plating.)

A dab of #4 swirl remover on a soft rag to cleaned away the tarnish. Don’t overdo it: inexpensive plating is thin, and you don’t want to polish the gold right off!
Follow that with some guitar polish, and it shines like a mirror: