Bridge Plate Repair
How to repair most fractured bridge pin holes with the BridgeSaver.
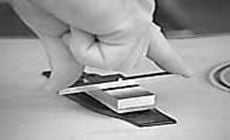
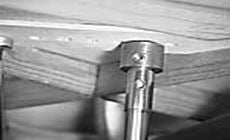
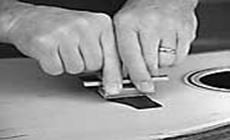
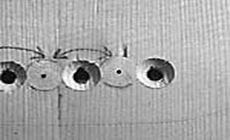
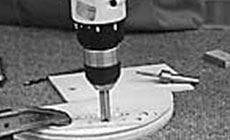
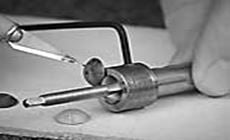
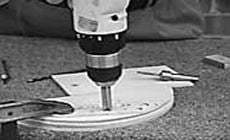
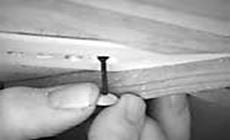
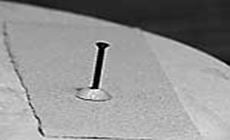
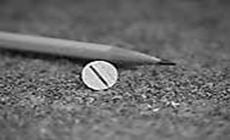
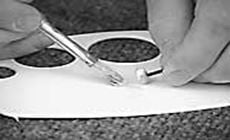
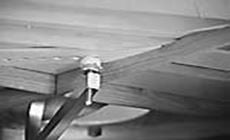
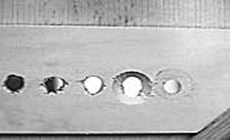
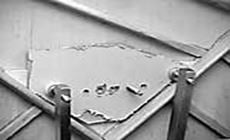
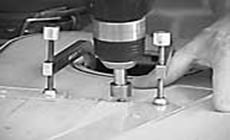
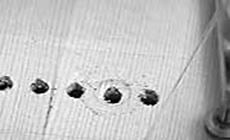
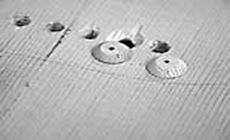
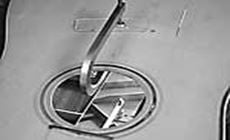
Most fractured bridge pin holes can be repaired with this tool. Before using this tool, install the adhesive-backed cork pad on the bottom of the threaded brass "shoe" (the pad is visible in photo 3). Inspect the bridge plate inside the guitar. If a section of wood between the holes has fallen away leaving a large void, repair methods beyond the scope of this tool will be required. Usually all six pin holes will need to be repaired. Place an inspection mirror inside the guitar (we recommend our #5124 3-piece mirror which unfolds for viewing every stage of the job easily). Photo 1 shows a good candidate for hole-plugging. Install the cutter from beneath the bridge plate (photo 2). Insert the threaded pilot through one of the bridge pin holes, and spin the padded brass shoe onto it from outside the guitar. It will work with the bridge on or off. Note that the shoe spins on "backwards," since it has left-hand threading. Snug the shoe against the bridge (or the guitar top) and place the brass tap handle with the square hole onto the squared end of the pilot (photo 3). Turn the tool clockwise while holding the threaded brass shoe. The threaded pilot will draw the cutter into the hole. Note: If you also turn the shoe clockwise at a slower rate than the tap handle, you can slow the cutting speed and possibly get a smoother cut. When the collar rubs against the bridge plate you have reached the desired depth (photo 4). If you wish to clean up the hole, turn the tap wrench and the shoe together at the same speed. The tool will simply spin and "burnish" the hole slightly without additional cutting (photo 5). Remove the cutter and carefully clean any wood chips from its cutting edges before moving on to the next hole. Note: You can't ream and patch adjacent bridge pin holes at the same time, since they may overlap slightly, so ream every other hole. For example, do the bass E, the D, and the B-string holes together, plug them, and then ream the treble E, G and A-string holes. A slight overlap of one plug into another should be expected (photo 6). Practice on scrap wood (photo 7) before you ream the guitar; you can cut the plugs, measure their thickness, and see how they fit in the test holes. If a plug is recessed lower than the hole, adjust the cutter's collar so that the bit matches the plug thickness (photo 8). The collar is preset at .130", but you can change it to suit the thickness of a given bridge plate by loosening the set screws and moving the collar up or down. Some worn holes are round and easy to ream. Others may be oblong or may appear as several connected holes. It's more difficult to center the cutter in oblong holes, so pay extra attention—start slowly and hold the shoe firmly to keep it centered. If the pin holes in the bridge are clean, they'll help keep the cutter centered. If the bridge has been removed from the guitar, you'll need to make a "centering caul" for the cutter. Drill a pilot hole in a scrap of 1/4" x 2" x 4" acrylic. Drill the hole to the same 3/16" diameter as the threaded shaft, so the shaft can pass though the caul. Deburr any rough edges on the acrylic caul, pad its underside, and clamp it in place with the hole centered where you want the pilot to cut (photo 9). Then use the cutter as normal. It will stay on center because the shaft will be held by the hole in the caul (photo 10). Thickness your plug wood (maple, rosewood, etc.) to approximately .135", or slightly thicker than the hole depth you have cut into the bridge plate. The plug cutter will form a plug approximately .130" thick. With your patching wood resting on a clean flat backer board on a drill press table, lower the spinning cutter into the patching wood. You'll see the plug shape develop. Stop when the flat top of the dome is gone. A faster drill speed is better than a slow one. Usually you'll end up with a dome-shaped plug that is not cut completely through the wood. Some plugs will be smoother than others, depending upon the wood fibers, the firmness of your drill press, and how often you clear the wood chips. If you use an electric hand drill, you must clamp the patch wood (photo 11). Start the cutter in reverse to center it and create a compressed rim, and then, without removing the cutter from the wood, switch to forward and cut the plug. Once the cut is started you can lift the cutter to inspect your progress and clear the wood chips. Before sanding and freeing the domed plugs, while they are still attached to the patch wood, drill a 1/16"-diameter hole in the center of each dome (photo 12).
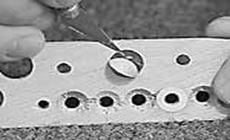
Sand the bottom side of the wood, preferably on a belt-sander, until the plugs are held by only a paper-thin bit of wood. Stop and punch out the plugs (photo 13); sometimes they'll fall out as you sand. "Tap" a wood thread into the hole in the plug using one of the small screws provided. Turn the screw into the plug to form the threads. Be sure it can be backed out fairly easily, and then reinstall the screw as a "handle." Install the plug without gluing, using the handle from outside the guitar to pull it into the hole (photo 14).
Feel inside to check if the plug needs to be thinned for an almost-flush fit. Use the handle to hold the plug as you sand off the flat bottom (photo 15); you may need to sand a couple of times. Leave the plug slightly thicker than the bridge plate. It will squeeze flush when clamped, and the excess can be sanded off later. Mark a pencil line on the flat bottom of the plug, in line with the direction of the grain, for proper alignment in the bridge plate (photo 16). The screw should remain in the plug, but should be easily removable. Place a mirror in the guitar for a good view of the bridge plate. Apply glue liberally to the dome of the plug (photo 17). Make a small ring of masking tape, sticky side out, and place it on your fingertip. Place the glued plug on the tape, reach inside (looking down through the bridge pin holes) and guide the screw up through a bridge pin hole. Pull the plug into the dish created by the cutter. Push the plug into place from inside the guitar, hold it there with the screw, and peel off the masking tape. If the grain orientation is misaligned, push the plug loose and realign it. Hold the plug firmly in place with your finger as you remove the screw (be careful not to turn the plug). Install a bridge clamp on the plug (photo 18), using a padded caul to protect the outside of the guitar (photo 19). We recommend our soundhole clamps with #2014 non-stick polyurethane disk attached to the bottom jaw. It should be 7/16" in diameter and slightly domed to push up on the center of the plug, so that it seats well before the jaw comes in full contact with the bridge plate. Squeeze the plug tightly, then quickly remove the clamp. Next, using a rag dampened with hot water, wipe off any glue from the clamp's bottom jaw, and wipe off the glue squeeze-out around the bridge plate plug. Replace the clamp and apply reasonable pressure. You can clamp three plugs at once and let them dry several hours before gluing the other three. You may wish to glue a few plugs into scrap wood to check the fit first. The plug may compress when cut, but swell a bit after being wet with glue. You'll soon get an idea of how different woods compress. When all the holes are plugged and dry, use successive grits of sandpaper on a small flat block to level the plugs with the bridge plate. If you "dry-fit" carefully beforehand, you won't have much leveling to do. If the bridge is removed you can patch the top as well as the bridge plate. The two plug holes will meet at the glue line, and the area will be like new. Because oblong holes are common, once you've reamed the bridge plate there's not a good hole to guide the cutter from above (photo 20). Thus, an interior centering jig (photo 21) is necessary to guide the cutter's pilot while you ream the top wood (photo 22). The centering jig pictured here is a scrap of acrylic with a row of 3/16" holes drilled in it. A centering caul will insure a clean hole inside and out (photo 23). Glue in both plugs at once. Flatten the tops of both domes so that one doesn't push the other loose. They should meet on the original glue joint between the top and the bridge plate (photo 24).
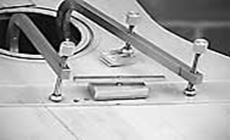
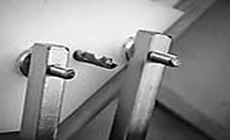
Glue in the bottom plug first, and clamp it using an exterior caul (photo 25). Remove the clamp, and glue and clamp the top plug. Then remove the clamp and clean the glue squeeze-out from the top and bottom (photo 26) and the clamp jaws. Reclamp and go on to another set of holes. Before drilling new holes, clamp backing material onto the inside of the guitar. Drill into an undrilled area of the backing material, not an existing hole (photo 27). Use two clamps, one on each side of the hole being drilled. Since the clamps are so close to the hole, use the supplied long-shank 3/16" drill bit so your drill chuck won't run into the clamps (photo 28). "I saturate the underside of each new bridge pin hole with medium-viscosity superglue. This hardens the wood and helps keep it clean. It's a tricky task—I push a slim cotton swab down through each hole and dip it into a small cup of superglue I hold inside the guitar. After coating the bottom of the hole, I remove the cup of glue, reach back in, and remove the swab from the inside. This leaves the glue only at the bottom of the hole. I repeat this for each hole, and then sand." The bridge should be glued onto the top at this point. Choose a new bridge pin: it may be necessary to fit it to the 3/16" drilled hole using our #3227 or #3229 bridge pin reamer, depending on the taper of the new pin. A grooved bridge pin accommodates the wound end of the string near the string ball. Thus, little or no sawing is needed to form a slot in the bridge pin hole to accept the string. A smooth ungrooved bridge pin will require a larger string slot. If a string slot is needed, notch the front center edge of the hole with our #5805 bridge pin hole saw to accommodate the wrapped end of the string when the bridge pin is pushed in. Each string will require a different slot size. Saw on the upstroke, and clean any burrs with our small slotting files. 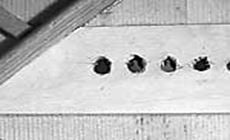
Reaming the pin holes on the bottom of the bridge plate:

Reaming irregularly-shaped holes:

Making the plugs:

Installing the plugs:

Patching both the top and the bridge plate:

Drilling new bridge pin holes:

A tip from BridgeSaver inventor Dan Erlewine:
Fitting new bridge pins:


